If you’ve ever tried to tidy up your WordPress site, you know that managing images can sometimes be a bit tricky. Maybe you uploaded duplicates, outdated visuals, or just want to free up some space. While deleting images from the media library seems straightforward, it’s important to understand what really happens behind the scenes. This guide will walk you through the ins and outs of permanently removing images from your WordPress Media Library, helping you keep your site lean, organized, and clutter-free.
Understanding the Difference Between Deleting and Permanently Removing Images
At first glance, deleting an image might seem like the same thing as permanently removing it, but there’s a subtle difference that’s important to understand. When you delete an image in WordPress via the media library, it typically goes to the Trash, which means it’s still stored somewhere on your server and can be restored if needed. This is a safety net—kind of like deleting a file on your computer and then finding it in the Trash bin.
However, if you want to permanently remove an image—meaning it’s gone forever and cannot be recovered—you need to take additional steps. This involves emptying the Trash in WordPress or using specific tools or plugins designed for complete removal. Simply clicking delete doesn’t always do the trick, especially if you want to free up server space or eliminate all traces of the image from your site.
Think of it like this: deleting an image is like moving a document to the recycle bin on your computer. Permanently removing it is like emptying the recycle bin—you clear out everything so it can’t be recovered. This distinction is critical when managing your media library, especially if you’re trying to optimize your website’s performance or ensure sensitive images are completely gone.
In the next sections, we’ll explore how to ensure images are truly and permanently removed from your WordPress site, including tips on using plugins and best practices to avoid accidental recoveries.
3. Steps to Permanently Delete Images from WordPress Media Library
So, you’ve decided that some images are just taking up space or maybe you no longer need them on your site. Deleting images from the Media Library might seem straightforward, but to ensure they’re gone for good, there are a few important steps to follow. Let’s walk through the process together!
Step 1: Log into Your WordPress Dashboard
Start by signing into your WordPress admin area. Once you’re in, navigate to the Media section, where all your images and media files are stored.
Step 2: Locate the Image You Want to Delete
You can browse through the media library or use the search feature if you’re looking for a specific image. Clicking on an image will open a detailed view with options.
Step 3: Delete the Image
- Click the Delete Permanently button if available. Note that in standard WordPress, deleting from the media library moves the image to trash, but it doesn’t delete it from your server immediately.
- If you see the Move to Trash option, click it. You will then need to go to the Trash tab within Media and delete it permanently from there.
Step 4: Empty the Trash (Optional but Necessary)
To make sure the image is vanished entirely, go to Media > Library > Trash. Here, you’ll find all deleted items. Select the images you want gone forever and click Delete Permanently.
Step 5: Clear Caches and Check Your Site
If you use caching plugins or a CDN, clear your cache to ensure the deleted images are no longer served to visitors. Double-check your site to confirm the images are fully removed.
A quick tip: Always back up your site before deleting media, especially if you’re cleaning up a lot of images. This way, if you accidentally delete something important, you can restore it easily.
4. Using Plugins to Facilitate Permanent Image Removal
If you’re dealing with a large media library or want a more streamlined way to ensure images are permanently gone, plugins can be your best friends. They simplify the process, save time, and often add extra features like bulk deletion and database cleanup.
Why Use Plugins?
- Simplify bulk deletions — delete multiple images at once instead of deleting one by one.
- Ensure complete removal — some plugins remove images not only from the library but also from server directories and database tables.
- Optimize your database — eliminate orphaned data that can accumulate from deleted images, keeping your site lean and fast.
Popular Plugins for Permanent Image Removal
| Plugin Name | Features | Notes |
|---|---|---|
| Media Cleaner |
|
Free version available with premium features for more advanced cleanup. |
| WP-Optimize |
|
Great for overall site optimization, including media management. |
| Media Deduper |
|
Ideal if you suspect you have multiple copies of the same image cluttering your library. |
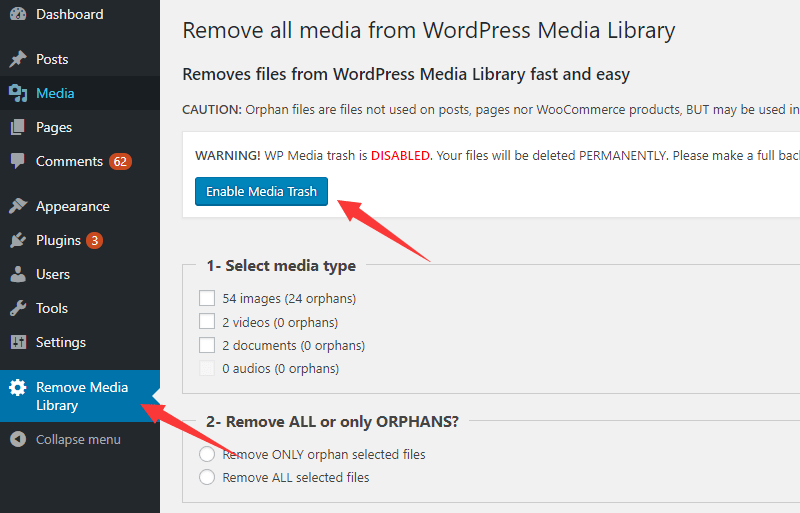
How to Use a Media Cleanup Plugin
- Install and activate your chosen plugin via the Plugins > Add New section.
- Navigate to the plugin’s interface, usually found under Media or Tools.
- Scan your media library for unused or duplicate images.
- Select the images you want to delete permanently.
- Confirm the deletion and let the plugin do its magic.
- Don’t forget to clear your cache afterward to see the changes reflected on your site.
Remember, always back up your site before performing bulk deletions, especially when using powerful cleanup plugins. That way, you can restore your media library if something unexpected happens.
5. Manual Method for Completely Removing Images via FTP or File Manager
Sometimes, despite deleting images from your WordPress Media Library, you might notice that they still linger in your server folders. This can happen if files weren’t properly removed or if there were issues during deletion. To truly get rid of unwanted images once and for all, a manual method using FTP (File Transfer Protocol) or your hosting file manager is often the most reliable approach.
Here’s how to do it:
- Backup Your Website: Before diving into file management, make sure to back up your website. This way, if anything unexpected happens, you can restore your site easily.
- Connect via FTP or File Manager: Use an FTP client like FileZilla or access your hosting provider’s file manager through your cPanel or similar dashboard.
- Navigate to the Uploads Folder: Go to
/wp-content/uploads/. This folder contains all your media files, organized by year and month unless you’ve changed the default structure. - Locate the Images: Find the images you want to delete. You can search by filename or browse through the folders.
- Delete the Files: Select the images and delete them. Be cautious to only remove files you’re certain are no longer needed.
- Remove Database References: Sometimes, images are still referenced in your database, especially if they were linked into posts or pages. To clean these up, you can run a database cleanup or use a plugin like WP-Optimize or Advanced Database Cleaner to remove orphaned references.
Important tips:
- Always double-check files before deleting—mistakes can affect other parts of your site.
- If you’re not comfortable working directly with files or databases, consider hiring a developer or using plugins designed for cleaning up media files.
- After deletion, clear your site cache and browser cache to see the changes reflected.
While this method requires a bit more technical know-how, it ensures that unwanted images are thoroughly removed from both your server and database, preventing any residual files from cluttering your media library or taking up unnecessary space.
6. Tips to Prevent Unwanted Images from Remaining in Your Media Library
Preventing unwanted images from sticking around in your WordPress Media Library is all about good habits and proactive management. Here are some practical tips to keep your media library clean and organized:
1. Be Selective When Uploading
Before uploading, ask yourself:
- Do I really need this image?
- Is it relevant to my content?
- Will I use it regularly?
By only uploading images you genuinely need, you minimize clutter and make it easier to manage your media library.
2. Use Media Management Plugins
Plugins like WP Media Folder or Media Cleaner can help you identify unused or orphaned images. They scan your media library for files that aren’t linked to any posts or pages and offer options to delete them safely.
3. Regularly Audit Your Media Library
Set aside time every few months to review your media library. Delete duplicates, outdated images, or files that no longer serve a purpose. This keeps your library streamlined and reduces storage usage.
4. Organize Your Media Files
Use folders or categories (via plugins) to organize images logically. When images are well-organized, it’s easier to spot duplicates or unnecessary files and remove them efficiently.
5. Be Careful with Bulk Deletions
While it’s tempting to delete multiple images at once, always review selections to avoid accidentally removing valuable media. Use plugins that support safe bulk deletions with previews.
6. Implement Proper Naming Conventions
Clear, descriptive filenames help you identify images quickly, making it easier to decide which files to keep or delete.
7. Keep Your WordPress and Plugins Up to Date
Updates often include security and performance improvements, and sometimes include media management enhancements that help prevent residual files.
By following these tips, you’ll create a more organized media library, reduce storage bloat, and ensure that unwanted images don’t accidentally remain hidden in the background. A little proactive effort goes a long way in keeping your WordPress site healthy and clutter-free!
Conclusion and Best Practices for Managing Media Files in WordPress
Effectively managing your media files in WordPress is essential for maintaining a clean, efficient, and professional website. To ensure your media library remains organized and optimized, consider adopting the following best practices:
- Regularly Review and Delete Unused Images: Periodically audit your media library to identify and remove images that are no longer in use, freeing up storage space and reducing clutter.
- Use Descriptive File Names and Alt Text: Naming your files with relevant keywords and adding descriptive alt text improves accessibility and SEO performance.
- Implement a Consistent Organization System: Categorize images into folders or tags to make future retrieval easier and to keep your library structured.
- Optimize Images Before Upload: Compress images to improve page load times without sacrificing quality, which benefits user experience and search engine rankings.
- Utilize Plugins for Media Management: Consider plugins like Media Cleaner or Enhanced Media Library to automate cleaning tasks and enhance organization.
By following these practices, you can maintain a streamlined media library that supports your website’s performance and SEO goals. Remember, consistent management not only saves storage space but also ensures your website remains professional, fast, and user-friendly.