When it comes to managing a WordPress website, security should be at the top of your list. Hackers and bots are constantly trying to break in, especially through login pages where vulnerabilities are common. One effective way to boost your site’s defenses is by limiting login attempts. This prevents brute-force attacks, where attackers repeatedly guess passwords until they find the right one. Setting a WPS limit login helps you safeguard your site without making the login process cumbersome for genuine users. In this post, we’ll explore how to implement this feature and why it’s a game-changer for your website’s security.
Understanding the WPS Limit Login Plugin and Its Benefits
The WPS Limit Login plugin is a simple yet powerful tool designed to enhance your WordPress site’s security by restricting the number of login attempts. Once you install and activate it, you can configure how many times someone can try to log in within a certain period. Here’s how it works and why it’s so beneficial:
- Prevents Brute-Force Attacks: By limiting login attempts, the plugin makes it nearly impossible for hackers to use automated tools to guess passwords repeatedly.
- Enhances Site Security: Reducing the risk of unauthorized access protects your data, user information, and overall site integrity.
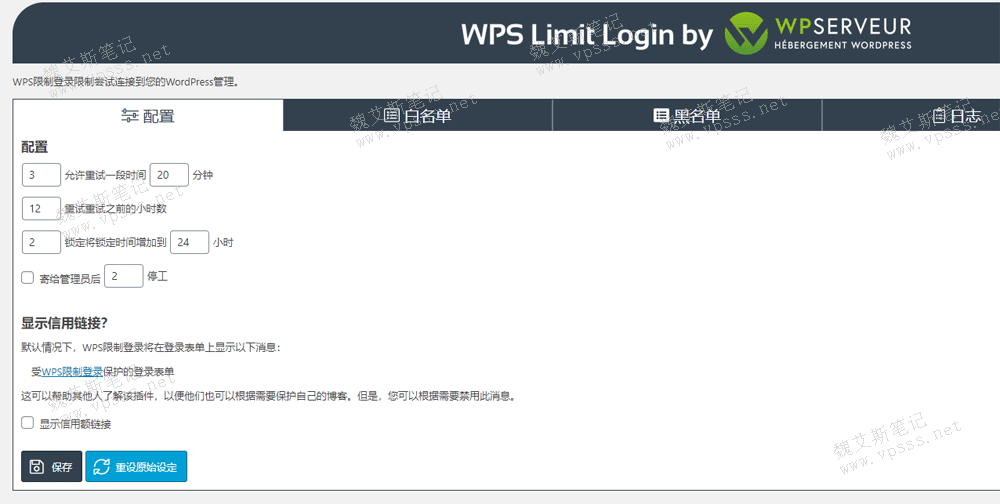
- Customizable Settings: You can set the maximum number of login attempts, lockout duration, and even whitelist certain IP addresses if needed.
- Easy to Use: The plugin is beginner-friendly with straightforward configuration options, making it accessible for all users.
- Reduces Server Load: Limiting login attempts decreases unnecessary server requests, helping your site run smoothly even under attack attempts.
In summary, the WPS Limit Login plugin provides an essential layer of security with minimal effort. It’s like having a bouncer at your website’s door—only allowing trusted visitors through after a certain number of tries. Next, let’s look at how you can set it up step-by-step to start protecting your site today.
3. Step-by-Step Guide to Installing the WPS Limit Login Plugin
Getting started with enhancing your WordPress site’s security by limiting login attempts? The WPS Limit Login plugin is a fantastic tool that makes it easy to add this layer of protection. Let’s walk through the installation process together – it’s straightforward and quick!
Step 1: Log into Your WordPress Dashboard
First things first, head over to your WordPress admin panel. Usually, it’s accessible via yourdomain.com/wp-admin. Enter your username and password to access the dashboard.
Step 2: Navigate to Plugins > Add New
Once inside, look for the sidebar menu. Hover over or click on Plugins, then select Add New. This takes you to the plugin repository where you can search for new tools to enhance your site.
Step 3: Search for “WPS Limit Login”
In the search bar on the top right, type WPS Limit Login. You should see the plugin appear in the results. The plugin is popular, lightweight, and easy to configure, making it a great choice for most users.
Step 4: Install the Plugin
- Click the Install Now button next to the WPS Limit Login plugin.
- Wait a few moments while WordPress downloads and installs the plugin for you.
Step 5: Activate the Plugin
- Once installed, the Install Now button transforms into Activate. Click on it to enable the plugin on your site.
- After activation, you’ll see a new menu item called Limit Login in your dashboard sidebar or under Settings.
And that’s it! You’ve successfully installed and activated the WPS Limit Login plugin. Next, let’s dive into configuring its settings to make sure your login attempts are well protected.
4. Configuring WPS Limit Login Settings for Optimal Security
Now that the plugin is installed and activated, it’s time to fine-tune its settings. Proper configuration is key to preventing brute-force attacks without locking out legitimate users. Here’s a simple guide to help you set it up for maximum security.
Step 1: Access the Plugin Settings
Go to your WordPress dashboard, then click on Limit Login in the sidebar menu. This opens the plugin’s settings page where all the magic happens.
Step 2: Set the Maximum Login Attempts
This option controls how many failed login attempts are allowed before blocking further tries. A good starting point is:
| Option | Recommended Setting |
|---|---|
| Maximum Login Attempts | 3-5 attempts |
This helps prevent brute-force attacks while giving your legitimate users a fair chance to log in.
Step 3: Define the Lockout Duration
Decide how long the IP should be blocked after exceeding the maximum attempts. For example:
- Lockout Time: 15 minutes to 1 hour
This prevents attackers from trying endlessly, but also allows genuine users to try again after a short period.
Step 4: Enable or Disable Notifications
It’s helpful to receive notifications when someone is locked out. Enable email alerts if you want to stay informed about potential security threats.
Step 5: Customize the Lockout Message
You can personalize the message displayed to users when they are locked out. Make it friendly but clear, such as:
“Too many login attempts. Please try again later.”
Step 6: Save Your Settings
Once all preferences are set, click the Save Changes button at the bottom of the page. Your new security measures are now active!
By adjusting these settings thoughtfully, you’re creating a robust barrier against unauthorized login attempts. Remember, security isn’t a one-time setup – it’s an ongoing process. Regularly review your plugin settings and stay vigilant against potential threats.
5. Tips for Managing Login Attempts and Protecting Your WordPress Site
Managing login attempts is a crucial step in safeguarding your WordPress site from brute-force attacks. These attacks happen when someone tries to access your site by guessing your username and password repeatedly. The good news is, you can take proactive measures to limit these attempts and keep your site safe.
First off, always set a reasonable limit for login attempts. For example, allowing 3-5 tries before locking out the user can prevent hackers from making endless guesses. Using plugins like WPS Limit Login or Login LockDown makes this process straightforward. These tools automatically track login attempts and block IP addresses that exceed your defined threshold.
Another key tip is to monitor your login activity regularly. Keep an eye on failed login attempts—if you notice a spike from a particular IP address or user agent, it might be time to investigate or block that source.
You should also consider implementing the following practices:
- Use strong, unique passwords: Avoid common words or simple combinations. A mix of uppercase, lowercase, numbers, and symbols adds an extra layer of security.
- Enable two-factor authentication (2FA): Adding 2FA means even if someone guesses your password, they still need a second code sent to your phone or email to log in.
- Limit login attempts per user or IP: As mentioned, plugins can do this for you. It’s especially useful if you have multiple users or a high-traffic site.
- Change your login URL: Instead of using the default /wp-login.php or /wp-admin, customize your login URL to make it harder for attackers to find the login page.
By combining these tactics with WPS Limit Login, you provide multiple layers of protection, making it significantly tougher for unauthorized users to gain access.
6. Additional Security Measures to Complement WPS Limit Login
While limiting login attempts is a fantastic step, security is best approached as a multi-layered strategy. Here are some additional measures you can take to enhance your WordPress site’s security:
1. Keep Everything Up to Date
WordPress core, themes, and plugins should always be current. Developers regularly release updates that patch security vulnerabilities. An outdated site is a prime target for hackers.
2. Install a Security Plugin
Plugins like Wordfence, Sucuri Security, or iThemes Security offer comprehensive protection—including malware scanning, firewall rules, and activity logs. They often include features to block malicious IPs and monitor suspicious activity.
3. Use SSL Encryption
Enabling HTTPS ensures that data transmitted between your site and visitors is encrypted. This not only improves security but also boosts trust and SEO rankings.
4. Regular Backups
In case of a security breach, having recent backups allows you to restore your site quickly. Use reliable backup plugins and store backups off-site.
5. Disable XML-RPC if Not Needed
XML-RPC can be exploited for attacks like pingbacks or DDoS. If you don’t need it, disable it via security plugins or custom code.
6. Limit User Permissions
Assign the minimum necessary permissions to each user. Avoid giving admin rights unless absolutely needed.
7. Hide WordPress Version
Hide or remove the WordPress version number from your site’s source code to make it less obvious what version you’re running, which can prevent targeted attacks.
Combining these best practices with WPS Limit Login creates a robust security environment. Remember, security isn’t a one-time setup—it’s an ongoing process. Regularly review your security measures and stay informed about new threats to keep your WordPress site safe and sound.
Conclusion and Best Practices for Maintaining a Secure WordPress Website
Securing your WordPress website is an ongoing process that requires vigilance and adherence to best practices. Implementing features like WPS Limit Login helps prevent brute-force attacks by restricting login attempts, but it should be part of a comprehensive security strategy. Regularly updating your WordPress core, themes, and plugins is essential to patch vulnerabilities and maintain a secure environment. Using strong, unique passwords and enabling two-factor authentication adds extra layers of protection for your user accounts.
Additionally, consider employing security plugins that offer features such as malware scanning, firewall protection, and login activity monitoring. Backing up your website frequently ensures you can restore your site quickly in case of a security breach. It’s also advisable to limit access to your admin area by IP address or user roles, reducing potential attack vectors.
Key best practices include:
- Regularly update WordPress, themes, and plugins
- Use strong, unique passwords for all accounts
- Enable two-factor authentication where possible
- Install reputable security plugins and configure them properly
- Implement regular backups and test recovery procedures
- Limit login attempts and monitor login activity
- Restrict admin area access based on IP or user roles
By combining these practices with tools like WPS Limit Login, you can significantly strengthen your website’s defenses against cyber threats. Remember, website security is an ongoing effort—staying informed about the latest security trends and vulnerabilities is key to maintaining a safe online presence.


