If you’re looking to dive into the world of website development or want a reliable way to host your WordPress site without relying on third-party hosting services, setting up a virtual server on your personal computer might be the perfect solution. Think of a virtual server as having your own mini data center right at home, giving you full control over your website environment. WordPress, being one of the most popular content management systems, runs seamlessly on virtual servers once everything is set up correctly. In this guide, we’ll walk you through each step so you can confidently host your
Prerequisites and Necessary Tools for the Setup
Before we jump into the setup process, let’s make sure you have everything you need. Setting up a virtual server for WordPress on your personal computer requires some basic prerequisites and tools:
- A computer with sufficient resources: Ideally, a machine with at least 8GB of RAM and a decent processor. While you can run a server on a less powerful machine, more resources mean smoother performance.
- Stable internet connection: For downloading software and updates, plus occasional remote access if needed.
- Operating System: Whether you’re using Windows, macOS, or Linux, most setup tools are compatible. Just know what you’re working with so you can follow the instructions accordingly.
- Virtualization Software: You’ll need a program to create and manage your virtual server. Popular options include:
- VirtualBox: Free and open-source, great for beginners.
- VMware Workstation Player: Also free for personal use with robust features.
- Linux Distribution (Optional but recommended): Many prefer Ubuntu Server or Debian for hosting, but you can also run other Linux distros depending on your familiarity.
- Web Server Software: Such as Apache or Nginx. These handle incoming web requests and serve your website.
- Database Management System: MySQL or MariaDB are popular choices for WordPress databases.
- PHP: WordPress requires PHP, so ensure you install a compatible version.
- FTP Client (Optional): Such as FileZilla, useful for managing files on your server.
- Text Editor: Like Visual Studio Code, Sublime Text, or Notepad++, for editing configuration files and code.
Having these tools ready before starting will make the process much smoother. Don’t worry if some of this sounds technical—we’ll guide you step-by-step to get everything up and running. And remember, setting up your own virtual server is a fantastic way to learn about web hosting and get hands-on experience managing a server environment.
3. Choosing the Right Virtualization Software
Alright, so you’re ready to set up a virtual server for your WordPress site on your personal computer—awesome! The first big step is choosing the right virtualization software. Don’t worry; there are plenty of options out there, and most are free or have free versions, so you can pick what suits your needs best.
When selecting virtualization software, consider these key factors:
- Compatibility: Make sure the software works well with your operating system—Windows, macOS, or Linux.
- Ease of Use: Some tools are more beginner-friendly with simple interfaces, while others offer advanced features for power users.
- Features: Think about whether you need snapshots (saving your VM’s state), networking options, or shared folders.
- Performance: The software should efficiently utilize your hardware resources—CPU, RAM, and storage.
- Community & Support: Good documentation and active user communities can save you a lot of headaches.
Here are some popular options you might consider:
| Software | Best For | Notes |
|---|---|---|
| VirtualBox | Beginners & General Use | Free, open-source, cross-platform, lots of tutorials available |
| VMware Workstation Player | Windows & Linux Users | Free for personal use, more polished interface, some advanced features in paid version |
| Parallels Desktop | Mac Users | Great for Mac, paid software, seamless integration with macOS |
| Hyper-V | Windows Users | Built into Windows 10/11 Pro and Enterprise, good for Windows-centric environments |
If you’re just starting out and want something straightforward, VirtualBox is a fantastic choice. It’s well-documented, easy to install, and runs smoothly on various operating systems. Once you’ve picked your software, download and install it following the official instructions. Remember, it’s always good to keep your virtualization software updated to benefit from the latest features and security patches.
4. Installing and Configuring the Virtual Server Environment
Great choice! Now that you’ve got your virtualization software ready, it’s time to install and set up your virtual server environment. Think of this as creating your own mini computer inside your existing one—pretty neat, right?
Here’s a simple step-by-step guide to get you started:
Step 1: Download a Base Operating System Image
- For WordPress, a common choice is Linux—Ubuntu Server or Debian are popular options because they’re lightweight and well-supported.
- Visit the official website of the OS you choose and download the ISO file (the disc image).
Step 2: Create a New Virtual Machine (VM)
- Open your virtualization software and select “Create New VM” or similar option.
- Choose the option to install from an ISO image.
- Point the setup to the OS ISO you downloaded.
- Configure basic settings like VM name, location, and hardware resources (more on that below).
Step 3: Allocate Resources
Be mindful here. You want to assign enough resources so your server runs smoothly without slowing down your host OS:
- CPU: 1-2 cores for small setups.
- RAM: At least 2GB, but more if your PC allows.
- Storage: 20GB or more for the OS and WordPress files.
Step 4: Complete the Installation
- Follow the on-screen prompts to install the OS inside your VM.
- Set up your username, password, and other preferences.
Step 5: Install Necessary Software & Configure Network
Once your OS is installed, you’ll want to:
- Update your system with the latest patches.
- Install essential tools like a web server (Apache or Nginx), PHP, and MySQL/MariaDB.
- Configure your network settings so your VM can communicate with your host machine and the internet. This usually involves setting up network adapters—NAT or bridged mode work well for most cases.
And voilà! Your virtual server environment is set up and ready for the next steps—installing WordPress, securing your site, and more. Remember, taking your time during this setup ensures a solid foundation for your WordPress project. Happy virtualizing!
5. Setting Up WordPress on Your Virtual Server
Alright, you’ve got your virtual server up and running—that’s a fantastic first step! Now, let’s get WordPress installed so you can start building your website. Don’t worry; it’s easier than you might think. I’ll walk you through each step to make sure everything goes smoothly.
First things first, you’ll want to install a web server environment if you haven’t already. Popular choices include Apache or Nginx. For simplicity, many users go with a pre-configured package like XAMPP or MAMP if you’re on Windows or macOS. If you’re on Linux, you can install Apache, PHP, and MySQL directly via your package manager (like apt or yum).
Step 1: Install a Web Server, PHP, and Database
- Web Server: Apache or Nginx
- PHP: Make sure PHP is installed (WordPress recommends PHP 7.4 or higher)
- Database: MySQL or MariaDB
Once you have these installed, you’re ready to download WordPress. Head over to the official WordPress website and grab the latest version.
Step 2: Download and Extract WordPress
Download the ZIP file from the site, then extract it into your web server’s root directory. For example, if you’re using Apache on Linux, this might be /var/www/html/. On Windows with XAMPP, it’s usually C:xampphtdocs.
Step 3: Create a Database for WordPress
Next, you need to set up a database. You can do this via phpMyAdmin or command line. Here’s a quick way using phpMyAdmin:
- Open phpMyAdmin in your browser (e.g.,
http://localhost/phpmyadmin) - Click on “Databases” tab
- Enter a name for your database (e.g., wordpress_db)
- Choose Collation (utf8mb4_unicode_ci is recommended)
- Click “Create”
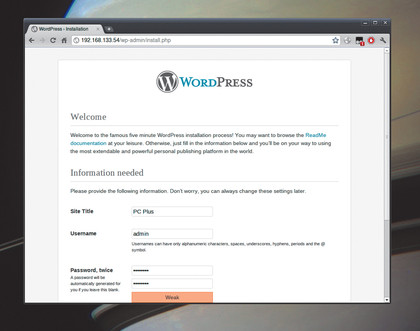
Step 4: Run the WordPress Installer
Now, navigate to your local server URL in your browser—if you extracted WordPress to htdocs/wordpress, go to http://localhost/wordpress. You’ll see the WordPress setup wizard. Follow these steps:
- Choose your language
- Enter your database details:
- Database Name: the name you created
- Username: typically root (or your database user)
- Password: your database password
- Database Host: usually localhost
- Table Prefix: you can leave this as wp_
- Run the installation
Once completed, you’ll be prompted to create your admin account. Fill in your desired username, password, and site title. And voilà—you now have a functioning WordPress site on your virtual server!
6. Configuring Domain and Network Settings for Local Access
Great job installing WordPress! Now, let’s make sure you can access your site easily from your local network. This involves configuring your domain name (so you don’t have to type in IP addresses all the time) and ensuring network settings are optimized for local access.
Assigning a Local Domain Name (Optional but Handy)
If you want to access your WordPress site using a friendly name like mydevsite.local, you can edit your system’s hosts file. Here’s how:
- Windows: Edit
C:WindowsSystem32driversetchostswith administrator privileges - macOS/Linux: Edit
/etc/hostsusing sudo
Add an entry like this at the bottom:
127.0.0.1 mydevsite.local
Now, when you type http://mydevsite.local into your browser, it points to your local server. Repeat this step on other devices on your network if you want to access your site from multiple computers.
Configuring Your Web Server for Local Access
Depending on your setup, you might need to tweak your web server’s configuration files to recognize your new local domain. For example, with Apache, you can create a virtual host:
<VirtualHost :80> ServerName mydevsite.local DocumentRoot "/path/to/your/wordpress"
 <Directory "/path/to/your/wordpress"> AllowOverride All Require all granted </Directory></VirtualHost>
After saving this configuration, restart your web server (e.g., sudo systemctl restart apache2) so it applies the changes. This way, your browser knows exactly which folder to serve when you visit http://mydevsite.local.
Ensuring Network Accessibility
If you want other devices on your network to see your server, make sure:
- Your PC’s firewall allows incoming traffic on port 80 (HTTP)
- Your PC has a static IP address (so it doesn’t change)
- Network settings are configured to permit local traffic
To find your IP address, open a command prompt or terminal and type ipconfig (Windows) or ifconfig / ip addr (Linux/macOS). Use this IP in your browser from other devices, like http://192.168.1.100.
By following these steps, you’ve set up a fully functional local environment for WordPress with a friendly domain name and accessible network settings. Now, you’re ready to experiment, develop, or even test plugins and themes before pushing your site live!
7. Troubleshooting Common Issues During Setup
Getting your virtual server up and running for WordPress can sometimes come with its fair share of hiccups. Don’t worry—many of these issues are common and have simple fixes. Let’s walk through some of the most frequent problems and how to troubleshoot them.
1. Server Not Starting or Connecting
If your server isn’t starting or you can’t connect to it, double-check that your virtualization software (like VirtualBox or VMware) is running properly and that the virtual machine (VM) is powered on. Also, ensure that the network settings are configured correctly—either as NAT or Bridged mode—so your PC can communicate with the VM.
2. Port Conflicts
Sometimes, the ports needed for the web server (usually 80 and 443) are already in use by other applications. To troubleshoot:
- Check which applications are using these ports with commands like
netstat -tulnon Linux or using Resource Monitor on Windows. - If ports are occupied, consider changing your web server to listen on different ports or free up the ports.
3. Database Connection Errors
If WordPress can’t connect to the database, verify that your database server (like MySQL or MariaDB) is running. Check your wp-config.php file to ensure database credentials (name, username, password, host) are correct. Also, confirm that the database user has appropriate permissions.
4. PHP or Web Server Errors
If you see error messages related to PHP or your web server (Apache or Nginx), review the server logs. Common issues include misconfigured .htaccess files, incorrect PHP version, or missing modules. Reinstall or update components as needed.
5. SSL/TLS Problems
Implementing HTTPS can sometimes cause certificate errors. Make sure your SSL certificates are valid and correctly installed. For local development, you can use self-signed certificates—just be aware that browsers may warn about security.
6. Performance Issues
If your server runs slowly, consider allocating more resources (CPU, RAM) to your VM. Also, check for background processes that might be consuming resources, and optimize your web server and database configurations.
Remember, troubleshooting is often a process of elimination. Take it step-by-step, check logs, and verify configurations. Most problems have straightforward fixes once you identify the root cause.
8. Conclusion and Tips for Maintaining Your Virtual WordPress Server
Congratulations! You’ve successfully set up your own virtual server for WordPress. Now, keeping it running smoothly and securely is key to a great experience and protecting your site. Here are some tips to help you maintain your virtual WordPress server:
Regular Backups
- Schedule frequent backups of your WordPress files and database.
- Use plugins like UpdraftPlus or BackupBuddy for automated backups.
- Store backups in a secure off-site location, such as cloud storage.
Keep Everything Updated
Always keep your WordPress core, themes, plugins, and server software up to date. Updates fix bugs, patch security vulnerabilities, and improve performance. Regularly check for updates and apply them promptly.
Monitor Server Performance and Security
- Use monitoring tools to keep an eye on CPU, RAM, and disk usage.
- Install security plugins like Wordfence or Sucuri Security to detect and prevent threats.
- Configure firewalls and limit access to your server’s management interfaces.
Optimize Your WordPress Site
- Use caching plugins like W3 Total Cache or WP Super Cache to speed up your site.
- Optimize images and database tables regularly.
- Consider using a Content Delivery Network (CDN) for faster content delivery.
Secure Your Server and Data
Implement strong passwords, enable SSH key authentication, and disable unnecessary services. Regularly review logs for suspicious activity and consider setting up automated alerts for critical issues.
Document Your Setup
Keep a record of your server configurations, passwords, and any custom setups. This will save you time if you need to troubleshoot or recreate your environment later.
By following these maintenance tips, your virtual WordPress server can stay secure, fast, and reliable for years to come. Happy blogging!