If you’re juggling multiple websites or planning to launch several in the future, managing them individually can get pretty overwhelming. That’s where WordPress Multisite comes to the rescue! Think of it as a single, powerful dashboard that lets you run and control multiple websites from one centralized location. It’s like having one master control room for all your online projects. The best part? It saves you time, simplifies updates, and keeps everything organized. Whether you’re a developer, a business owner, or a blogger with multiple sites, understanding how Multisite works can seriously streamline your workflow and make managing your online presence much more efficient.
Prerequisites for Setting Up WordPress Multisite

Before you dive into setting up your WordPress Multisite network, there are a few important prerequisites to check off your list. First, you need a self-hosted WordPress installation. This means you’re not using WordPress.com, but a hosting provider that gives you full control over your server environment. Make sure your hosting plan supports PHP and MySQL/MariaDB, as these are essential for WordPress to run smoothly.
Next, it’s recommended to have a domain name and SSL certificate for security and professionalism. While Multisite can work with subdomains or subdirectories, choosing the right structure depends on your needs—so plan accordingly.
Additionally, ensure you have FTP or file manager access to your server, as you’ll need to modify some configuration files during setup. It’s also wise to back up your existing WordPress site before starting, just in case anything goes awry. Lastly, familiarize yourself with basic server management and WordPress configuration—knowing your way around wp-config.php and .htaccess files will make the process much smoother.
3. Step-by-Step Guide to Enable WordPress Multisite
Getting your WordPress Multisite network up and running might sound a bit intimidating at first, but don’t worry — it’s actually pretty straightforward once you know the steps. Let’s walk through the process together so you can start managing multiple websites smoothly.
Step 1: Backup Your Website Before making any significant changes, it’s always a good idea to back up your current site. This way, if anything unexpected happens, you can restore your site to its previous state without any stress.
Step 2: Deactivate All Plugins Navigate to your WordPress dashboard, go to the Plugins section, and deactivate all active plugins. This helps prevent conflicts during the multisite setup process.
Step 3: Edit wp-config.php Using an FTP client or your hosting file manager, locate the wp-config.php file in your WordPress root directory. Open it and add the following line just above / That's all, stop editing! Happy publishing. /:
/ Enable Multisite /define('WP_ALLOW_MULTISITE', true);Save and close the file. This line tells WordPress to enable the multisite features.
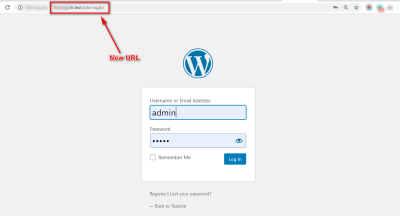
Step 4: Access the Network Setup Back in your WordPress dashboard, refresh the page. You should now see a new menu item under Tools called Network Setup. Click on it.
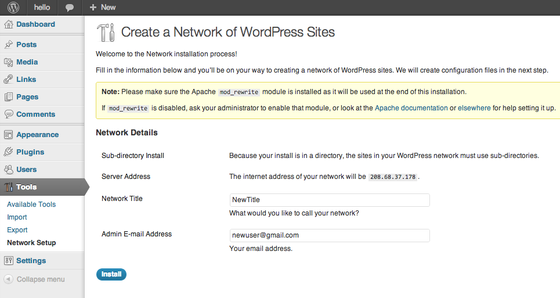
Step 5: Configure Your Network On the Network Setup page, you’ll be prompted to choose between Subdomains (site1.yourdomain.com) and Subdirectories (yourdomain.com/site1). Pick the option that fits your needs. Keep in mind:
- Subdomains: Good if you want separate sites with their own domains, but may require wildcard DNS setup.
- Subdirectories: Easier to set up, ideal for managing multiple sites under the same domain.
Enter your network title and admin email address. Once done, click Install.
Step 6: Update wp-config.php and .htaccess After clicking Install, you’ll see some code snippets that you need to add to your wp-config.php and .htaccess files. Carefully copy and paste these snippets into the respective files:
| File | Code Snippet |
|---|---|
| wp-config.php |
|
| .htaccess |
|
Once these are in place, refresh your site, and your multisite should be active!
4. Configuring Your Network and Creating New Sites

Congratulations! You’ve successfully enabled WordPress Multisite. Now, let’s walk through configuring your network and creating new sites so you can start managing multiple websites effortlessly.
Accessing the Network Admin Dashboard In your WordPress dashboard, you’ll now see a new menu item called My Sites. Hover over it and select Network Admin, then click on Dashboard. This is where you’ll manage your entire network of sites.
Configuring Network Settings Before adding sites, it’s a good idea to review your network settings. Under Network Admin > Settings, you can customize options like:
- Network Title and Admin Email: Make sure these are accurate.
- Registration Settings: Decide if users can register new sites or if registration is restricted.
- Upload Settings: Define maximum file upload sizes for sites.
- Admin Email Notifications: Choose whether to receive notifications about network activities.
Adjust these according to your needs, then save your settings.
Creating New Sites To add a new site, navigate to Network Admin > Sites and click Add New. Here’s what you need to fill out:
- Site Address: Enter the subdomain or subdirectory, depending on your setup.
- Site Title: Give your site a friendly name.
- Admin Email: Specify the primary contact for the site.
After clicking Add Site, WordPress will create the new website within your network. You can then manage each site individually, install themes and plugins, and control user access.
Managing Sites and Users Once your sites are set up, you can manage them from the Sites list. Clicking on a site allows you to update settings, themes, plugins, and users. You can also assign different roles to users for each site, giving you flexibility in managing access.
Remember, each site operates independently in terms of content and users but shares the core WordPress installation and database, making management much more streamlined. With your network configured and sites created, you’re ready to expand your online presence confidently!
5. Managing and Maintaining Your Multisite Network
Once your WordPress Multisite network is up and running, the real fun begins—managing and maintaining it to ensure everything runs smoothly. Think of it like tending to a garden; regular attention helps keep everything healthy and thriving. Here are some essential tips and best practices to keep your multisite network in top shape.
Centralized Dashboard is your best friend. WordPress provides a network admin dashboard where you can oversee all sites, users, themes, and plugins from one place. Make it a habit to check this regularly to catch any issues early.
Another key aspect is user management. Assign roles carefully—super admins, admins for specific sites, editors, and contributors. This way, you control who can do what, reducing the risk of accidental changes or security breaches.
Keeping everything updated is crucial. Regularly update your WordPress core, themes, and plugins across the network. Automate updates where possible, but also make sure to back up before making major changes. Outdated software is a common security vulnerability.
Managing plugins and themes can become tricky if you have many sites. To keep things streamlined, consider:
- Using only essential plugins that are compatible across sites
- Centralizing plugin management when possible
- Deactivating unused plugins to reduce potential security risks
Monitoring and backups are vital. Use reliable backup solutions that support multisite networks—backups should include the entire network, not just individual sites. Schedule regular backups and test restoring from them periodically.
Additionally, keep an eye on performance metrics. Use tools like Google Analytics or dedicated WordPress performance plugins to monitor traffic, load times, and user behavior. This helps you identify and resolve issues proactively.
Finally, foster a community among your site admins and users. Clear documentation, regular updates, and open communication channels make managing a multisite network much easier and more enjoyable.
6. Tips for Optimizing Performance and Security
Running multiple websites on a single WordPress Multisite network can be a powerhouse of efficiency, but it also demands careful attention to performance and security. Here are some practical tips to keep your network fast, safe, and reliable.
Performance Optimization is all about speed and responsiveness. Here’s what you should focus on:
- Caching: Use caching plugins like WP Super Cache or W3 Total Cache to serve static pages quickly. Consider server-side caching if available.
- Content Delivery Network (CDN): Implement a CDN such as Cloudflare or StackPath to distribute your content globally, reducing load times for visitors from different regions.
- Image Optimization: Compress images using tools like Smush or ShortPixel to improve load times without sacrificing quality.
- Database Optimization: Regularly clean and optimize your database to prevent bloat, which can slow down your site. Plugins like WP-Optimize make this process easy.
- Resource Management: Monitor server resources—CPU, RAM, bandwidth—and upgrade or optimize your hosting plan if needed. Good hosting is the foundation of good performance.
Security should never be an afterthought, especially with multiple sites at stake. Here’s how to keep your network safe:
- Strong Passwords and User Roles: Enforce strong passwords for all users and assign roles with the least privileges necessary.
- Security Plugins: Install security plugins like Wordfence or Sucuri to add a layer of protection against malware, brute-force attacks, and other threats.
- SSL Certificates: Ensure your entire network uses HTTPS to encrypt data in transit. Many hosting providers offer free SSL certificates via Let’s Encrypt.
- Regular Updates: As mentioned earlier, keeping your core, themes, and plugins updated is vital—many security breaches exploit outdated software.
- Firewall and IP Lockdown: Use firewalls and limit login attempts to prevent unauthorized access attempts.
- Backup and Disaster Recovery Plans: In case of a security breach, quick recovery is essential. Regular backups and a clear recovery plan can save your network from disaster.
By applying these tips, you’ll create a robust environment where your multiple websites can thrive—fast, secure, and easy to manage. Remember, maintaining a multisite network is an ongoing process, but with the right tools and habits, it becomes much more manageable and rewarding.
7. Common Issues and Troubleshooting Strategies
Getting your WordPress Multisite network up and running smoothly is a fantastic goal, but it’s not uncommon to encounter some hiccups along the way. Don’t worry—most issues have straightforward solutions once you know where to look. Let’s go over some of the common problems and how to troubleshoot them effectively.
1. Domain Mapping Problems
If your subsites aren’t displaying the correct domains or URLs, domain mapping might be the culprit. This often happens when the DNS settings or plugin configurations aren’t set up properly. Double-check that your DNS records are pointing to the right server, and verify that your domain mapping plugin (like WordPress MU Domain Mapping) is correctly configured. Clear your browser cache and try accessing the site again.
2. Plugin Compatibility Issues
Not all plugins are built for Multisite environments. Some can cause conflicts or break sites. To troubleshoot, deactivate all plugins and then reactivate them one by one, checking if the problem persists after each activation. Focus on plugins related to site management or domain handling first. Always test plugins on a staging environment before deploying them live.
3. Performance and Speed Concerns
Running multiple sites can strain your server. If your network feels sluggish, consider:
- Upgrading your hosting plan to include more resources
- Implementing caching solutions like WP Super Cache or W3 Total Cache
- Using a Content Delivery Network (CDN) to distribute content globally
Monitoring server resource usage with tools like New Relic or server logs can also help identify bottlenecks.
4. Database Errors
Large multisite networks can lead to database issues if not optimized. Regularly optimize your database tables via phpMyAdmin or plugins like WP-Optimize. Ensure your database user has the correct permissions and that your database server is configured to handle your network’s size.
5. Backup and Recovery Challenges
Backing up a multisite network requires more than just backing up individual sites. Use backup solutions that support multisite, such as UpdraftPlus or BlogVault, and ensure that backups include both your files and database. Test your restore process periodically to avoid surprises during emergencies.
8. Conclusion and Next Steps for Managing Multiple Websites with WordPress Multisite
Setting up and managing a WordPress Multisite network can seem daunting at first, but with a clear plan and some patience, it becomes an incredibly powerful way to handle multiple websites efficiently. By centralizing updates, user management, and theme control, you save time and reduce the complexity of maintaining separate sites.
Remember, the key steps include planning your network structure, properly configuring your server, choosing the right domain strategy, and installing essential plugins. As you grow your network, keep an eye on performance, security, and backup strategies to keep everything running smoothly.
Next steps? Consider creating a detailed documentation of your setup process, so you can troubleshoot more easily in the future. Experiment with staging environments before making big changes, and stay updated on WordPress core updates and best practices. If you encounter issues, don’t hesitate to reach out to the community forums or professional support—there’s a wealth of knowledge out there ready to help.
With these strategies in place, you’re well on your way to mastering WordPress Multisite and managing multiple websites effectively. Happy networking!