If you’re stepping into the world of SEO and website optimization, you’ve likely heard of the All in One SEO Plugin. It’s a powerful tool designed to help beginners and seasoned pros alike enhance their website’s visibility on search engines. This plugin streamlines SEO processes, making it straightforward to implement best practices without the need for deep technical knowledge. With its user-friendly interface, it caters to all levels, so you can focus on creating great content while it takes care of the nitty-gritty details. Let’s explore what makes this plugin a must-have for anyone looking to boost their online presence!
Key Features of All in One SEO Plugin

The All in One SEO Plugin comes packed with a variety of features that make optimizing your website a breeze. Here’s a breakdown of some of the standout functionalities:
- Easy Setup Wizard: This walks you through the necessary configurations to get started, ensuring you’re not overwhelmed from the get-go.
- XML Sitemap Support: Automatically generates sitemaps, helping search engines crawl and index your site more efficiently.
- Social Media Integration: Connects seamlessly with platforms like Facebook and Twitter to enhance the visibility of your content on social networks.
- SEO Analysis: Offers powerful tools that evaluate your posts and pages, providing real-time feedback on how to improve your SEO strategies.
- Title and Meta Tag Management: Customize titles and descriptions for each page or post, helping search engines understand your content better.
- Robots.txt and .htaccess Editing: User-friendly interfaces let you control how search engines interact with your website.
With features tailored to enhance your SEO game, the All in One SEO Plugin provides all the tools necessary for beginners to create an impactful online presence effortlessly.
Installing the All in One SEO Plugin

Installing the All in One SEO Plugin is a straightforward process that even beginners can handle with ease. Whether you’re starting from scratch or enhancing your existing WordPress site, you’ll be glad to know that this popular plugin is just a few clicks away.
Here’s how you can install the plugin:
- Log into Your WordPress Dashboard: Open your web browser and log into your WordPress account.
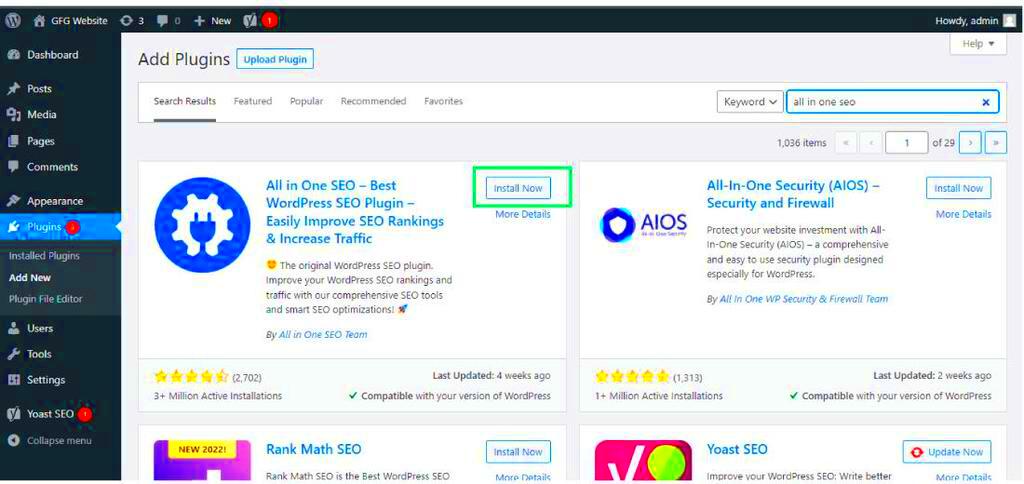
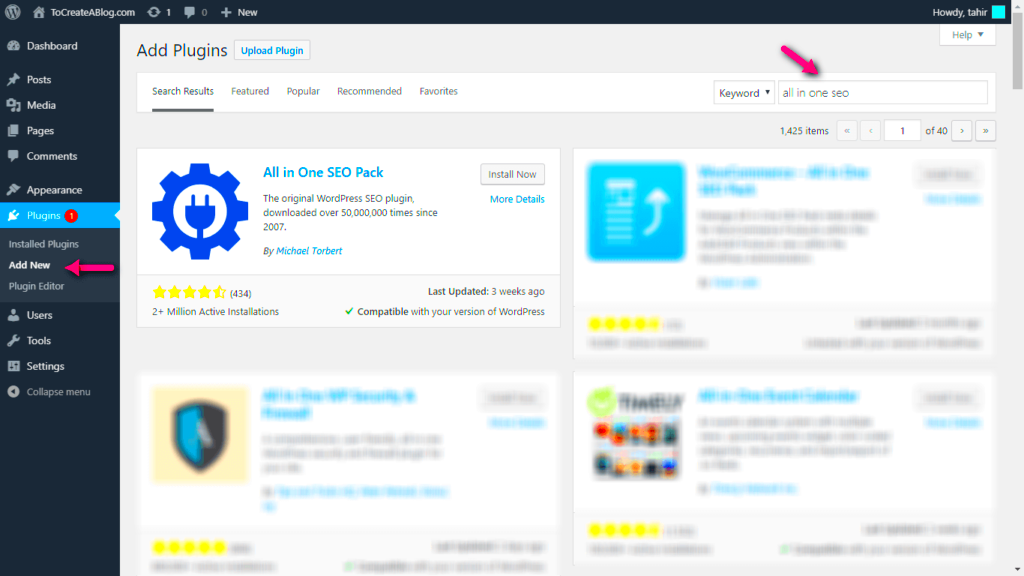
- Go to the Plugins Section: On the left-hand sidebar, find the “Plugins” option and click on it. Then, select “Add New.”
- Search for the Plugin: In the search bar located at the upper right corner, type “All in One SEO.” You should see the plugin appear in the search results.
- Install the Plugin: Click the “Install Now” button next to the All in One SEO Plugin. Wait for a moment as WordPress processes your request.
- Activate the Plugin: Once installed, you’ll see an “Activate” button. Click it, and voilà! Your SEO plugin is now live.
That’s it! You’ve successfully installed the All in One SEO Plugin. Now that it’s in place, let’s move on to setting it up so you can start reaping the benefits of improved search engine visibility.
Setting Up the Plugin for the First Time
Now that you’ve installed the All in One SEO Plugin, it’s time to set it up for the first time. This initial configuration is crucial because it lays the foundation for enhancing your website’s SEO capabilities.
Let’s break it down step by step:
- Access the Plugin Settings: On your WordPress dashboard, look for the “All in One SEO” tab on the left sidebar and click on it.
- Run the Setup Wizard: When you click on the plugin, you’ll be greeted with a friendly wizard that guides you through the setup process. Click “Let’s Get Started.”
- Configure Basic Settings: Start with basic options such as enabling XML sitemaps and setting up your homepage. Here’s a quick list of what to consider:
- Site Title
- Site Description
- Home Page Settings
- Link Social Media Accounts: If you have social media profiles for your website, linking them can boost engagement. Add your social profiles for Facebook, Twitter, and others as prompted.
- Save Settings: Don’t forget to hit the “Save Changes” button after you’ve customized your settings. You can always revisit and tweak them down the line.
Congratulations! You’ve set up the All in One SEO Plugin for the first time. It’s now time to explore advanced features to fully utilize the plugin’s potential, which will help boost your site’s visibility and ranking on search engines.
5. Configuring General Settings
When you first install the All in One SEO (AIOSEO) plugin, one of the crucial steps you need to take is configuring the general settings. This will set the foundation for how the plugin optimizes your site for search engines. Let’s break down what you should focus on to get everything working smoothly!
- Accessing General Settings: Once your plugin is installed and activated, navigate to the AIOSEO tab in your WordPress dashboard. Click on ‘General Settings’ to start customizing.
- Site Title and Tagline: Ensure that your site title and tagline are clear and aligned with your brand. Search engines use this information to understand the context of your site.
- Home Page Settings: Decide if you want to use a static front page or let your latest posts show up here. Each option has its benefits depending on your goals.
Make sure to look into other settings like XML Sitemaps, which is essential for Google to easily crawl your site. The AIOSEO plugin automatically generates an XML sitemap for you, but it’s good to customize it according to your needs.
Social Media Integration: Connect your social profiles (like Facebook and Twitter) to your site. This will enhance your online presence and make it easier for people to find you across different platforms.
Lastly, don’t forget to hit that save button when you’re done. Configuring these general settings is an essential step in optimizing your site’s SEO, so take your time to get it right!
6. Optimizing Post and Page SEO
Now that you’ve set your general settings, it’s time to focus on optimizing individual posts and pages. This is where the magic happens, and you can really tailor your content to rank higher in search results.
The All in One SEO plugin comes loaded with user-friendly features that make this task easier than you might think!
- Focus Keyphrase: When you’re creating a new post, AIOSEO prompts you to choose a focus keyphrase. Think of this as your post’s “main topic.” What do you want people to search for? Add the keyphrase here, and the plugin will guide you on how well your content aligns with it.
- SEO Title and Meta Description: AIOSEO allows you to customize your SEO title and meta description. These elements show up in search results, so make them punchy and relevant. Aim for under 60 characters for the title and 150 for the description.
- Content Analysis: As you write, watch for the content analysis feature. It gives you hints on how to improve your on-page SEO, like using the keyphrase in headings or ensuring your content is of high quality.
Additionally, don’t underestimate the power of the Social Media Preview. This feature lets you see how your content will look when shared on platforms like Facebook and Twitter. A well-crafted preview can encourage more clicks!
Finally, always remember to save your changes. By optimizing your posts and pages with AIOSEO, you’re not just trying to rank higher; you’re also making your content more accessible and engaging for your audience.
7. Using the Sitemap Feature
The Sitemap feature in the All in One SEO Plugin is a game-changer when it comes to improving your website’s visibility. So, what exactly is a sitemap? Simply put, it’s a file that lists all the pages on your website, helping search engines like Google crawl and index your content effectively. Think of it as a roadmap that guides search engines through your site.
To get started with using the sitemap feature, follow these simple steps:
- Navigate to the All in One SEO Dashboard: After you’ve installed and activated the plugin, go to the All in One SEO settings in your WordPress admin panel.
- Access the Sitemap Settings: Look for the ‘Sitemap’ option in the AIOSEO menu. You’ll find various customizable settings.
- Enable the Sitemap: By default, the sitemap should be enabled, but double-check to ensure it is. Simply toggle the switch if it’s off.
- Customize Your Sitemap: You can select which post types (like posts, pages, or custom post types) to include and exclude. Tailoring your sitemap to focus on valuable content helps search engines prioritize what’s important.
- Save Changes: Don’t forget to hit that ‘Save’ button after making your adjustments!
Once your sitemap is set, you can easily share it with search engines. Copy the sitemap link, usually found at yourdomain.com/sitemap.xml, and submit it to Google Search Console and other search engines. This presents a clear path for them to find and index your content quickly, boosting your chances of ranking higher!
8. Integrating Social Media Settings
In today’s digital landscape, social media is an essential aspect of your online presence. Integrating social media settings into the All in One SEO Plugin not only promotes your content but also enhances your visibility across various platforms. Let’s explore how to set this up seamlessly!
Here’s how you can integrate your social media settings in All in One SEO:
- Go to the AIOSEO Dashboard: Head over to your WordPress dashboard and find the AIOSEO plugin settings.
- Select the Social Media Tab: Under the main settings, you will notice a ‘Social Media’ section. Click on it to open up your options.
- Fill in Your Social Media Profiles: Here, you can add links to your various social media profiles such as Facebook, Twitter, LinkedIn, and Instagram. This helps search engines understand more about your brand identity.
- Enable Open Graph Metadata: Open Graph tags are crucial for optimizing how your content appears when shared on social platforms. Enable this feature to ensure your posts are visually appealing and have a proper description.
- Save Your Changes: Make sure to save your settings once you’ve filled everything out to ensure your social media profiles are linked properly!
With everything set up, your content will not only reach a wider audience but will also look more enticing when shared online. Now, sit back and watch your online presence grow as you engage with your followers across multiple channels!
9. Advanced SEO Options for Users
Once you’ve mastered the basics of the All in One SEO Plugin, you’ll be thrilled to discover the advanced options it offers. These features are designed to give you more control over your site’s SEO performance. So, let’s dive into these advanced settings and see how they can take your SEO strategy to the next level!
1. Custom Post Types
By default, the plugin optimizes posts and pages. However, if you have custom post types on your site, you can enable SEO options for them too. Here’s how:
- Navigate to the All in One SEO menu.
- Choose “Feature Manager” and enable the “Custom Post Types” option.
This lets you add titles, descriptions, and keywords for those specific posts, giving you tailored optimization.
2. XML Sitemap Generation
XML sitemaps help search engines index your pages more efficiently. The All in One SEO plugin automatically generates a sitemap for you. To customize it:
- Go to the “Sitemap” settings under the All in One SEO menu.
- Here, you can choose which post types to include.
This makes it easy for search engines to find and crawl your content!
3. Social Media Integration
Enhancing your social media presence can drive more traffic. The plugin allows you to connect Open Graph and Twitter Card tags to your posts. To set it up:
- Go to the “Social Settings.”
- Input your social media information for better visibility on platforms like Facebook and Twitter.
This will not only improve your SEO but also increase shareability across social networks.
4. SEO Analysis Tool
The built-in SEO analysis tool gives you insights into your posts’ optimizations. Pay attention to the suggestions it provides—it can help you spot opportunities for improvement!
10. Troubleshooting Common Issues
Even the most well-planned websites can run into trouble. When you’re using the All in One SEO Plugin, it’s essential to be aware of common issues that might arise and how to handle them. Don’t worry; troubleshooting is often easier than you think!
1. Plugin Conflicts
If you notice that the plugin isn’t functioning correctly, the first suspect is a conflict with another plugin. To troubleshoot:
- Disable all other plugins temporarily.
- Re-enable them one at a time to identify the culprit.
Once you find the conflicting plugin, you can decide whether to keep one or the other or look for alternatives.
2. Incorrect Meta Data
Sometimes, your page or post’s metadata might not appear as expected in search engines. If this happens:
- Go into the specific post or page and check the All in One SEO meta box settings.
- Ensure you’ve filled in all fields correctly: title, description, and keywords.
Don’t forget to clear your cache if you’re using a caching plugin, as cached versions may not reflect your updates!
3. Sitemap Not Indexing
If your sitemap isn’t getting indexed by search engines, it could also be a configuration issue:
- Head over to the “Sitemap” settings.
- Ensure it is enabled and that there are no restrictions set for search engines.
You may also want to resubmit your sitemap through Google Search Console to prompt a re-crawl.
4. Performance Issues
If your site feels sluggish after installing the plugin, it could be due to various settings. To resolve this:
- Check if you have enabled features you don’t need.
- Disable unused features in the Feature Manager.
Regularly optimizing your site’s performance is vital for both user experience and SEO ranking!
Conclusion and Next Steps
In conclusion, the All in One SEO plugin is an invaluable tool for beginners looking to enhance their website’s search engine optimization. By following the steps outlined in this guide, you have taken significant strides towards better visibility and performance online. Here’s a quick recap of what you’ve learned:
- Installation and Setup: You learned how to install the plugin and configure your basic settings for optimal functioning.
- On-page SEO: You explored how to use the plugin to optimize your titles, meta descriptions, and more for individual posts and pages.
- XML Sitemaps: You discovered the importance of sitemaps for search engines and how to generate one with the plugin.
- Social Media Integration: You understood how to configure the plugin to enhance sharing and visibility on social platforms.
Moving forward, consider the following next steps to further enhance your website’s SEO:
| Next Steps | Action Items |
|---|---|
| Regular Updates | Keep your All in One SEO plugin updated to access the latest features. |
| Content Quality | Focus on creating high-quality, engaging content that addresses user intent. |
| Monitor Performance | Use Google Analytics and Search Console to track your site’s performance. |
| Explore Advanced Features | As you become more comfortable, delve into the advanced settings of the plugin. |
By implementing these strategies, you will not only enhance your site’s SEO but also drive more traffic and increase user engagement. Happy optimizing!


