If you’re looking to make your website’s content more engaging and easier to navigate, the Timeline Plugin on WordPress.org might just be your new best friend. This nifty tool allows you to display your posts, milestones, or events in a visual timeline format, making it super simple for visitors to follow your story or track important updates. Whether you’re showcasing a company’s history, a project’s progress, or personal achievements, a timeline adds a dynamic touch that can boost user engagement and clarity. Plus, it’s pretty easy to set up and customize, even if you’re not a coding expert.
Step-by-Step Guide to Installing the Timeline Plugin on WordPress.org
Getting started with the Timeline Plugin is straightforward. Here’s a simple step-by-step guide to help you install it on your WordPress site:
- Log in to your WordPress Dashboard: Head over to your website’s admin area by entering your URL followed by /wp-admin. Enter your username and password to access the backend.
- Navigate to Plugins > Add New: On the left sidebar, find the “Plugins” menu, then click “Add New” to browse the plugin repository.
- Search for the Timeline Plugin: In the search bar on the top right, type “Timeline” or the specific name if you already know it (e.g., “WP Timeline” or “Cool Timeline”).
- Identify the correct plugin: Look through the search results and find the plugin that suits your needs. Pay attention to ratings, reviews, and last update date to ensure it’s reliable and maintained.
- Click Install Now: Once you’ve found the right plugin, click the “Install Now” button. WordPress will handle the download and installation process automatically.
- Activate the Plugin: After installation, click the “Activate” button to enable the plugin on your site.
- Configure the Plugin Settings: Usually, a new menu or settings page will appear in your dashboard sidebar. Click on it to access the plugin’s options.
- Create Your Timeline: Follow the plugin’s instructions to add your content—this might involve creating new timeline items, selecting display options, or customizing styles.
And that’s it! With these simple steps, your timeline is ready to showcase your content creatively. Don’t forget to preview your site to see how it looks and make any necessary tweaks for the perfect presentation.
3. Configuring the Timeline Plugin for Your Website
Once you’ve installed and activated the Timeline Plugin on your WordPress.org site, it’s time to set it up so it fits seamlessly with your website’s style and needs. Configuration might seem tricky at first, but don’t worry — it’s straightforward and gives you plenty of control over how your timeline looks and functions.
First, head over to the plugin’s settings panel, usually found under your WordPress dashboard menu. Here, you’ll see a variety of options to tweak:
- Timeline Layout: Choose from different layout styles such as vertical, horizontal, or chronological. Think about your content and how you want visitors to experience it.
- Design Settings: Customize colors, fonts, and spacing to match your website’s branding. Some plugins also allow you to add custom CSS if you want more advanced styling.
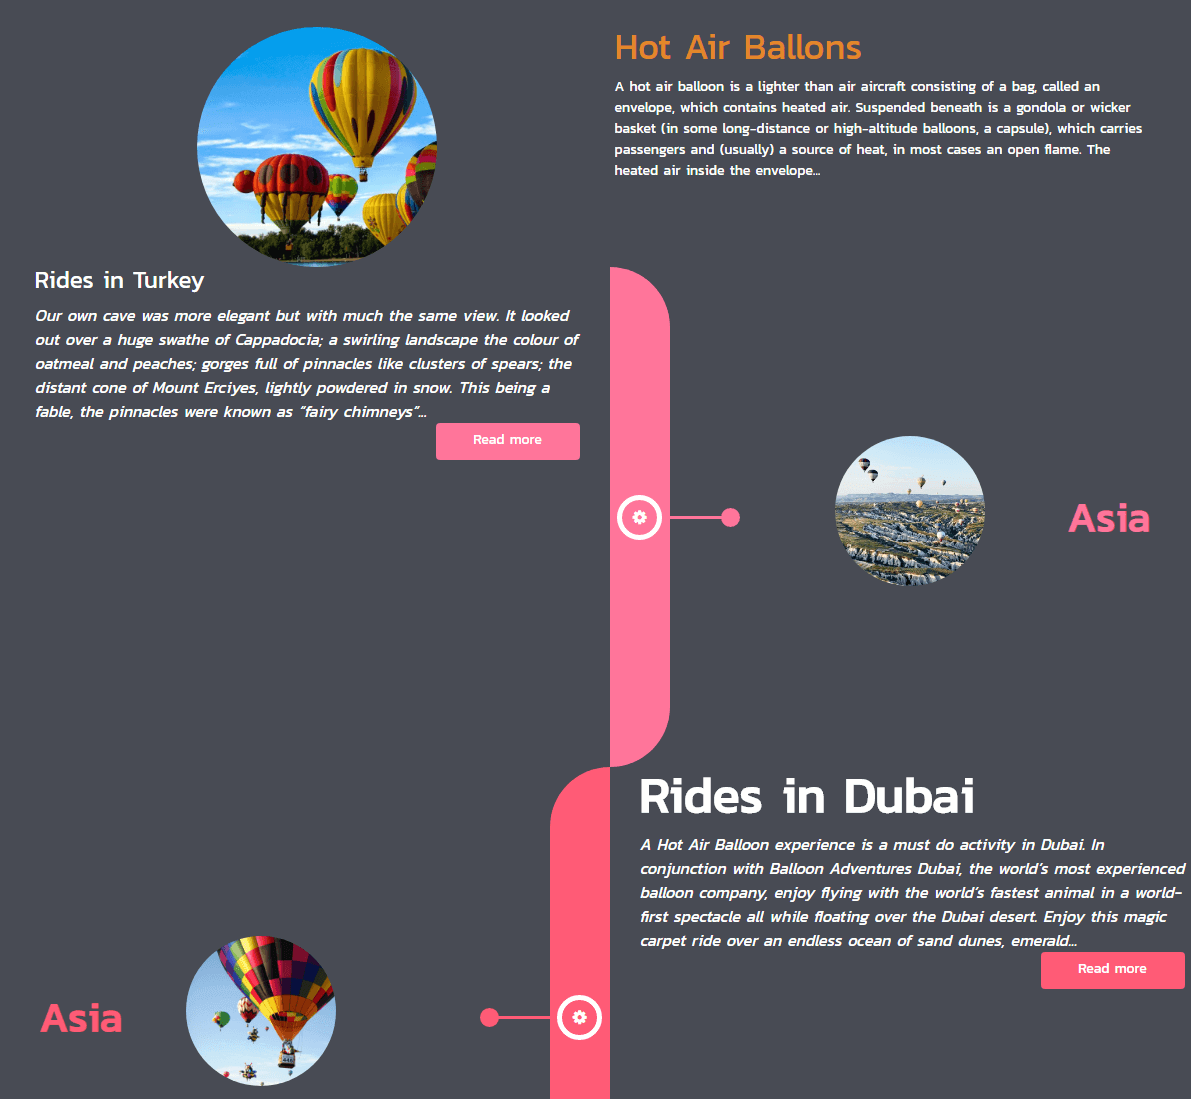
- Display Options: Decide whether to show images, icons, or videos alongside timeline entries. You can also set how many items appear per page or if the timeline should be infinite scrolling.
- Filtering and Sorting: Enable filters so visitors can sort timeline entries by categories or dates, making it easier to find specific content.
- Performance Settings: If your site has lots of timeline entries, enable lazy loading or caching options to keep the page fast and responsive.
Most plugins will have a preview feature, so you can see how your settings look before making everything live. Spend some time experimenting with different configurations to find the perfect balance between aesthetics and usability.
Additionally, check if your plugin supports integrations with other tools or plugins you use, like page builders or SEO plugins. This can make managing your timeline even smoother and more efficient.
Remember, the key is to keep your timeline user-friendly and visually appealing. Don’t be afraid to revisit and tweak your settings as your content grows or your website’s design evolves. A well-configured timeline not only looks great but also enhances your visitors’ experience, guiding them smoothly through your story or history.
4. Adding and Customizing Timeline Content
Now that your plugin is configured, it’s time to start adding content to your timeline. This is where the real fun begins! Whether you’re showcasing company milestones, personal achievements, or a chronological history, adding content is simple and intuitive.
Most timeline plugins provide a dedicated interface within your WordPress dashboard for creating new timeline entries. Here’s a step-by-step guide to get you started:
- Create a New Timeline Entry: Click on the “Add New” button within the plugin’s menu. You’ll see a form where you can input all the details of your timeline item.
- Enter Title and Date: This helps in organizing your timeline chronologically. Use clear titles that quickly tell visitors what each entry is about.
- Add Content: Write a brief description, story, or details related to that particular point in time. Use paragraph tags to break up text and make it easy to read.
- Insert Media: Upload images, videos, or icons to make each entry visually engaging. Many plugins allow you to add media directly within the entry form.
- Choose Category or Tag: If your plugin supports categorization, assign each entry to relevant categories or tags. This helps with filtering and navigation.
- Set Display Options: Decide if this entry should be pinned, highlighted, or styled differently. Some plugins let you customize the appearance on a per-entry basis.
- Publish or Save Draft: Once you’re happy with your entry, publish it immediately or save it as a draft to come back later.
To keep your timeline organized, consider creating a structured approach to adding entries. For example, if you’re building a company timeline, plan out major milestones in advance, then add them in order.
Customizing each timeline item further can involve:
- Changing Colors: Match specific entries with your brand colors or highlight special events.
- Adding Links: Include links to related pages, blog posts, or external resources for more context.
- Using Icons or Images: Enhance visual appeal and make entries easily recognizable at a glance.
As your timeline grows, remember to regularly review and update entries to keep your content fresh and relevant. Well-placed, engaging, and well-organized timeline content can dramatically improve how visitors interact with your site, making your story memorable and easy to follow.
5. Best Practices for Using the Timeline Plugin to Enhance Content Presentation
Using the Timeline plugin can be a game-changer when it comes to presenting your content in a clear and engaging way. But to really make the most of it, there are some best practices you should keep in mind. Think of these as your go-to tips to ensure your timelines look professional, are easy to navigate, and truly serve your content goals.
Start with a Clear Structure: Before diving into creating your timeline, outline what story or information you want to tell. Whether it’s a historical event, project milestones, or your personal journey, having a clear structure helps you organize your content logically.
Use Visual Hierarchies: Break down information into digestible chunks. Use headings, subheadings, and bullet points to highlight key points within each timeline entry. This not only improves readability but also guides your visitors through the content smoothly.
Incorporate Rich Media: One of the strengths of the Timeline plugin is its ability to handle images, videos, and other media. Use relevant visuals to make your timeline more engaging. For instance, add photos to historical events or screenshots for software updates. Just remember to keep media optimized so your page loads quickly.
Be Consistent with Styling: Consistency is key. Stick to a color scheme and font style that matches your website’s overall design. Most timeline plugins allow you to customize styles; use this feature to create a cohesive look.
Prioritize User Experience: Make sure your timeline is easy to navigate. Use clear labels, avoid overcrowding, and consider adding filters or categories if your timeline covers diverse topics. Also, test how it looks on different devices—what looks good on a desktop should also be accessible on mobiles and tablets.
Limit the Amount of Content per Entry: While it’s tempting to include lots of details, remember that shorter, punchier entries tend to keep visitors engaged. If you have extensive information, consider linking to dedicated pages or expanding sections.
By following these best practices, your timeline will not only look great but also serve as an effective storytelling tool that keeps visitors interested and informed. Remember, the goal is to make your content easier to understand and more visually appealing, so your audience sticks around and explores more of what you have to offer.
6. Troubleshooting Common Issues with the Timeline Plugin
Even the best plugins can sometimes run into issues. If you’re experiencing hiccups with the Timeline plugin on your WordPress site, don’t worry—it’s often straightforward to resolve common problems. Here’s a rundown of some typical issues and how to fix them:
1. Timeline Not Displaying Properly
If your timeline isn’t appearing as expected or is missing entirely, check the following:
- Shortcode or Block Placement: Ensure you’ve inserted the correct shortcode or used the proper block (if using the block editor).
- Plugin Activation: Verify that the plugin is activated in your WordPress plugins list.
- Compatibility: Make sure your WordPress version and theme are compatible with the plugin. Update if necessary.
- Conflicting Plugins: Deactivate other plugins temporarily to see if there’s a conflict causing display issues.
2. Styling and Layout Problems
If your timeline looks off—such as overlapping elements, unusual spacing, or broken styles—try these steps:
- Clear Cache: Sometimes, browser or website caching can prevent style updates. Clear your cache and refresh the page.
- Check Custom CSS: If you’ve added custom styles, ensure they aren’t conflicting with the plugin’s styles.
- Use Default Styles: Temporarily revert to default styles to identify if customizations are causing issues.
3. Media Not Loading
If images or videos in your timeline aren’t showing up:
- File Paths: Confirm that media files are uploaded correctly and paths are accurate.
- File Permissions: Ensure your media files have the correct permissions for public access.
- Compatibility: Check if the media format is supported by your browser and WordPress.
4. Performance Issues
If your page loads slowly after adding a timeline:
- Optimize Media: Compress images and videos.
- Limit Content: Avoid overly lengthy timelines with too many entries or media items.
- Use Caching Plugins: Implement caching to improve overall site speed.
5. Getting Help
If you’ve tried troubleshooting but still face issues, consider these options:
- Check Documentation: Review the plugin’s official documentation or FAQs.
- Community Forums: Post your issue in WordPress support forums or the plugin’s support page.
- Update Plugin: Make sure you’re running the latest version of the plugin—it often includes bug fixes.
- Contact Support: Reach out directly to the plugin developer if available.
Remember, most issues are fixable with a bit of patience. Keep your plugins updated, test changes in a staging environment if possible, and don’t hesitate to seek help from the community. Troubleshooting is part of the process, and resolving these issues will help you create a seamless, attractive timeline that enhances your website’s storytelling!
Conclusion and Tips for Maximizing the Plugin’s Potential
Using the Timeline Plugin on WordPress.org can significantly enhance your website’s content presentation, making it more engaging and easier to navigate for visitors. To get the most out of this powerful tool, consider implementing the following tips:
- Plan Your Content Structure: Before creating timelines, outline your content to ensure logical flow and clarity. Group related events or milestones for better storytelling.
- Customize Styles: Take advantage of the plugin’s customization options to match your website’s branding. Adjust colors, fonts, and layout styles for a cohesive look.
- Use Clear Labels and Dates: Ensure that each timeline entry has concise descriptions and accurate dates. This improves readability and informational accuracy.
- Leverage Media: Incorporate images, videos, or icons within timeline entries to make your content more visually appealing and informative.
- Optimize for Mobile Devices: Test your timelines on various devices to ensure responsiveness. A mobile-friendly timeline enhances user experience across all platforms.
| Tip | Benefit |
|---|---|
| Plan Content Structure | Creates logical and engaging timelines |
| Customize Styles | Aligns the timeline with your branding |
| Use Media | Enhances visual appeal and information clarity |
By applying these strategies, you can maximize the capabilities of the Timeline Plugin, delivering a compelling and user-friendly experience that effectively communicates your content story. Regularly updating and refining your timelines will also ensure they remain relevant and impactful over time.