If you’re looking to jazz up your WordPress site with stunning, high-quality images, Pexels is a fantastic resource. Known for its vast library of free stock photos, Pexels offers images that can make your content more engaging and visually appealing. Integrating Pexels directly into WordPress used to involve manual downloads and uploads, which could be quite a hassle. Luckily, with the official Pexels
Benefits of Using the Pexels WordPress Module
Using the Pexels WordPress module comes with a bunch of advantages that can really enhance your website-building experience. Here are some of the key benefits:
- Easy Integration: No more juggling multiple tabs or downloading and uploading images manually. The plugin adds a simple search bar directly in your editor, making it super easy to find the perfect image.
- Access to a Huge Library: Pexels boasts thousands of free, high-resolution images across various categories. With the plugin, you can browse this entire library without leaving your WordPress dashboard.
- Time-Saving: Searching for images, selecting, and inserting them into your posts becomes a quick, streamlined process. This means you can focus more on creating content and less on managing media.
- SEO-Friendly: Since images are pulled directly from Pexels, they are often optimized for web use, which can help your site load faster. Plus, you can add relevant alt text easily to improve accessibility and SEO.
- Free and Legal: All images on Pexels are free to use for commercial and personal projects, with no attribution required—though giving credit is always appreciated. This makes it a safe choice for any website.
- Consistent Visual Quality: The images available are curated for high quality, ensuring your website maintains a professional look without stretching your budget.
All these benefits combine to make the Pexels WordPress module a must-have tool for bloggers, marketers, and website owners who want beautiful visuals without the fuss. The simplicity and efficiency it offers can really elevate your content game, making your site more attractive and engaging for visitors.
3. Step-by-Step Guide to Installing the Pexels Plugin on WordPress
Getting started with the Pexels plugin on your WordPress site is pretty straightforward, but it’s important to follow each step carefully to ensure everything works smoothly. Don’t worry if you’re not super tech-savvy — I’ll walk you through the process!
First things first, log into your WordPress dashboard. Once you’re in, follow these simple steps:
- Navigate to Plugins > Add New.
- In the search bar on the top right, type “Pexels”. Within seconds, you’ll see the plugin appear in the list.
- Look for the plugin titled “Pexels” — it’s usually developed by the official Pexels team or a reputable developer.
- Click the Install Now button next to the plugin.
- Once installed, the button will change to Activate. Click it to activate the plugin on your site.
And that’s it! You’ve now installed and activated the Pexels plugin. To make sure everything is working, you might want to visit the plugin’s settings or look for a new Pexels icon inside your post editor. Don’t worry — the setup is simple, and most plugins will prompt you to connect your Pexels account if needed.
Remember, keeping your plugins updated is key to maintaining security and functionality. So, once installed, check for any available updates and activate them when prompted. That way, you’ll always have the latest features and security patches.
4. How to Search and Insert Pexels Images Using the Module
Now that your plugin is installed and activated, it’s time to start adding those beautiful, high-quality images from Pexels directly into your posts and pages. Here’s how to do it in a simple, step-by-step way:
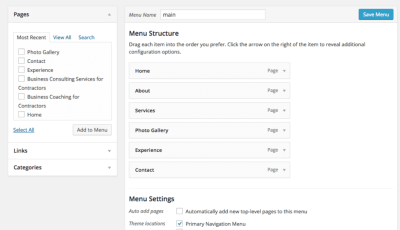
Accessing the Pexels Module
When editing a post or page, you’ll notice a new icon or button in your editor toolbar — usually represented by the Pexels logo or labeled simply as “Add Pexels Image.” Click on it, and a search window will pop up.
Searching for Images
- Type in keywords related to the image you’re looking for — for example, “mountains,” “coffee,” or “cityscape.”
- The module will instantly display a gallery of images that match your search terms, pulled directly from Pexels’ library.
Previewing and Selecting Images
Hover over images to see a larger preview. When you find one you love, click on it to select. You’ll often see options to choose the size of the image (small, medium, large) or to view additional details about the photo.
Inserting the Image into Your Content
Once you’ve selected your perfect image, simply click the Insert or Insert into Post button. The image will then appear directly in your editor at the cursor’s position.
Adjusting the Image
After the image is inserted, you can resize, align, or add captions, just like any other media in WordPress. Most plugins also allow you to insert images with a single click, making your workflow faster and more efficient.
Pro Tips for Using Pexels Images
- Use relevant keywords to find the best images for your content.
- Explore different sizes to optimize page load times without sacrificing quality.
- Always give credit when required — Pexels images are free, but crediting the photographer is appreciated.
And that’s all there is to it! With just a few clicks, you can enhance your website’s visual appeal with stunning, free images from Pexels. Happy uploading!
5. Tips for Optimizing Pexels Images for Your Website
Using beautiful images from Pexels is a great way to make your website visually appealing, but to ensure your site loads quickly and performs well, some optimization is essential. Here are some practical tips to get the most out of your Pexels images:
Choose the Right Image Size
Before uploading or inserting images, think about the dimensions you actually need. Avoid using overly large images that will be scaled down in the browser, as this can slow down your site. Use the Pexels module to select images that are close to your display size, or resize them beforehand using tools like Photoshop, GIMP, or online editors.
Compress Images for Faster Load Times
Even high-quality images can be optimized for web by compressing them without losing too much quality. There are many free and paid tools available, such as TinyPNG, ImageOptim, or WP Smush, which can significantly reduce file sizes. Smaller images mean quicker page loads and a better user experience.
Use Appropriate Image Formats
JPEGs are typically best for photographs, offering a good balance between quality and compression. PNGs are better for images with transparency or sharp edges, like logos. WebP is a modern format that offers excellent compression and quality — consider converting your images to WebP if your website and browser support it.
Implement Lazy Loading
Lazy loading defers the loading of images until they are about to enter the viewport. This technique improves load times, especially on pages with many images. WordPress now supports native lazy loading, but if you’re using a plugin or custom implementation, ensure it’s enabled for Pexels images.
Maintain a Consistent Style
To create a cohesive look, try to select images with similar color schemes or styles. This not only enhances visual appeal but also keeps your branding consistent. The Pexels module makes it easy to find images aligned with your theme or niche.
Optimize Alt Text and Captions
Don’t forget to add descriptive alt text and captions where appropriate. This improves accessibility and SEO, helping search engines understand your images better and making your site more user-friendly.
6. Troubleshooting Common Issues with Pexels Image Integration
Even with the best intentions, you might encounter some hiccups when integrating Pexels images via the WordPress module. Here are common issues and how to resolve them:
Images Not Displaying Properly
- Problem: The image appears broken or shows a placeholder.
- Solution: Double-check that the image URL is correct and that the image exists on Pexels. Refresh your cache, or try re-inserting the image. Also, ensure your website has internet access and that there are no firewall restrictions blocking external images.
Slow Page Loads Due to Large Images
- Problem: Your pages take longer to load after adding images.
- Solution: Use image compression tools to reduce file sizes. Implement lazy loading if not already active. Consider resizing images to the display size before uploading.
Images Not Appearing at All
- Problem: Pexels images do not appear after inserting via the module.
- Solution: Verify that your plugin and WordPress are up to date. Check for plugin conflicts by temporarily disabling other plugins. Clear your browser and website cache to see if that resolves the issue.
Broken Image Links After Theme Change
- Problem: Images break when you switch themes.
- Solution: Some themes handle image paths differently. Re-insert images using the WordPress editor or check if the theme’s media settings need adjustment. Also, ensure that image URLs are absolute and not relative paths that might break with theme changes.
Permission or Access Errors
- Problem: Errors related to permissions or restricted access.
- Solution: Confirm that your website has proper permissions to fetch external content. Ensure your hosting environment allows outbound HTTP requests. If using a security plugin, check that it isn’t blocking external image loads.
By following these tips and troubleshooting steps, you can seamlessly integrate beautiful Pexels images into your WordPress site, creating a visually stunning and efficient website. Don’t forget to regularly review your images and optimize them for the best results!
Additional Resources for Enhancing Your WordPress Image Management
Optimizing your WordPress image management can significantly improve your website’s performance and visual appeal. To help you master this aspect, explore the following resources:
- Official WordPress Documentation: The Media Library Guide provides comprehensive insights into managing images, including uploading, editing, and organizing media files.
- Pexels Plugin Documentation: Visit the Pexels plugin page for detailed instructions, FAQs, and troubleshooting tips to get the most out of your image integrations.
- Image Optimization Plugins: Tools like Smush and EWWW Image Optimizer can reduce image sizes without quality loss, boosting page load times.
- Best Practices for Image SEO: Learn how to optimize image filenames, alt text, and captions to improve search engine rankings. Resources such as Moz’s Image SEO Guide are invaluable.
- Community Forums & Tutorials: Engage with the WordPress community on forums like Support Forums or watch tutorials on platforms like YouTube to see real-world examples and solutions.
Table of Resources Overview:
| Resource Type | Recommended Links |
|---|---|
| Official Documentation | WordPress Media Library |
| Plugins | Pexels Plugin, Smush |
| SEO Resources | Moz Image SEO Guide |
| Community & Support | WordPress Support Forums |
By leveraging these resources, you can significantly enhance your image management workflow, leading to a more efficient, optimized, and visually appealing WordPress website.