If you’re diving into the world of WordPress, you’ve probably noticed how icons make websites look more engaging and user-friendly. From social media icons to custom buttons, icons play a crucial role in modern web design. But have you ever wondered how WordPress manages to add these icons seamlessly? Understanding how icons are integrated into
Overview of CSS and Icon Usage in WordPress
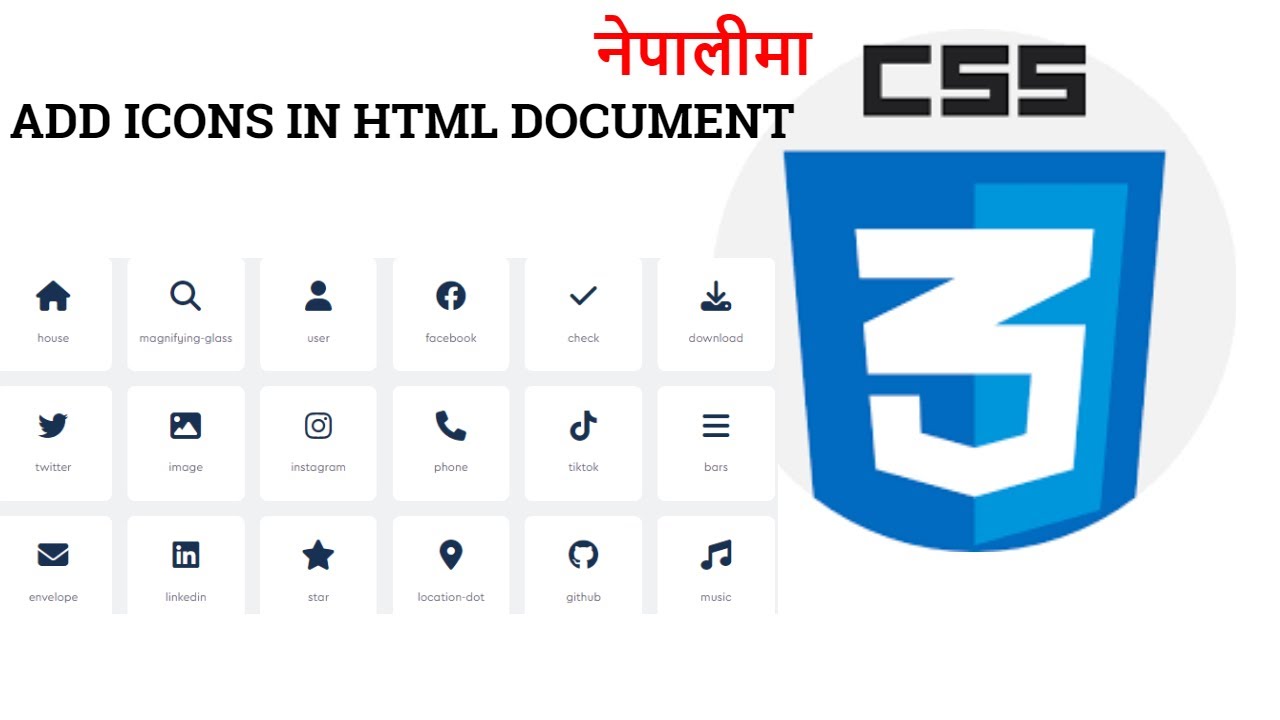
CSS (Cascading Style Sheets) is the secret sauce behind how icons appear on your WordPress site. It controls the visual aspects—size, color, positioning, and more—making sure icons look just right. WordPress leverages CSS in several ways to add icons, often through icon fonts or SVGs (Scalable Vector Graphics). Icon fonts like Font Awesome or Dashicons are popular because they allow you to add scalable, customizable icons with simple HTML classes. These icon fonts are essentially fonts that contain icon glyphs instead of letters or numbers. When you include a specific class in your HTML, CSS displays the corresponding icon. Another method involves using SVG images directly, which are vector graphics that can be styled with CSS too. WordPress themes and plugins often enqueue stylesheets that contain icon font libraries or inline SVGs, making it easy to add icons anywhere on your site. Here’s a quick breakdown:
- Icon Fonts: Use font files like Font Awesome or Dashicons, integrated via CSS classes.
- SVGs: Inline or linked SVG images that can be styled with CSS for color, size, and effects.
- CSS Pseudo-Elements: Use ::before or ::after to insert icons without cluttering your HTML.
In WordPress, theme developers often enqueue icon font stylesheets in functions.php, allowing you to add icons effortlessly through classes in your markup. Understanding this CSS-icon relationship empowers you to customize icons beyond default settings, making your website truly stand out. Whether you’re tweaking icon sizes, colors, or hover effects, CSS gives you the control to craft a visually appealing and user-friendly site.”
3. Step-by-Step Process of Adding Icons in WordPress CSS
So, you want to spice up your WordPress site with some cool icons? Great choice! Icons can really make your website more engaging and easier to navigate. Let’s walk through a simple, step-by-step process to add icons using CSS in your WordPress theme.
Step 1: Choose Your Icon Library
First things first, pick an icon library. Popular options include Font Awesome, Ionicons, or Material Icons. These libraries offer thousands of icons that you can easily embed into your site.
Step 2: Enqueue the Icon Library in WordPress
Next, you need to include the icon library in your theme. Usually, this involves adding a line of code to your functions.php file:
<?phpfunction add_icon_library() { wp_enqueue_style('font-awesome', 'https://cdnjs.cloudflare.com/ajax/libs/font-awesome/6.0.0/css/all.min.css');}add_action('wp_enqueue_scripts', 'add_icon_library');This code loads Font Awesome from a CDN. Make sure to replace the URL if you’re using a different library.
Step 3: Add HTML Markup for Icons
Now, in your theme files or widgets, add the HTML for the icons. For example, with Font Awesome:
<i class="fas fa-camera"></i> You can place this icon anywhere — in menus, headers, or buttons.
Step 4: Style Your Icons with CSS
Finally, customize the look of your icons with CSS. For example:
.icon { font-size: 24px; color: 333; margin-right: 10px;}And then apply the class to your icon markup:
<i class="fas fa-camera icon"></i>This way, all icons with the class .icon will have consistent styling.
Extra Tips:
- Use child themes for customization to avoid losing changes after updates.
- Test your icons on different devices to ensure they look sharp and clear.
- Combine icons with text for clarity — e.g.,
<i class="fas fa-envelope"></i> Contact Us.
And that’s it! Adding icons via CSS in WordPress is straightforward once you get the hang of it. It’s a great way to add some visual flair and improve user experience.
4. Common Methods for Including Icons in WordPress Themes
When it comes to adding icons to your WordPress site, there isn’t just one way to do it. Different methods suit different needs and skill levels. Let’s explore some of the most common approaches so you can pick the best fit for your project.
Method 1: Using Icon Fonts (e.g., Font Awesome, Ionicons)
This is the most popular method. You include an icon font library via CDN or by downloading the files, then insert icons using HTML markup and style them with CSS. The benefits include:
- Wide variety of icons
- Easy to style with CSS
- Scalable without losing quality
However, it can add extra weight to your site if you include large icon libraries you don’t use fully.
Method 2: Embedding SVG Icons
SVG (Scalable Vector Graphics) icons are vector images that you embed directly into your HTML or CSS. This approach offers:
- High-quality visuals that scale perfectly
- Less dependency on external libraries
- More control over styling with CSS
To use SVG icons, you can upload SVG files to your media library and embed them inline or via CSS backgrounds. Just keep in mind that some browsers have security settings around inline SVGs.
Method 3: Using Icon Packs Built into Themes or Plugins
Some WordPress themes or plugins come with built-in icon sets. For example, page builders like Elementor or Beaver Builder often have dedicated icon widgets. The advantages include:
- Easy integration without coding
- Consistent design language
- Less setup time
On the flip side, you’re limited to the icon sets provided by the theme or plugin, which might not include everything you need.
Method 4: Custom Icon Fonts
If you want total control, you can create your own icon font using tools like IcoMoon or Fontello. This way, you only include the icons you need, keeping your site lean and fast.
It involves:
- Selecting your icons
- Generating a custom font
- Enqueueing it in your theme
- Using CSS classes to display icons
It’s a bit more technical but offers the most tailored solution for your design.
Summary Table of Methods
| Method | Ease of Use | Customization | Performance | Best For |
|---|---|---|---|---|
| Icon Fonts | Easy | High | Moderate | General use, wide variety |
| SVG Icons | Moderate | High | High | High-quality visuals, lightweight |
| Built-in Theme/Plugin Icons | Very Easy | Limited | Good | Quick setup, no coding |
| Custom Icon Fonts | Advanced | Very High | Optimized | Unique branding, performance-focused |
Choosing the right method depends on your specific needs, technical comfort level, and how much control you want over your icons. Whether you prefer quick solutions or custom-designed icons, there’s an option out there that fits your project perfectly.
5. Using Icon Fonts and SVGs in WordPress
When it comes to adding icons to your WordPress site, you’ve got a couple of popular options: icon fonts and SVGs. Both serve the purpose of making your website look more professional and visually appealing, but they each have their unique strengths and considerations.
Icon Fonts are fonts that contain icon glyphs instead of traditional letters. Think of them like fonts but with pictures. Popular icon font libraries like Font Awesome, Material Icons, and Ionicons make it super easy to embed icons just by adding a class or an HTML snippet. For example, with Font Awesome, you might add something like <i class="fas fa-camera"></i> to display a camera icon.
One of the main perks of icon fonts is their scalability. They look sharp on any screen resolution because they’re vectors, and you can easily resize them with CSS. Plus, because they’re fonts, you can style them with color, shadows, or animations just like text.
However, icon fonts aren’t without drawbacks. They can add extra load time if you’re loading many icon sets, and they’re not as flexible for complex or custom icons. Also, accessibility can be a concern if not implemented carefully since fonts are not inherently descriptive for screen readers.
SVGs (Scalable Vector Graphics) are another fantastic option. Unlike icon fonts, SVGs are actual image files that describe shapes and paths. They can be embedded inline directly into your HTML, linked as external files, or added via CSS backgrounds. SVGs are highly customizable — you can change colors, animate parts, and even morph shapes with CSS or JavaScript.
Using SVGs in WordPress is straightforward. You can upload SVG files just like images, or embed SVG code directly into posts or templates. Many themes and plugins now support SVG uploads, making it easier to manage them.
One of the biggest advantages of SVGs is their flexibility and accessibility. Since they’re XML-based, they can be styled with CSS, and screen readers can interpret them more effectively if you add proper aria attributes.
In summary:
- Icon Fonts: Easy to implement, scalable, and widely supported. Good for simple icons and quick setups.
- SVGs: Highly customizable, flexible, and better for complex or unique icons. Slightly more setup involved but offers more control.
Whether you choose icon fonts or SVGs depends on your needs, design preferences, and how much customization you want. Many developers even combine both, using icon fonts for standard icons and SVGs for custom or complex graphics.
6. Best Practices for Customizing Icons with CSS
Customizing icons with CSS is a powerful way to ensure they seamlessly fit your website’s style. Here are some best practices to keep in mind so your icons look great and behave consistently across your site:
1. Use CSS Variables for Colors
Instead of hardcoding colors, leverage CSS variables. This makes it easier to update the color scheme site-wide. For example:
:root { --icon-color: 333;}
And then style your icons like this:
.icon { color: var(--icon-color);}
2. Resize with CSS Font-Size or Width/Height
If you’re using icon fonts, adjusting the font-size changes their size. For SVGs, you can set width and height for precise control.
- Icon Font:
.icon { font-size: 24px; } - SVG:
.icon { width: 48px; height: 48px; }
3. Style with CSS Pseudo-Classes
Add hover effects or animations to make icons more interactive. For example:
.icon:hover { color: 0073aa; transform: scale(1.2); transition: all 0.3s ease;}
4. Use CSS Transitions and Animations
Subtle animations can draw attention or add polish:
@keyframes spin { 0% { transform: rotate(0deg); } 100% { transform: rotate(360deg); }}.icon-spin { animation: spin 2s linear infinite;}
5. Accessibility Is Key
Always ensure your icons are accessible. Use aria-hidden="true" for purely decorative icons, or provide descriptive labels with aria-label or aria-labelledby.
Example:
<span class="icon" aria-hidden="true"></span>
6. Keep Consistent Styling
Maintain a consistent style for all icons to create a cohesive look. Use shared classes, variables, and design tokens whenever possible.
7. Test Responsiveness
Make sure icons look good on all devices. Resize your browser or test on different screens to see how icons adapt. Adjust CSS accordingly for mobile or high-DPI displays.
8. Optimize for Performance
If you’re using many SVG icons, consider combining them into a sprite sheet or using inline SVGs to reduce HTTP requests. For icon fonts, only load the icon sets you need to keep load times minimal.
By following these best practices, you’ll ensure your icons not only look fantastic but also contribute positively to the user experience. Remember, small details like icon styling can make a big difference in your website’s overall polish!
7. Troubleshooting Icon Display Issues in WordPress
Encountering problems with icons not showing up as expected? Don’t worry — it’s a common issue, and most of the time, it’s something you can fix with a few simple checks. Let’s walk through some of the most common reasons why icons might not display properly and how to troubleshoot them.
Check Your Font Library or Icon Set
First things first, ensure that the icon font library or icon set you’re using is correctly loaded. If you’re relying on a CDN, verify your link tags or script tags are correctly added to your site. For example, if you’re using Font Awesome, your code should look something like:
<link rel="stylesheet" href="https://cdnjs.cloudflare.com/ajax/libs/font-awesome/6.0.0-beta3/css/all.min.css">If that link is missing or incorrect, icons won’t render. Also, double-check that the version you’re referencing matches the icons you’re trying to display.
Inspect Your CSS and HTML
Next, use your browser’s developer tools (right-click on the icon area and select “Inspect”) to see if the icon element is correctly structured. Look for:
- Correct class names, like
fa-useroricon-home. - Proper font-family declarations in CSS, such as font-family: ‘Font Awesome 5 Free’;.
- No CSS rules hiding the icon with properties like display: none; or opacity: 0;.
If the icon element exists but isn’t visible, it might be a CSS conflict or specificity issue. Try overriding styles temporarily to see if the icon appears.
Verify Font Files and Paths
If you’re hosting icon fonts locally, confirm that the font files are uploaded correctly to your server and that your CSS points to the right path. A typo in the file path can prevent icons from loading. For example:
@font-face { font-family: 'MyIcons'; src: url('/fonts/my-icons.ttf') format('truetype');}Use your browser’s developer tools to check if font files are loading without errors (look for 404 errors). Fix any path issues accordingly.
Resolve CORS and Security Restrictions
If you’re loading fonts or icons from a CDN, ensure there are no CORS (Cross-Origin Resource Sharing) issues. Sometimes, security settings or server configurations block font files from loading. Check your browser console for error messages related to this. If needed, adjust server headers to allow cross-origin requests.
Clear Caches and Regenerate CSS
Especially if you recently made changes, clear your browser cache and any caching plugins on your WordPress site. Additionally, if you’re using a CSS preprocessor or minifier, regenerate your CSS files to ensure your latest styles are applied.
Use Fallbacks and Alternative Methods
If an icon still won’t display, consider using SVG icons or inline images as a fallback. This can be especially helpful if font-based icons are problematic on your setup. Tools like SVG sprites or inline SVG code can ensure your icons are always visible regardless of font issues.
8. Conclusion and Additional Resources for WordPress Icon Integration
Adding icons to your WordPress site can elevate its design and improve user experience — but it comes with its quirks. Understanding how WordPress and CSS work together to display these icons is key to troubleshooting issues and customizing your site effectively. Remember, the main steps involve ensuring your icon library is correctly linked, your HTML structure is sound, and your CSS styles are properly applied.
If you run into issues, don’t forget to leverage browser developer tools—they’re invaluable for diagnosing problems. Also, always keep your icon libraries up to date to benefit from the latest features and fixes.
For further learning, here are some great resources:
- Font Awesome Help Center
- MDN Web Docs on CSS Fonts
- WordPress Support on Using Fonts
- CSS-Tricks Guide to Font Awesome and WordPress
With a bit of patience and some troubleshooting know-how, you’ll be customizing icons on your WordPress site like a pro in no time. Happy icon designing!