If you’ve ever shared a link from your website and noticed how your images appear on social media, you know how important visuals are for engagement. When using WordPress with Elementor, customizing your social images ensures they look great across platforms like Facebook, Twitter, and LinkedIn. But with each platform having its own preferred image sizes, it can get a bit overwhelming. Don’t worry! In this quick guide, we’ll break down the key social image dimensions you need to know to make your content pop and look professional everywhere.
Importance of Proper Social Image Sizes for Your Website
Using the right social image sizes isn’t just about aesthetics—it’s about making sure your content gets noticed and performs well. When images are the correct size, they display perfectly without cropping awkwardly or appearing pixelated, which helps build trust with your audience. Plus, properly optimized images can boost your click-through rates, increase engagement, and improve how your content is shared and viewed across social platforms.
Imagine sharing a blog post with a tiny or stretched-out thumbnail—that’s not very appealing, right? On the other hand, a well-sized, eye-catching image can grab attention instantly. It also helps your website appear more professional and consistent. So, taking a few extra minutes to understand and implement the right social image dimensions can make a big difference in how your content performs and how your brand is perceived online.
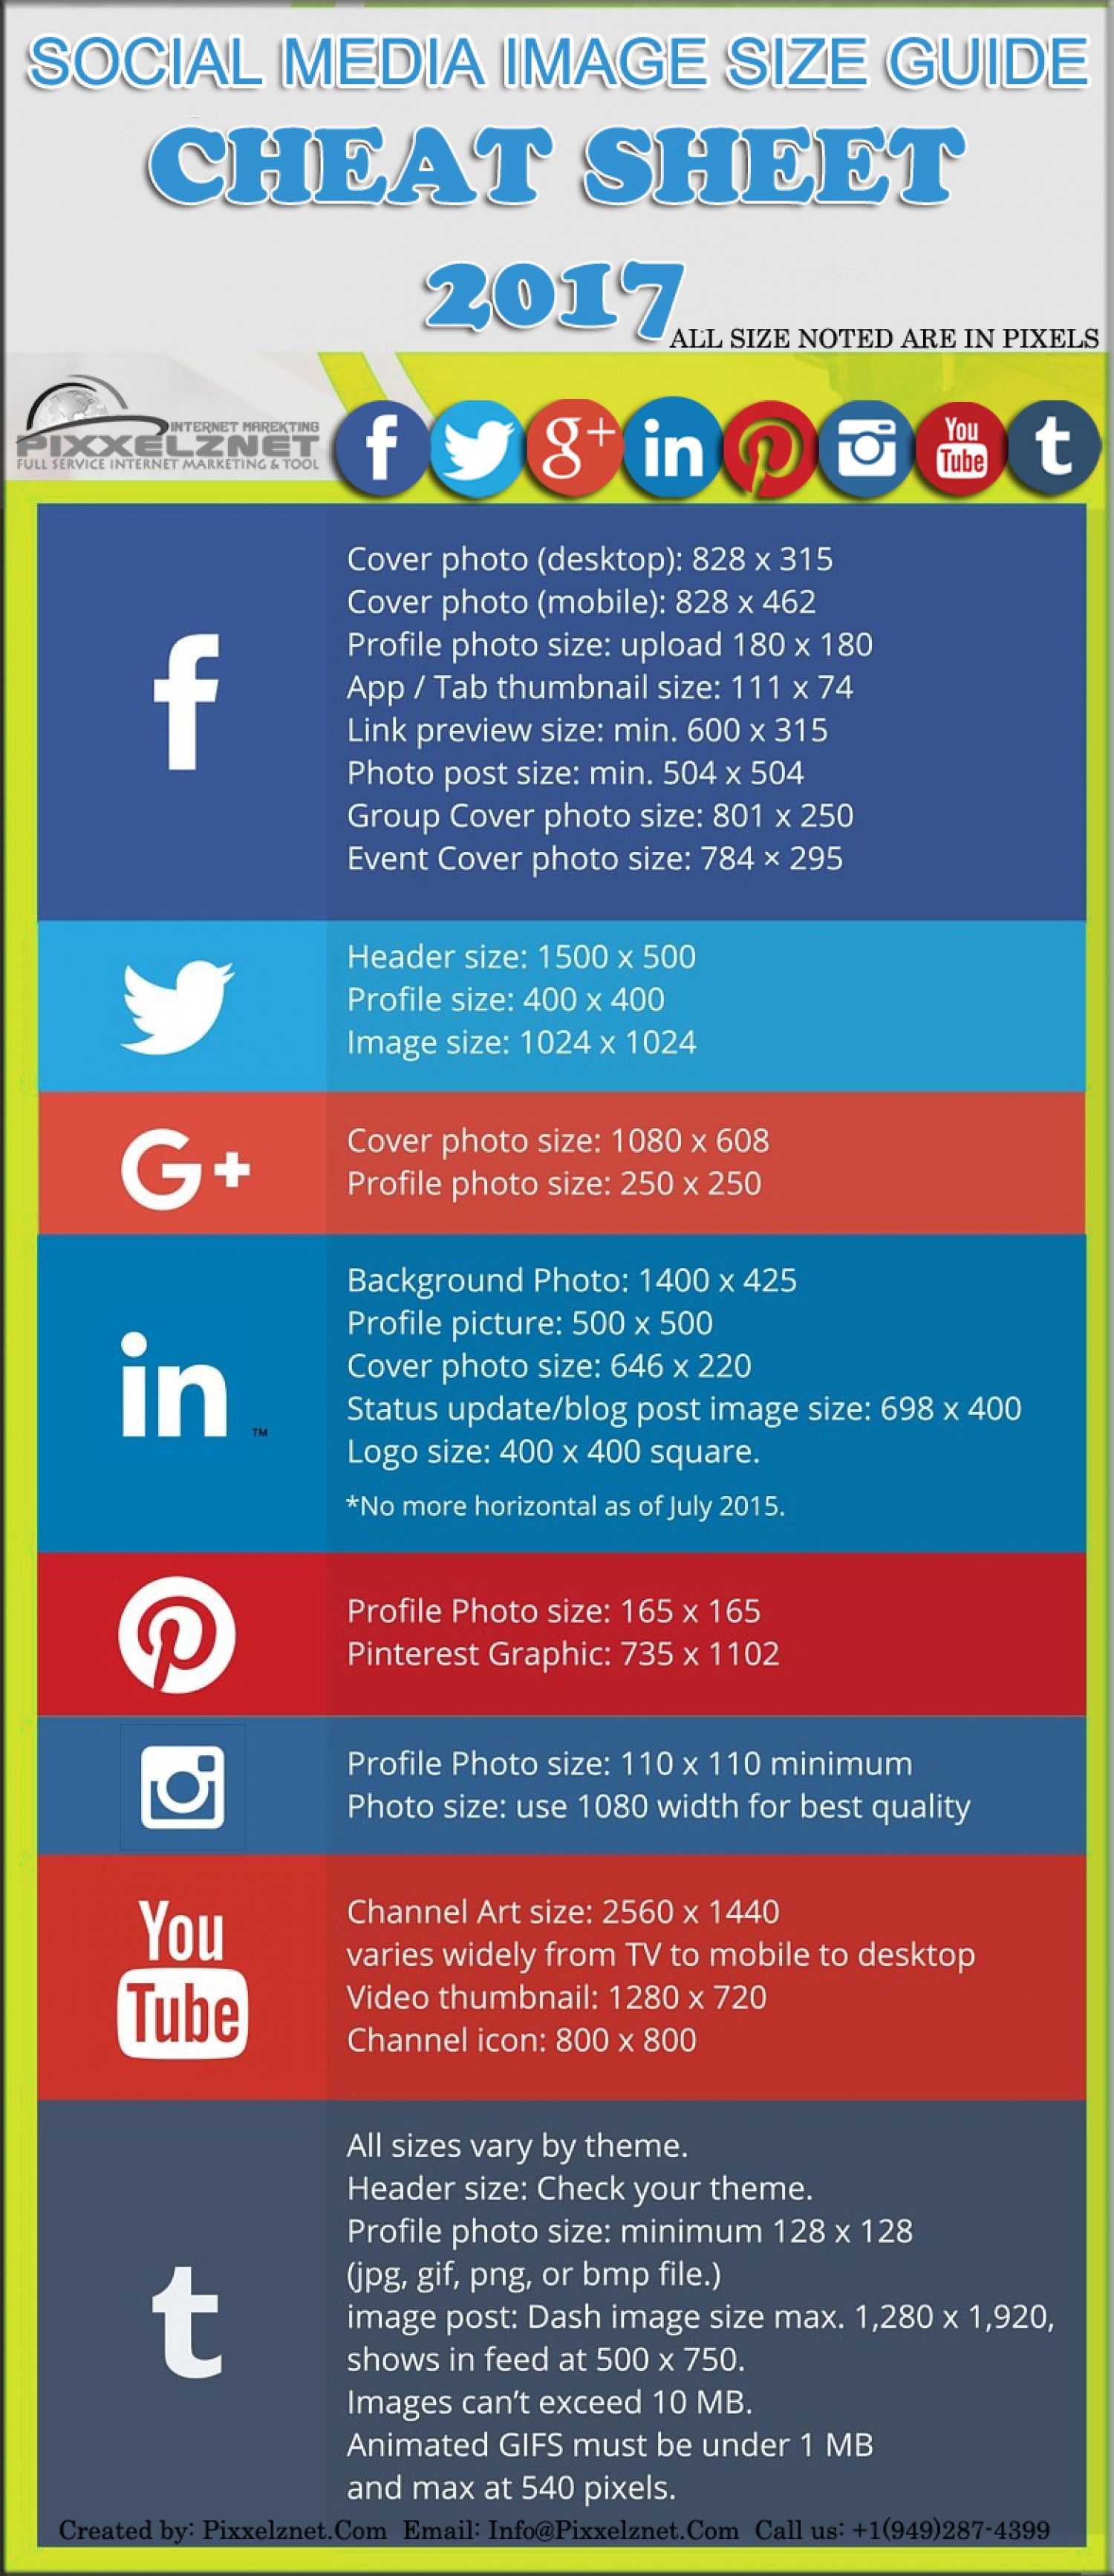
3. Recommended Social Image Dimensions for Popular Platforms
Getting your social images just right can make a huge difference in how your content looks and performs on different platforms. Each social network has its own preferred image sizes to ensure your visuals are sharp, clear, and eye-catching. Let’s walk through some of the most popular platforms and their recommended image dimensions so you can optimize your content effectively.
For Facebook, the goal is to make sure your images display beautifully whether they appear in feeds, shares, or on your page timeline. The recommended size for shared images is:
- 1200 x 630 pixels
This size ensures your images look crisp on both desktop and mobile. When creating a Facebook Open Graph image (used when your content is shared), stick to this size to prevent cropping or pixelation.
Twitter displays images a bit differently, especially with tweets that include images. The recommended dimensions are:
- 1200 x 675 pixels
This aspect ratio (16:9) helps your images appear full-width and sharp in the feed. If you’re using Twitter Cards for rich previews, ensure your images follow these specs for the best presentation.
LinkedIn’s feed favors images that are professional and clear. The optimal size for shared images is:
- 1200 x 627 pixels
This size ensures your visuals look polished when shared in posts or articles. For company pages, maintaining this size helps your branding stay consistent and professional.
Instagram is all about square and vertical images. While the platform supports multiple formats, the most common recommended dimensions are:
- 1080 x 1080 pixels for square posts
- 1080 x 1350 pixels for portrait images
- 1080 x 566 pixels for landscape images
For social previews that get shared outside Instagram, aim for square images at 1080×1080 for consistency.
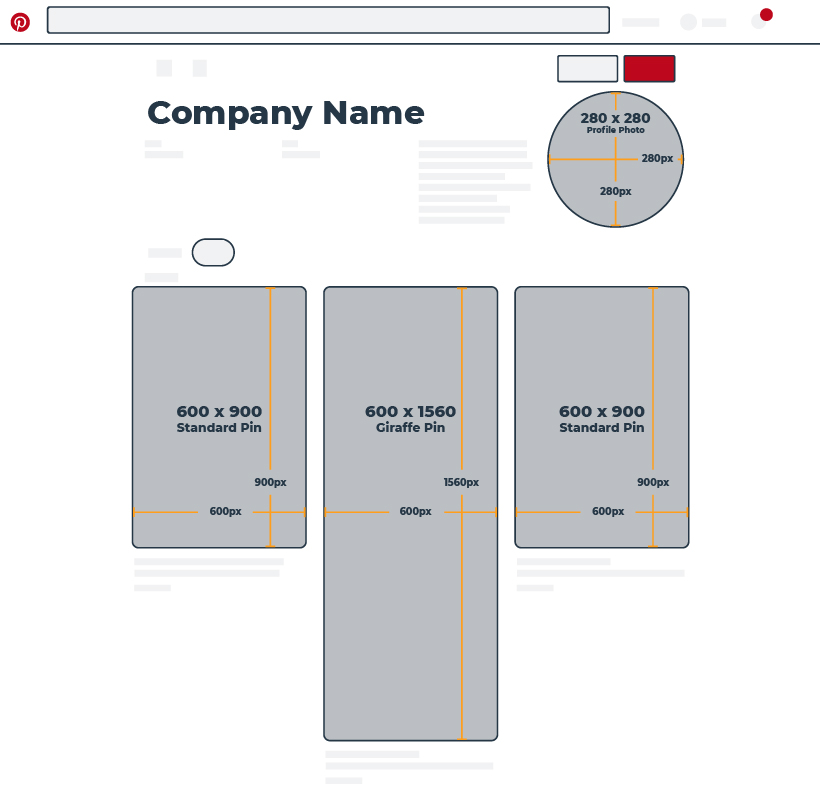
On Pinterest, vertical images perform best. The recommended size is:
- 735 x 1102 pixels
This size helps your pins stand out in feeds and ensures they look great when someone saves or shares your content.
4. How to Set Social Images in WordPress Elementor
Now that you know the ideal dimensions for your social images, the next step is to set them up correctly within your WordPress site using Elementor. Don’t worry — it’s pretty straightforward, and I’ll guide you through the process.
Step 1: Prepare Your Social Images
Before diving into Elementor, make sure your images are optimized:
- Resize images to the recommended dimensions for each platform.
- Compress images to reduce load times without sacrificing quality.
- Use descriptive filenames and include alt text for accessibility and SEO benefits.
Step 2: Access the WordPress Customizer or SEO Plugin
Many SEO plugins like Yoast SEO or Rank Math allow you to set social sharing images globally or per post/page. Alternatively, you can set images directly within Elementor for specific pages or posts.
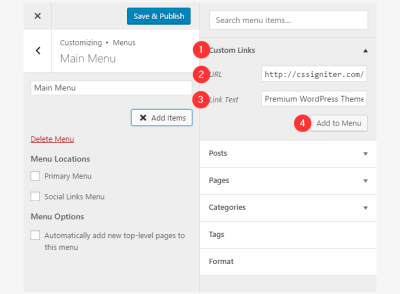
Step 3: Set Social Images in Elementor
- Open the page or post you want to edit with Elementor.
- Click on the Settings icon (bottom left) to access page settings.
- Navigate to the SEO or Social tab, depending on your plugin or theme.
- Look for options like Facebook Open Graph or Twitter Card.
- Upload your prepared social image — make sure it follows the recommended dimensions.
- Save your settings and update the page.
Step 4: Use Elementor Widgets for Custom Social Images
If you want to set custom images for specific sections or articles:
- Use the Image widget to insert your social image into a hero section or featured area.
- In the widget’s settings, upload your optimized image.
- Ensure the image is set to the correct size and alignment for best appearance.
Step 5: Test Your Social Sharing
Once you’ve set your images, it’s a good idea to test how they appear when shared. Use tools like:
- Facebook Sharing Debugger
- Twitter Card Validator
- LinkedIn Post Inspector
These tools fetch your page and show you how your images will look. If something’s off, double-check your image sizes and meta tags.
And there you have it! Setting up your social images properly ensures your content looks professional and enticing across all platforms. With a little planning and the right tools, you can boost engagement and make your WordPress site stand out in social feeds.
5. Tips for Creating Effective Social Media Images
Creating social media images that grab attention and convey your message effectively isn’t just about choosing the right size—it’s also about making your visuals stand out in a crowded feed. Here are some practical tips to help you craft images that resonate with your audience and boost engagement.
Know Your Audience
Start by understanding who your followers are. Are they professionals, young creatives, or a niche community? Tailor your visuals to match their interests, preferences, and the kind of content they engage with most. This makes your images more relatable and likely to get noticed.
Keep It Simple and Clear
When designing social images, less is often more. Use minimal text, bold fonts, and clear visuals to communicate your message quickly. Remember that users scroll fast, so your image should instantly convey what you’re about without requiring them to read a lot.
Use High-Quality Visuals
Blurry or pixelated images can make your brand look unprofessional. Invest in high-resolution photos or graphics, and ensure your images are crisp and well-lit. Tools like Canva or Adobe Spark can help you create professional-looking visuals easily.
Stick to Brand Colors and Fonts
Consistency is key. Use your brand’s color palette and fonts to reinforce your identity. This not only makes your images more recognizable but also helps build trust and familiarity with your audience.
Incorporate a Call-to-Action (CTA)
If your goal is to drive engagement or conversions, include a clear CTA. Whether it’s “Learn More,” “Shop Now,” or “Join Us,” make sure it stands out and is easy to understand. A well-placed CTA can significantly increase your click-through rates.
Test and Analyze
Don’t be afraid to experiment with different styles, colors, and formats. Use analytics to see what types of images perform best, and refine your approach over time. A/B testing can be especially helpful in figuring out what resonates most with your audience.
6. Common Mistakes to Avoid with Social Image Sizes
Even when you’re aiming for the perfect social media image, a few pitfalls can trip you up. Here are some common mistakes to watch out for—and how to avoid them:
Ignoring Platform-Specific Sizes
Each social network has its own ideal image dimensions. Uploading an image that’s not optimized for the platform can lead to awkward cropping, blurry visuals, or missing content. Always double-check the recommended sizes before posting.
Using Low-Resolution Images
Nothing kills engagement faster than a pixelated or blurry image. Always use high-quality visuals. If you’re resizing images, do so carefully to maintain clarity and sharpness.
Overloading with Text or Clutter
Too much text or busy visuals can overwhelm viewers. Keep your images clean, with a clear focal point. Use white space effectively to make your message stand out.
Neglecting Mobile Optimization
Most social media users access platforms via smartphones. An image that looks great on a desktop might be unreadable or awkward on a phone. Test your visuals on different devices to ensure they look good everywhere.
Forgetting Consistency
Inconsistent visuals can confuse your audience. Stick to your brand colors, fonts, and style to build a cohesive look across all your posts. This helps in establishing a strong brand identity.
Not Including Branding Elements
Make sure your logo or brand name is visible on your images when appropriate. This increases brand recognition and prevents others from using your visuals without credit.
Skipping Testing and Analytics
Don’t assume your images are working just because they look good to you. Use analytics to track performance, and adjust your strategy accordingly. Continuous improvement is key to social media success.
Conclusion and Additional Resources for Optimizing Social Media Images
Optimizing social media images is essential for maximizing your online presence and engagement. By understanding the recommended dimensions for various platforms, you can ensure your visuals appear professional and eye-catching. Remember, using the correct sizes helps prevent cropping issues and maintains your brand consistency across channels.
To recap, here are some key points:
- Always verify platform-specific image sizes before uploading.
- Use high-resolution images to ensure clarity on all devices.
- Maintain aspect ratios to avoid distortion.
- Leverage tools and plugins like WordPress plugins or image resize tools to streamline the process.
For further learning, explore these helpful resources:
| Resource | Description | Link |
|---|---|---|
| Canva Design School | Guides on creating optimized social media images | https://www.canva.com/learn/social-media-image-size-guides/ |
| Facebook Business Help Center | Official image size recommendations for Facebook | https://www.facebook.com/business/help/980593475366490 |
| Social Media Examiner | Expert tips on social media image optimization | https://www.socialmediaexaminer.com/social-media-image-size-guide/ |
By applying these best practices and utilizing available resources, you’ll enhance your social media strategy and create visually compelling content that resonates with your audience.