If you’re thinking about creating a website or a blog, you’ve probably heard of WordPress. It’s one of the most popular content management systems out there, powering over 40% of websites on the internet! WordPress is loved for its ease of use, flexibility, and tons of free themes and plugins that let you customize your site just the way you want. Whether you’re a beginner or a seasoned developer,
Step 1: Downloading WordPress from the Official Website
Getting started with WordPress is simple, and the first step is downloading the software from the official site. Head over to wordpress.org/download/. Here, you’ll find the latest version available for free. It’s super important to always download WordPress from the official source to ensure you’re getting a secure, clean copy.
Once you’re on the page, look for the big green button that says Download WordPress. Click on it, and the download will start automatically. The file will come as a compressed ZIP folder, usually named something like wordpress-x.x.x.zip, where x.x.x is the version number. After downloading, save the file to a location on your computer where you can easily find it later.
Before you proceed to install WordPress, make sure you have a few things ready:
- Web hosting account — where your website will live
- Domain name — your website’s address (like www.yourwebsite.com)
- Database details — MySQL or MariaDB info for connecting WordPress to your database
Once you’ve downloaded the ZIP file, the next steps involve extracting it and uploading it to your server, but for now, just make sure you’ve got the latest version safely saved on your computer. That’s it for this step—easy, right? Now, you’re ready to move on to setting up your server environment to host your new WordPress site.
Step 2: Preparing Your Server for WordPress Installation
Now that you have your server ready, it’s time to get it all set up for WordPress. Think of this step as preparing the perfect foundation for a house—you want everything to be solid and in place before you start building. Don’t worry; it’s simpler than it sounds!
First things first, ensure your server meets the minimum requirements for WordPress:
- PHP version: 7.4 or greater
- MySQL version: 5.6 or greater OR MariaDB version 10.1 or greater
- Web server: Apache or Nginx (most servers support these)
If you’re unsure about your server’s specifications, check with your hosting provider or look into your server control panel. Most hosting services offer easy tools to review this info.
Setting Up a Database
WordPress needs a database to store all your content, settings, and users. Here’s how you can create one:
- Log into your hosting control panel (like cPanel or Plesk).
- Find the section labeled Databases and click on MySQL Databases.
- Create a new database—give it a friendly name.
- Create a new MySQL user and assign a strong password.
- Grant this user full privileges to the database you just created.
Keep a note of the database name, username, and password—you’ll need these during the installation.
Configuring Your Server for WordPress
Depending on your server setup, you might want to tweak a few settings:
- Enable PHP extensions: Make sure extensions like GD, cURL, and OpenSSL are enabled.
- Adjust PHP limits: Increase max_execution_time, memory_limit, and upload_max_filesize if you plan to upload large files or plugins.
- Configure your web server: If you’re using Nginx, set up the right server blocks. For Apache, ensure the .htaccess file is writable.
If all this sounds a bit technical, don’t worry—most hosting providers offer one-click WordPress installers or detailed guides to make this process even easier.
Step 3: Uploading WordPress Files to Your Server
With your server prepped, it’s time to get the WordPress files onto your server so you can start installing. Think of this step as moving into your new home—you’re bringing in all the furniture and essentials.
Downloading WordPress
First, grab the latest version of WordPress from the official website:
- Visit wordpress.org/download/
- Click the Download WordPress button
- Save the ZIP file to your computer
Extracting Files
Once downloaded, extract the ZIP archive. You’ll get a folder named wordpress containing all the files you need.
Uploading Files to Your Server
You have a couple of options here:
- Using an FTP client: This is the most common method. Popular FTP programs include FileZilla, Cyberduck, and WinSCP.
- Using your hosting control panel: Many hosts provide a file manager with drag-and-drop features.
Using an FTP Client
Here’s a quick rundown:
- Open your FTP client and connect using your server’s FTP address, username, and password.
- Navigate to the root directory of your website—often called public_html or www.
- Upload all the files and folders from the extracted wordpress folder into this root directory.
Using Your Hosting File Manager
If you prefer a more straightforward approach:
- Log into your hosting control panel.
- Open the File Manager.
- Navigate to the root directory (like public_html).
- Upload the ZIP file you downloaded.
- Use the extract option to unpack the ZIP directly in the directory.
Final Checks
After uploading, ensure that all files are in place and permissions are correct. Usually, default permissions work fine, but if you run into issues, your hosting provider can help you set them up properly.
And that’s it for this step! Once your files are uploaded, you’re ready to proceed with the final step—configuring your WordPress installation through the web interface.
5. Step 4: Creating a Database for WordPress
Alright, so now that you’ve got your server ready and the WordPress files downloaded, it’s time to set up a database. Think of the database as the storage room where all your website’s content, settings, and posts will live. Without it, WordPress doesn’t have a place to keep everything organized. Don’t worry — creating a database is simpler than it sounds, especially if you follow these steps.
Most hosting providers include a control panel like cPanel or Plesk, which makes database creation straightforward. Here’s a quick overview of how to do it:
- Log into your hosting control panel: Use your username and password provided by your hosting company.
- Locate the Database section: Find options like “MySQL Databases” or “Databases.” Usually, it’s easy to spot on the main dashboard.
- Create a new database: Click on the button that says “Create Database” or similar. Give your database a memorable name — something related to your site makes sense, like mywebsite_db.
- Create a database user: You’ll need a username and password for the database. Make sure to choose a strong password to keep things secure. Some hosts generate one automatically for you.
- Assign user to the database: Link the new user with your database, granting all privileges — this allows WordPress to read, write, and manage data in your database.
Once you’ve completed these steps, write down the database name, username, and password — you’ll need this info in the next step when running the WordPress installer. Remember, never share your database credentials with anyone, and keep them in a safe place.
6. Step 5: Running the WordPress Installation Script
Now for the exciting part — actually installing WordPress! With your files uploaded and your database set up, you’re ready to bring your website to life. To do this, just point your browser to your domain or server URL where you uploaded WordPress files. The installation process kicks off automatically.
Here’s what happens next:
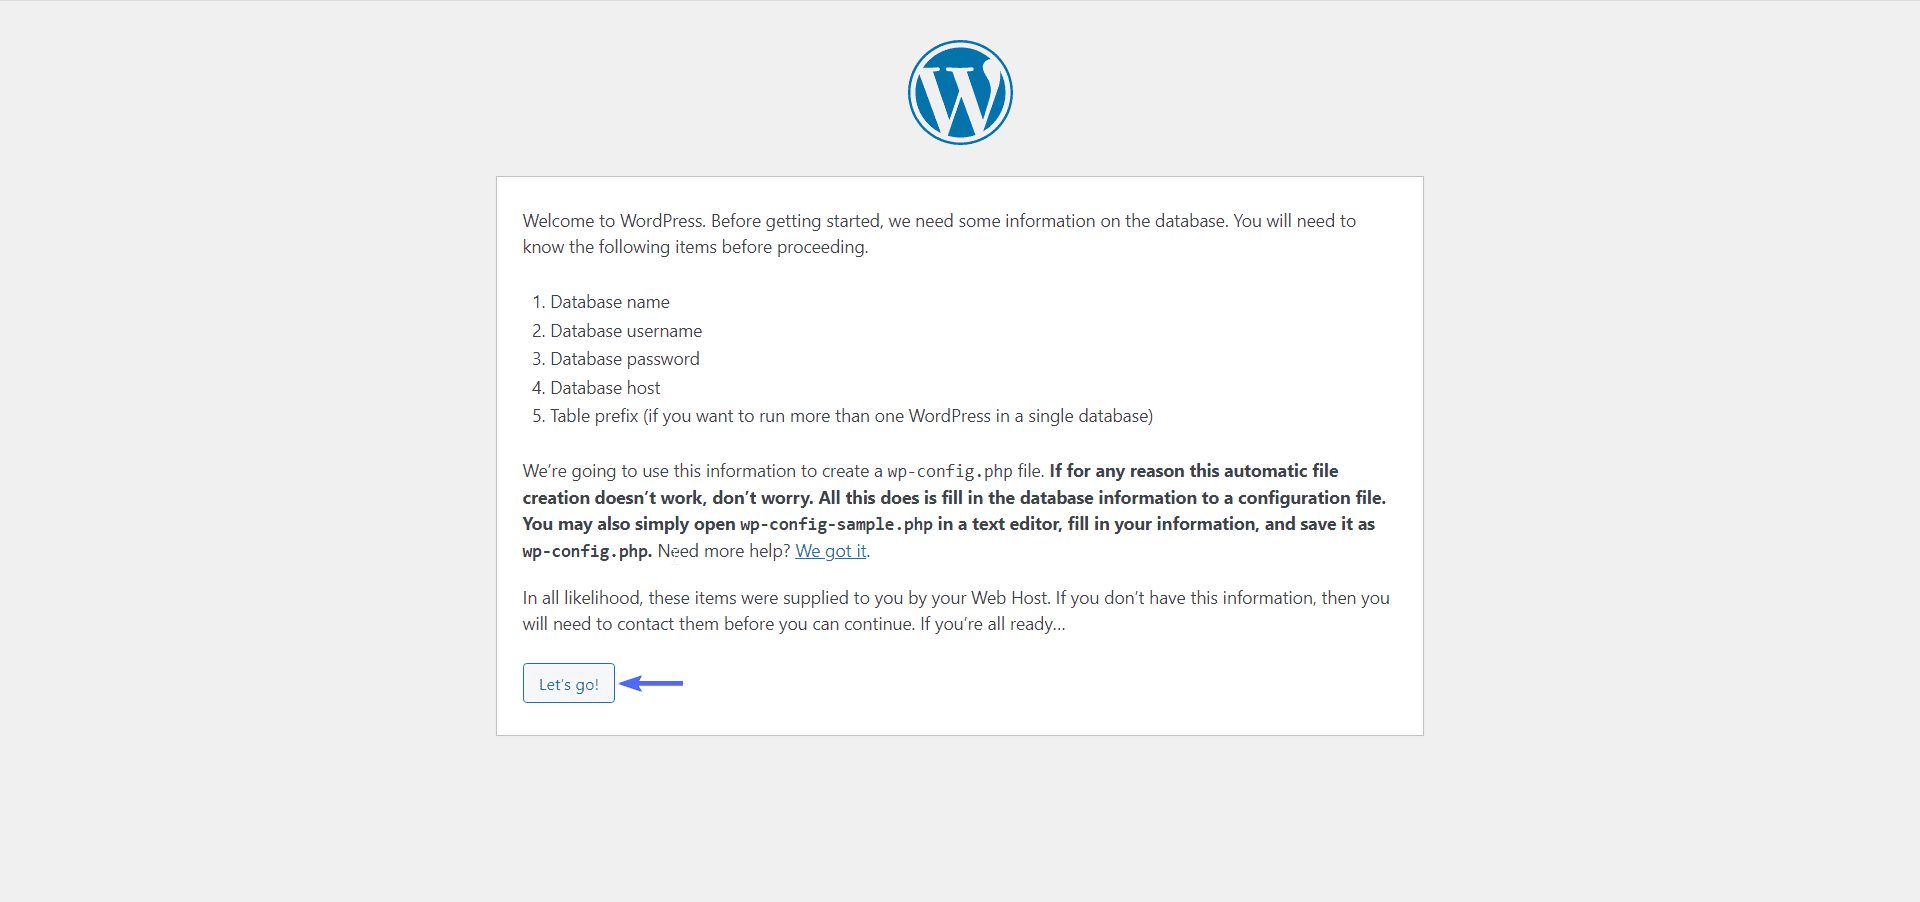
- Opening the installer: When you visit your site’s URL, you’ll see a welcome screen that says “Let’s go!” or similar. If not, double-check that you uploaded files to the correct directory.
- Choosing your language: Select your preferred language and click “Continue.”
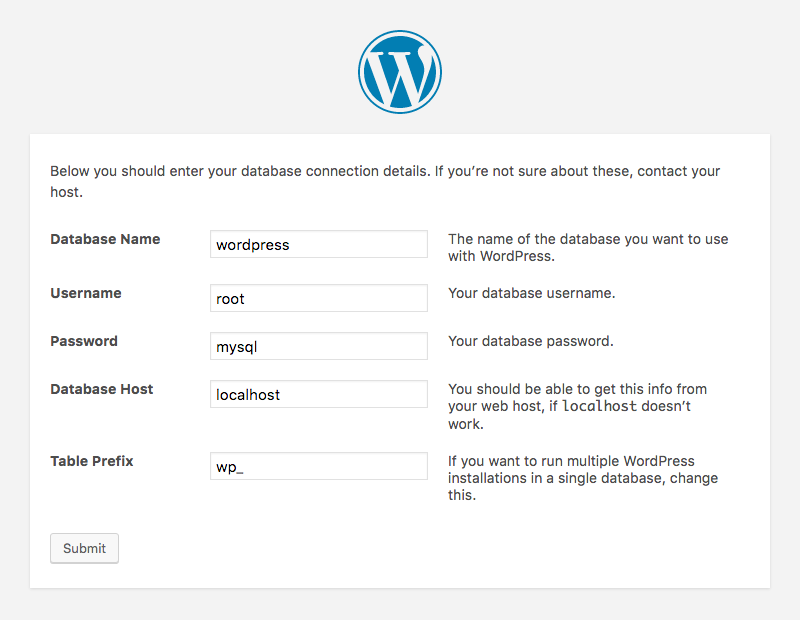
- Entering database details: You’ll be prompted to input your database name, username, password, and database host (usually “localhost”). Enter the info you saved earlier. Don’t worry — if you made a typo, the installer will let you know.
- Running the installation: After submitting your database info, WordPress will connect to your database and set up the necessary tables. If everything checks out, you’ll see a success message.
- Site configuration: Next, you’ll be asked to enter your site title, create your admin username, password, and provide your email address. Make sure to choose a strong password for security.
- Completing the setup: Once you fill out all the info, click “Install WordPress.” Within moments, you’ll get a success message and a login link.
That’s it! You’ve successfully installed WordPress on your server. Now, just log in with your admin username and password, and you’re ready to start customizing your website, adding content, and exploring all the features WordPress has to offer.
7. Tips for a Successful WordPress Setup
Getting your WordPress site up and running smoothly isn’t just about the installation; it’s about setting a solid foundation. Here are some practical tips to ensure your WordPress setup is successful and ready to grow.
Choose the Right Hosting Provider
Your hosting provider plays a crucial role in your website’s performance and security. Look for hosts that are optimized for WordPress, offer good uptime, and have excellent customer support. Managed WordPress hosting options like Bluehost, SiteGround, or WP Engine can make your life much easier, especially if you’re just starting out.
Update Everything
Right after installation, check for updates on WordPress core, themes, and plugins. Keeping everything up to date not only introduces new features but also patches security vulnerabilities. Remember, outdated software is a common target for hackers.
Install Essential Plugins
Plugins extend your website’s functionality. Start with the basics such as:
- SEO plugin (like Yoast SEO or Rank Math) to help your site rank better in search engines.
- Security plugin (like Wordfence or Sucuri) to keep your site safe from threats.
- Backup plugin (like UpdraftPlus) to ensure you can restore your site if anything goes wrong.
- Cache plugin (like W3 Total Cache or WP Super Cache) to improve your site’s speed.
Configure Permalinks
Go to your WordPress dashboard, navigate to Settings > Permalinks, and choose a SEO-friendly URL structure, such as “Post name”. This makes your URLs clean and easy to read, which benefits both visitors and search engines.
Set Up Basic Security Measures
Security should never be an afterthought. Use strong, unique passwords for your admin accounts, enable two-factor authentication if available, and limit login attempts. Also, consider setting up SSL (HTTPS) — many hosting providers offer free SSL certificates, and it’s essential for encrypting data and building trust with your visitors.
Test Your Site
Before going live, test your website on different devices and browsers. Check loading speeds, links, forms, and images. Tools like Google PageSpeed Insights or GTmetrix can help identify areas for improvement.
Plan for Content & Growth
Think about your content strategy early. Set up a content calendar, categorize your posts, and create essential pages like About, Contact, and Privacy Policy. This planning will save you headaches later and help your site grow organically.
8. Conclusion and Next Steps After Installing WordPress
Congratulations! You’ve successfully installed WordPress and laid the groundwork for your website. But the journey doesn’t end here — in fact, it’s just beginning.
Start Creating Content
Now that your site is live, focus on producing valuable content that resonates with your target audience. Whether it’s blog posts, videos, or images, quality content keeps visitors engaged and encourages them to return.
Customize Your Design
Choose a theme that matches your brand and customize it to suit your style. Many themes offer easy-to-use options for colors, fonts, and layouts, so you don’t need to be a coding wizard.
Optimize for Search Engines
Implement SEO best practices: use relevant keywords, optimize meta descriptions, and create descriptive alt text for images. Over time, these efforts help your site rank higher in search results, bringing in more traffic.
Build Your Audience
Leverage social media, email marketing, and networking to grow your community. Engage with your visitors through comments and feedback, creating a loyal following.
Monitor and Maintain Your Website
Regular updates, backups, and security scans are essential. Use analytics tools like Google Analytics to track your performance and understand your visitors better. This data guides your future content and marketing strategies.
Explore Advanced Features
As you get comfortable, consider adding eCommerce capabilities with WooCommerce, integrating forms with plugins like Contact Form 7, or setting up multilingual support with plugins like WPML. The possibilities are endless!
Remember, building a successful website is an ongoing process. Stay curious, keep learning, and don’t hesitate to seek help from online communities or professional developers if you need it. Happy website building!
