If you’re diving into WordPress development, you’ve probably come across the term “hooks” a few times. But what exactly are they, and why are they so important? Think of hooks as the way WordPress allows you to insert, modify, or extend its core functionality without changing the core code itself. This means you can add your own custom features or tweak existing ones seamlessly. Whether you’re customizing themes, creating plugins, or just trying to make your site more dynamic, understanding hooks is essential. They give you the power to interact with
Understanding Actions and Filters in WordPress

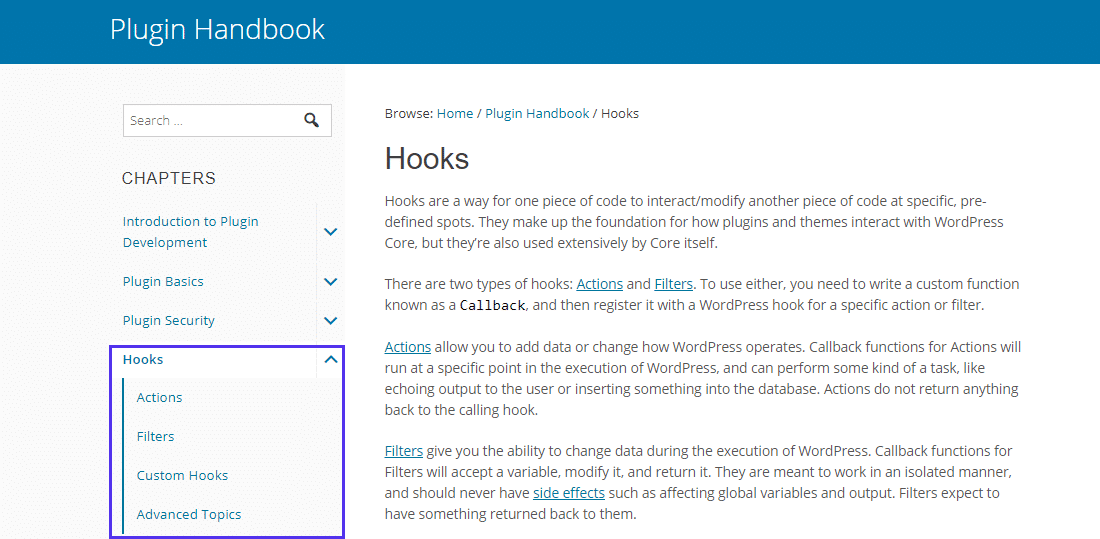
In the world of WordPress, hooks are broadly categorized into two types: Actions and Filters. Both serve different purposes but work together to give you control over your site’s output and behavior.
Actions are all about executing code at specific points during WordPress‘s execution. They allow you to perform tasks, like adding content, enqueueing scripts, or modifying database entries. For example, if you want to output some custom content right after the main content of your posts, you’d use an action hook.
Filters are used to modify data before it’s displayed or saved. They let you change things like post titles, content, or even URLs. Think of filters as the gatekeepers that can tweak data passing through them, giving you a chance to customize how things appear or behave.
Here’s a quick comparison:
| Feature | Actions | Filters |
|---|---|---|
| Purpose | Perform tasks at specific points | Modify data before output or save |
| Use case | Adding custom content, scripts, or performing operations | Changing post titles, content, or URLs |
| Example | Outputting extra content after main content | Appending text to post content |
When you want to output content after the main content, you’ll typically use an action hook. Understanding when and how to use actions versus filters empowers you to craft a site that’s tailored exactly to your needs. Stay tuned, because mastering these hooks will unlock a whole new level of customization for your WordPress projects!
3. How to Add Content After Main Content Using Hooks

So, you’ve got your WordPress site set up and you’re looking to add some extra content right after your main post or page content. Maybe you want to include a call-to-action, an advertisement, or some custom message — all without editing your theme files directly. This is where WordPress hooks come in handy!
Hooks are like little points in your theme where you can ‘hook into’ and insert your own code. Specifically, to add content after the main content, you’ll want to tap into a hook that’s executed at that point. Typically, themes provide actions like the_content, or sometimes custom hooks are available, depending on your theme.
Here’s the simple process:
- Identify the hook available in your theme for adding content after the main content.
- Create a custom function that outputs your desired content.
- Attach your function to the hook using
add_action().
For example, if your theme uses the_content filter, you might use the_content to append your content. Alternatively, some themes have a custom hook like after_main_content. If you’re unsure, check your theme’s template files or documentation.
Here’s a quick example of adding content after the main content using the the_content filter:
function add_custom_content_after_main($content) { if (is_single()) { // Only on single post pages $extra = '<div class="my-custom-section">Thank you for reading! </div>'; return $content . $extra; } return $content;}add_filter('the_content', 'add_custom_content_after_main');This code appends a “Thank you for reading!” message directly after your post content. Remember, filters like the_content modify the content before it gets displayed, giving you a flexible way to add anything you’d like.
If your theme provides a specific hook, such as do_action('after_main_content'), then you can simply add your function like this:
function my_custom_output() { echo '<div class="custom-message">Here's some extra info after the main content!</div>';}add_action('after_main_content', 'my_custom_output');Just make sure that your theme actually calls that hook in the appropriate place. If not, you might need to edit the theme files or stick with filters like the_content.
In summary, using hooks is a flexible way to insert content after the main content without hacking your theme files. Just identify the right hook, write your function, and attach it with add_action(). Easy peasy!
4. Practical Examples of Using Hooks to Output Content After Main Content
Now, let’s get practical! Here are some real-world examples of how you can use WordPress hooks to display content after your main post or page content. These snippets can be customized to fit your needs, whether you’re adding a simple message, an email signup form, or even a product advertisement.
Example 1: Adding a Call-to-Action (CTA) Box
Suppose you want to encourage readers to subscribe to your newsletter right after each post. Here’s how you can do it:
function add_newsletter_cta() { echo '<div class="newsletter-cta">'; echo '<h2>Subscribe to Our Newsletter!</h2>'; echo '<p>Stay updated with the latest posts and offers.</p>'; echo '<form method="post" action="/subscribe">'; echo '<input type="email" name="email" placeholder="Your email address" required />'; echo '<button type="submit">Subscribe</button>'; echo '</form>'; echo '</div>';}add_action('after_main_content', 'add_newsletter_cta');This code creates a simple subscription box that appears right after your post content, encouraging engagement.
Example 2: Displaying Related Posts
Want to keep visitors on your site longer? Show related posts at the end of your content:
function display_related_posts() { // Basic example, you'd typically query related posts dynamically echo '<div class="related-posts">'; echo '<h3>Related Posts</h3>'; echo '<ul>'; echo '<li><a href="/post-1">Post 1 Title</a></li>'; echo '<li><a href="/post-2">Post 2 Title</a></li>'; echo '<li><a href="/post-3">Post 3 Title</a></li>'; echo '</ul>'; echo '</div>';}add_action('after_main_content', 'display_related_posts');For a more dynamic approach, you’d write a custom query to fetch related posts based on categories or tags.
Example 3: Inserting an Advertisement Banner
If you’re monetizing your site, placing ads after your content can boost visibility:
function insert_advertisement() { echo '<div class="ad-banner">'; echo '<!-- Replace with your ad code or image -->'; echo '<img src="/path-to-your-ad.jpg" alt="Advertisement" />'; echo '</div>';}add_action('after_main_content', 'insert_advertisement');This way, you can monetize your content seamlessly without disrupting the user experience.
Important Tips:
- Check your theme: Not all themes have a predefined hook like
after_main_content. If yours doesn’t, usethe_contentfilter or consider editing your theme files carefully. - Keep it lightweight: Avoid adding heavy scripts or large images directly in these hooks to ensure your site loads fast.
- Test thoroughly: Always preview your changes to see how they look across different devices and ensure they don’t interfere with your site’s layout.
Using hooks creatively allows you to enhance your site’s functionality and user experience without messing with core theme files. Whether it’s a simple message or a complex widget, hooks make it easy to keep your content fresh and engaging!
5. Best Practices for Using Hooks to Modify WordPress Content
Using hooks effectively in WordPress can really level up your website customization game. But to get the most out of them—and avoid headaches—it’s good to follow some best practices. Think of hooks as your tools to gently insert or modify content without messing up the core code. Here are some tips to keep your hook usage clean, safe, and efficient:
Follow the Hierarchy and Priority
When adding actions or filters, pay attention to the priority parameter. It controls the order in which multiple functions run. For example, if you want your content to appear after most other modifications, set a higher priority number like 20 or 30. Conversely, if you want your hook to run early, use a lower number like 5. This helps prevent your code from unintentionally overwriting or conflicting with other functions.
Use Child Themes or Custom Plugins
Never edit core theme or plugin files directly. Instead, create a child theme or a custom plugin to add your hooks. This way, your changes won’t be lost during updates, and your site stays maintainable. It’s a safer, cleaner approach to customizing WordPress.
Write Clear, Descriptive Function Names
When defining functions hooked into WordPress, choose names that clearly describe what they do. For example, add_after_main_content is more understandable than a vague name like my_function. This practice makes debugging and future updates easier.
Keep Your Hook Functions Focused
Each function should do one thing well. If your function is trying to do too much—like outputting content and modifying styles—it can become complicated to troubleshoot. Break complex tasks into smaller, manageable functions and hook them separately.
Test Extensively
Before deploying your hooks on a live site, try them out on a staging environment. Check different pages, post types, and scenarios to ensure your content appears exactly where you want it. Also, watch out for conflicts with other plugins or themes.
Document Your Hooks
Keep notes or comments in your code about why and where you’re adding hooks. This documentation makes it easier to revisit your customizations later, especially if you come back after months or hand off the project to another developer.
6. Troubleshooting Common Issues When Using Hooks for Content Output
Even with the best intentions, working with hooks can sometimes lead to unexpected issues. Don’t worry—most problems are straightforward to diagnose and fix if you know where to look. Here are some common pitfalls and how to troubleshoot them:
Content Not Showing Up
- Check the Hook Placement: Ensure you’re using the correct hook. For example,
the_contentis for post content, whilewp_footeris for footer scripts. - Verify Function Execution: Add a simple
error_log()orechostatement inside your hooked function to confirm it runs. - Priority Conflicts: Your function might be overridden or skipped because another hook with a higher priority runs after yours. Adjust the priority accordingly.
Content Appears Multiple Times or in Wrong Places
- Multiple Hooks Doing Similar Things: If several functions are hooked into the same action, content might duplicate. Review your hooks and ensure only the necessary ones are active.
- Incorrect Hook Type: Using a filter where an action is needed (or vice versa) can cause unexpected behavior. Double-check the hook type.
Debugging Tips
- Use Debugging Plugins: Plugins like Query Monitor can help you see what hooks are running and in what order.
- Check for Syntax Errors: A missing semicolon or typo can prevent your functions from executing. Run your code through a PHP linter or IDE to catch mistakes.
- Conflict with Other Plugins or Themes: Temporarily deactivate other plugins or switch themes to see if conflicts resolve the issue.
Best Practices for Troubleshooting
Always start with the simplest possible test case. For example, create a minimal function that outputs static content and hook it into your target location. If that works, gradually add complexity back until you identify what causes the issue. Remember, patience and a systematic approach go a long way in troubleshooting WordPress hooks.
By following these troubleshooting steps and best practices, you’ll become more confident in managing your content output with hooks. Over time, you’ll find that hooks are powerful tools that, when used correctly, make your WordPress sites more flexible and dynamic.
Conclusion and Additional Resources for WordPress Hook Customization
Mastering the use of WordPress hooks is essential for customizing your website effectively. By leveraging actions and filters, you can insert, modify, or remove content seamlessly without altering core files. Remember, the key to successful hook implementation is understanding the timing and priority of your functions to ensure they execute at the right moment. Practice by experimenting with different hooks and observing their impact on your site’s layout and functionality.
For further learning, consider exploring these resources:
- Official WordPress Developer Handbook: A comprehensive guide to actions and filters – https://developer.wordpress.org/plugins/hooks/
- WPBeginner’s Guide to Hooks: Easy-to-understand tutorials and examples – https://www.wpbeginner.com/glossary/hooks/
- Community Forums: Engage with fellow developers and troubleshoot issues – https://wordpress.org/support/
By continually exploring and practicing hook customization, you will enhance your ability to create dynamic and tailored WordPress sites that meet your specific needs. Stay curious, experiment often, and leverage the abundant resources available to become proficient in WordPress development.