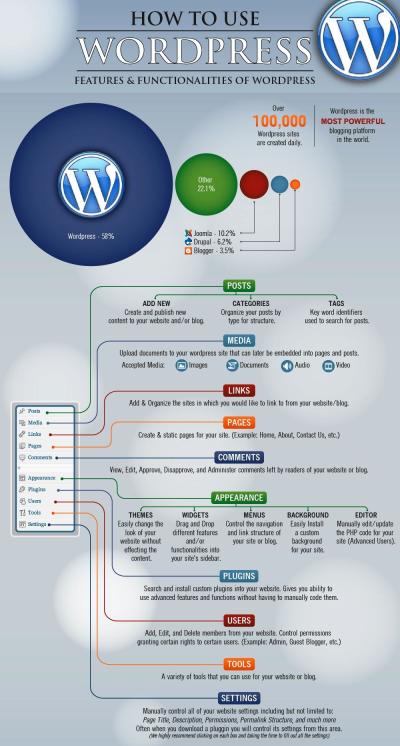
Getting started with your own website might seem daunting at first, but that’s where WordPress comes in. It’s a user-friendly platform that powers over 40% of all websites on the internet! Whether you’re creating a blog, a portfolio, or a business site, WordPress makes it easy to bring your ideas to life without needing to be a coding expert. Its flexibility, wide range of themes and plugins, and active community mean you’ll always find support and options to customize your site exactly how you want. So, let’s dive into what makes
Preparing to Build Your WordPress Website
Before you start building your website, it’s important to get everything in order. Think of this step as laying a solid foundation for a house—you want to make sure all your tools and plans are in place first. First, you’ll need a domain name, which is your website’s address (like www.yourwebsite.com). Choose something memorable and relevant to your content or brand. Next, select a reliable web hosting provider—this is where your website lives on the internet. Popular options include Bluehost, SiteGround, and DreamHost, many of which offer easy one-click WordPress installations.
Once you’ve secured your domain and hosting, it’s time to prepare your login credentials and gather any branding materials such as your logo, color schemes, and content ideas. Having these ready will streamline the setup process. Additionally, consider sketching out a rough structure or sitemap of your website—think about what pages you need, like Home, About, Services, or Blog. This planning step helps you stay organized and ensures your website will be user-friendly from the start. With your domain, hosting, and plans set, you’re now ready to move on to installing WordPress and customizing your site to match your vision.
3. How to Choose the Right Hosting Provider and Domain Name
Alright, so you’re excited to get started with your new WordPress website — awesome! Before you dive into creating content and customizing your site, there are two super important steps: picking the right hosting provider and choosing a memorable domain name. Don’t worry, I’ll guide you through it in a friendly way.
Choosing the Right Hosting Provider
Your hosting provider is like the landlord for your website. They store all your website files and make sure your site is accessible on the internet. Picking a good host is crucial because it affects your site’s speed, security, and reliability. Here are some key things to look for:
- Performance and Speed: Look for hosts with fast servers and good uptime (aim for 99.9%). Nobody wants to visit a sluggish site or see it down all the time.
- Customer Support: Friendly, available support can save you tons of stress if something goes wrong. Check reviews or test their support chat.
- Price: You don’t need to break the bank, but avoid super cheap options that might skimp on quality. Look for plans that fit your budget and offer good value.
- Features: Make sure they support WordPress easily, include SSL certificates (for secure browsing), and offer backups.
- Reputation: Read reviews or ask fellow bloggers for their recommendations. Some popular hosts for beginners include Bluehost, SiteGround, and DreamHost.
Choosing a Domain Name
The domain name is your website’s address on the internet — like yourwebsite.com. Picking a good domain helps people remember you and boosts your branding. Here’s how to choose one:
- Keep It Short and Simple: Short names are easier to remember. Avoid complex words or hyphens that can confuse people.
- Make It Relevant: Your domain should reflect what your site is about. If you’re starting a baking blog, something like SweetTreats.com works well.
- Choose the Right Extension: .com is the most popular and professional, but other options like .net, .org, or niche-specific ones can work too.
- Check Availability: Use domain registrars like Namecheap or GoDaddy to see if your preferred name is available. If it’s taken, try variations or different words.
- Think Long-Term: Pick a name that won’t limit you as your site grows. Avoid trendy slang or overly niche terms that might become outdated.
Once you’ve chosen a domain, you’ll need to register it through a domain registrar. Many hosting providers also offer domain registration, so you can often buy your domain and hosting in one place — making things simpler.
4. Installing WordPress on Your Hosting Platform
Great! You’ve got your hosting and domain sorted. Now, it’s time for the exciting part — installing WordPress. Luckily, most hosting providers make this process pretty straightforward, often with just a few clicks. Let me walk you through the typical steps:
Step-by-Step Guide to Installing WordPress
- Log Into Your Hosting Account: Head over to your hosting provider’s website and sign in to your account dashboard.
- Find the WordPress Installer: Many hosts have a “One-Click Install” or “Auto Installer” feature. Look for options labeled WordPress, Softaculous, or similar.
- Start the Installation: Click on the WordPress installer and follow the prompts. You’ll usually need to select your domain name from a dropdown menu.
- Configure Basic Settings: During setup, you’ll be asked to create a website title, admin username, password, and email address. Pick a strong password and a username different from “admin” if possible — it’s more secure!
- Complete the Installation: Hit the “Install” button and wait a few moments. Your hosting provider will handle the rest.
Post-Installation Tips
Once WordPress is installed, you’ll see a login page at yourdomain.com/wp-admin. Use the admin username and password you created during setup to log in. From there, you can start customizing your site by choosing themes, installing plugins, and adding content.
If your host doesn’t have a one-click installer, don’t worry — you can also install WordPress manually. I’ll cover that in the next section, but for most beginners, the one-click method is fast and hassle-free.
And that’s it! Just a few simple steps, and your WordPress site is ready to go. Next up, we’ll look at customizing your website’s look and feel to make it uniquely yours.
5. Setting Up Your WordPress Website for the First Time
Congratulations! You’re almost ready to launch your very own WordPress website. Setting things up properly from the start can save you a lot of headaches down the line. Let’s walk through the essential steps to get your site up and running smoothly.
First things first, you’ll need a domain name and a hosting provider. Your domain name is your website’s address (like www.yourwebsite.com), and hosting is where your website lives on the internet. There are many hosting providers out there—some popular options include Bluehost, SiteGround, and HostGator—which often offer one-click WordPress installation to make things easier.
Once you’ve chosen a host and registered your domain, it’s time to install WordPress. Most hosting companies provide a simple, one-click installation process—just follow their instructions, and before you know it, WordPress will be installed on your domain.
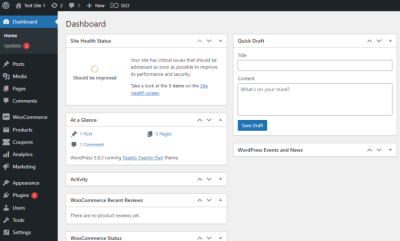
After installation, you’ll want to log in to your WordPress admin dashboard. You can usually access this by visiting www.yourwebsite.com/wp-admin. Use the username and password you set during installation. This dashboard is your control panel for managing everything on your site.
Here are a few quick tips to get started:
- Update your site title and tagline: Go to Settings > General and customize your site’s name and tagline to reflect your brand or purpose.
- Set your permalink structure: For better SEO and user experience, navigate to Settings > Permalinks and choose the “Post name” option.
- Adjust reading settings: Decide if your homepage displays your latest posts or a static page. This can be set under Settings > Reading.
Another important step is to secure your website. Installing an SSL certificate encrypts data exchanged between your site and visitors, boosting security and trust. Many hosts include SSL for free or offer easy setup options.
Finally, take time to explore your dashboard. Familiarize yourself with sections like Posts, Pages, Appearance, and Plugins. This will make customizing and managing your site much easier as you progress.
6. Customizing Your Website with Themes and Plugins
This is where your website starts to really take shape! Customizing your site with themes and plugins allows you to create a unique look and add powerful features without needing to code. Let’s dive into how to do that effectively.
Themes are design templates that control how your website looks. Think of them as the skin or outfit for your site. WordPress offers thousands of free and premium themes, making it easy to find one that matches your style and purpose.
To install a theme, go to Appearance > Themes in your dashboard. Click “Add New,” and you can browse or search for themes by features, popularity, or keyword. When you find one you like, click “Install” and then “Activate.”
Once activated, many themes come with customization options. Navigate to Appearance > Customize to tweak settings like colors, fonts, header images, and layout options. Take your time to experiment and preview changes before publishing them live.
Next up are plugins. These are like apps for your website—they add specific functionalities that aren’t built into WordPress by default. Want a contact form? There’s a plugin for that. Need SEO tools? There’s a plugin for that too.
Installing plugins is straightforward:
- Go to Plugins > Add New.
- Use the search bar to find a plugin that suits your needs. Popular choices include Yoast SEO, Contact Form 7, and Jetpack.
- Click “Install Now,” then “Activate.”
Once activated, most plugins will add new menu items or settings pages to your dashboard. Take some time to explore their options and configure them to fit your website’s goals.
Here are some essential plugins every beginner should consider:
| Plugin | Purpose | Recommended For |
|---|---|---|
| Yoast SEO | Improve your search engine optimization | Helping your site rank higher on Google |
| Contact Form 7 | Add contact forms easily | Allow visitors to reach out to you |
| Jetpack | Security, performance, and site management tools | All-in-one site management |
| WP Super Cache | Speed up your website with caching | Enhancing site performance |
Remember, less is more. Stick to a few well-chosen plugins to keep your site fast and secure. Regularly update your themes and plugins to stay protected against vulnerabilities.
In summary, customizing your website with themes and plugins transforms a basic setup into a professional and functional site tailored to your needs. Take your time exploring options, and don’t be afraid to experiment. Your perfect website is just a few clicks away!
7. Creating and Managing Content with Posts and Pages
Now that your WordPress site is set up, it’s time to start adding content. Understanding the difference between posts and pages is key to organizing your website effectively. Think of posts as your dynamic, regularly updated content—like blog articles, news updates, or anything that’s time-sensitive. Pages, on the other hand, are your static content—think of your About, Contact, or Services pages that you want visitors to access anytime.
Creating a Post: To add a new post, go to your WordPress dashboard and click on Posts > Add New. Here, you’ll see a familiar editor where you can add your title, write your content, and insert media like images or videos. You can also categorize your posts to keep things organized and add tags for better searchability.
Creating a Page: Similarly, to create a page, navigate to Pages > Add New. The process is similar to creating a post, but pages are usually more straightforward and don’t require categories or tags. Use pages for essential static information about your site.
Managing your content is just as important as creating it. You can view all your posts and pages in their respective sections, edit or delete them as needed, and even schedule posts to go live at a future date. This scheduling feature is super handy if you want to plan your content calendar ahead of time.
| Feature | Posts | Pages |
|---|---|---|
| Purpose | Dynamic, time-sensitive content like blogs, news, updates | Static content such as About, Contact, Policies |
| Organization | Categories, tags, archives | No categories or tags; organized by hierarchy if needed |
| Display | Usually listed on blog page or homepage | Linked from menu or footer |
Remember, consistency is key. Regularly updating your posts keeps your site fresh and encourages visitors to return. Also, think about your site’s structure—use pages for core info and posts for updates or articles. With a little practice, managing your content will become second nature!
8. Optimizing Your Website for Search Engines
Ever wondered why some websites pop up at the top of Google search results while others stay buried? The secret lies in Search Engine Optimization (SEO). Luckily, WordPress makes it pretty straightforward to optimize your site, especially with the help of plugins and good practices.
Start with Quality Content: Search engines love valuable, well-written content. Focus on creating content that answers your audience’s questions, provides solutions, or entertains. Use clear headings, relevant keywords, and engaging language. Remember, don’t stuff keywords—keep it natural and reader-friendly.
Next, make sure your website is technically optimized:
- Use SEO-Friendly URLs: When creating posts or pages, check that your permalinks are descriptive and include keywords. You can set this up in Settings > Permalinks.
- Optimize Titles and Meta Descriptions: These appear in search results. Customize them to include keywords and make them compelling to encourage clicks.
- Use Headings Properly: Use H2, H3 tags to structure your content. This helps search engines understand your content better.
- Compress Images: Large images slow down your site, which can hurt your rankings. Use tools or plugins to optimize images for faster loading.
To make SEO easier, consider installing a dedicated plugin like Yoast SEO or All in One SEO Pack. These tools guide you through optimizing each post and page, checking for keyword usage, readability, and technical issues.
Finally, don’t forget about backlinks and internal linking. Linking to your own related content helps search engines crawl your site more effectively and keeps visitors engaged longer. Building backlinks from reputable sites can also boost your authority.
SEO isn’t a one-time setup; it’s an ongoing process. Regularly update your content, fix broken links, and stay informed about the latest SEO trends. Over time, these efforts will help your website rank higher, attract more visitors, and grow your online presence.
9. Securing Your WordPress Site Against Threats
Congratulations! You’ve set up your WordPress site, and it’s looking great. But before you start sharing it with the world, let’s talk about something super important—security. The internet is filled with all kinds of threats, from hackers trying to exploit vulnerabilities to malware lurking around. The good news? With a few simple steps, you can greatly reduce the risk and protect your hard work.
First off, always keep your WordPress core, themes, and plugins updated. Developers release updates not just for new features but also to patch security holes. Think of it like updating your phone’s software—those updates keep you safe from known issues.
Essential Security Tips:
- Use Strong Passwords: Avoid common passwords like ‘password123’. Instead, use a mix of upper and lowercase letters, numbers, and symbols. Consider using a password manager to generate and store complex passwords.
- Install a Security Plugin: Plugins like Wordfence or Sucuri Security act like the security guards of your website. They monitor for suspicious activity, block malicious IPs, and help you clean up if something goes wrong.
- Enable Two-Factor Authentication (2FA): Adding an extra layer of login security means even if someone gets your password, they still need a second form of verification, like a code sent to your phone.
- Secure Your Login Page: Change the default login URL to something unique, or limit login attempts to prevent brute-force attacks.
- Backup Regularly: In case of a security breach, having recent backups means you can restore your site quickly. Use plugins like UpdraftPlus or BackupBuddy for automated backups.
Additional Security Measures:
| Security Measure | Why It Matters |
|---|---|
| SSL Certificate | Encrypts data transferred between your site and visitors, making it safer and boosting SEO. |
| Disable File Editing | Prevents hackers from editing theme and plugin files through the dashboard. |
| Limit User Permissions | Only give users the permissions they need. For instance, don’t give subscribers admin rights. |
Remember, security isn’t a one-time setup—think of it as ongoing maintenance. Regularly monitor your site, stay informed about the latest threats, and keep your defenses up-to-date. With these simple steps, your WordPress site will be much safer and more resilient against potential threats.
10. Launching Your Website and Next Steps for Growth
You’re almost there! Once you’ve secured your site, it’s time to go live and start sharing your creation with the world. Launching your website is an exciting milestone, but it’s just the beginning. Let’s explore what you should do after launch to ensure your site not only attracts visitors but also continues to grow and evolve.
Launching Your Website
Before hitting the “publish” button, double-check everything:
- Test Your Site: View it on different devices and browsers to ensure it looks good everywhere.
- Check All Links and Forms: Make sure navigation works and contact forms send messages correctly.
- Optimize for Speed: Use caching plugins like W3 Total Cache or WP Super Cache to make your site load faster.
- Set Up Analytics: Install Google Analytics to track visitor behavior and gather insights.
Once everything looks good, you’re ready to go live! Hit that publish button, and your website is now accessible to the world.
Next Steps for Growth
Launching is just the start. To grow your website, consider these essential next steps:
- Create Consistent Content: Regular blog posts, updates, or new pages keep visitors engaged and coming back for more.
- Build Your Audience: Promote your site on social media, join relevant online communities, and consider email marketing to connect with your visitors.
- Improve SEO: Use SEO plugins like Yoast SEO to optimize your content, making it easier for people to find you via search engines.
- Engage Visitors: Add a newsletter signup, comment sections, or interactive features to encourage interaction.
- Monitor Performance: Keep an eye on your analytics and adjust your strategies based on what works best.
- Expand Your Offerings: As your site grows, consider adding new features, products, or services to meet your audience’s needs.
Remember, building a successful website is a journey. Stay consistent, keep learning, and don’t be afraid to experiment with new ideas. Celebrate your milestones along the way, and enjoy the process of turning your website into a vibrant online presence!

