If you’ve ever wondered how some websites manage to be more inclusive than others, the secret often lies in something called alt text. Alt text, or alternative text, is a description added to images on your website. It’s not just about SEO; it’s a vital tool to make your site accessible to everyone, including people with visual impairments who use screen readers. When images lack alt text, they become invisible to these tools, making your site less inclusive. In this guide, we’ll explore why alt text matters so much and how to use it effectively in WordPress to create a welcoming experience for all visitors.
Understanding the Benefits of Proper Alt Text for Your Website
Using proper alt text isn’t just a good practice — it offers real benefits that can positively impact your website. Here’s why you should pay attention to it:
- Enhances Accessibility: Alt text helps users with visual impairments understand what images depict, giving them equal access to your content.
- Boosts SEO: Search engines can’t interpret images the way humans do. Well-crafted alt text improves your chances of appearing in image search results and boosts overall SEO rankings.
- Improves User Experience: Clear descriptions help all users understand your content better, especially if images fail to load or are slow to appear.
- Complies with Legal Standards: Many countries have accessibility regulations (like the ADA in the US). Proper alt text can help you stay compliant and avoid potential legal issues.
Think of alt text as a bridge — it connects your visual content to everyone, regardless of their abilities or device limitations. When you take the time to craft meaningful descriptions, you’re not just making your website more inclusive; you’re also strengthening your online presence and reputation. So, next time you upload an image in WordPress, remember: a good alt text is a small change that makes a big difference for accessibility and your site’s overall success.
3. How to Add Alt Text to Images in WordPress
Adding alt text to your images in WordPress is a straightforward process, but it’s super important for making your website accessible to everyone. Whether you’re uploading new images or editing existing ones, here’s how you can do it easily:
- Upload Your Image: When you’re creating a new post or page, click on the Add Media button above the editor. Select your image from your computer or media library and upload it.
- Insert into Post: Once uploaded, click on the image thumbnail, then hit the Insert into Post button.
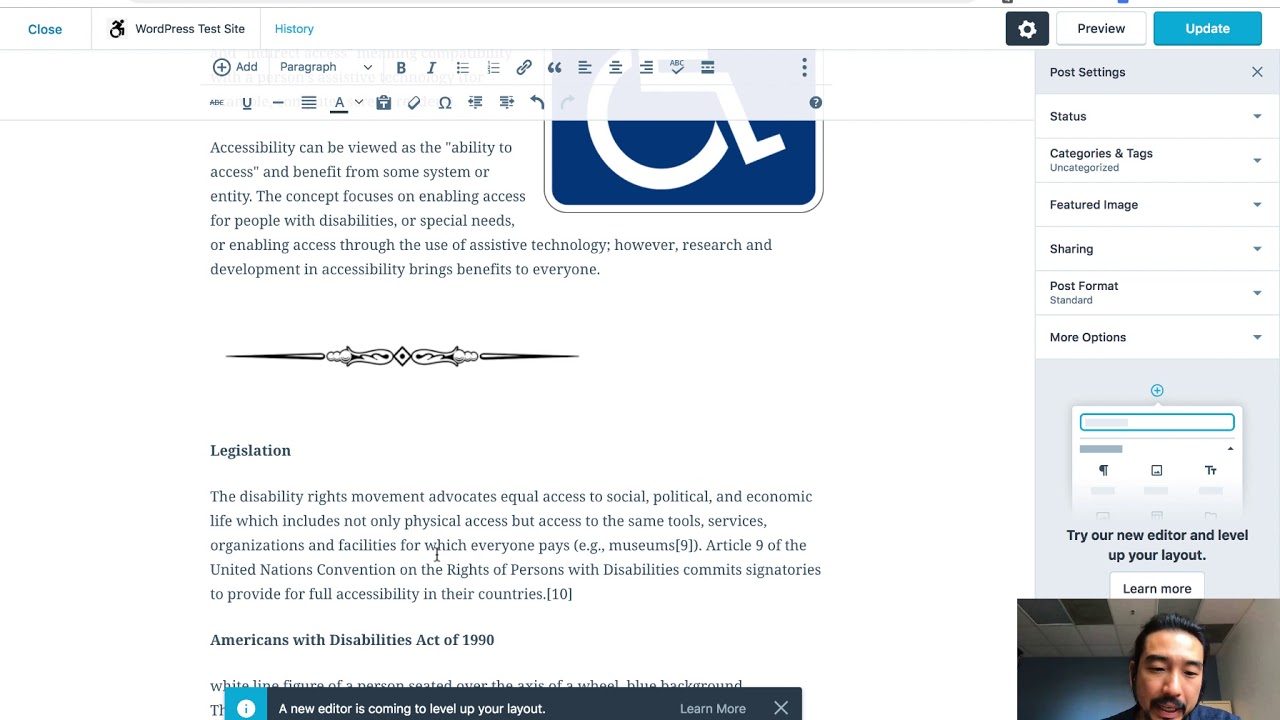
- Access the Image Details: After inserting, click on the image within the editor. You’ll see a small toolbar pop up—click the Edit icon (it looks like a pencil).
- Add Alt Text: In the image details window, locate the Alt Text field. This is where you type a descriptive, concise explanation of what the image depicts.
- Save Your Changes: After entering your alt text, click Update or Insert into Post to save changes. Your alt text is now attached to the image.
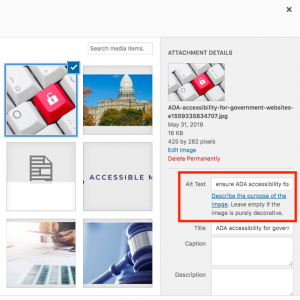
If you’re editing an existing image in the Media Library, go to Media > Library, select the image, and then add or update the alt text in the attachment details on the right sidebar.
Tip: Always remember to fill in the alt text field for every image you upload. WordPress even prompts you to add alt text when uploading images, making it easy to remember.
4. Best Practices for Writing Effective Alt Text
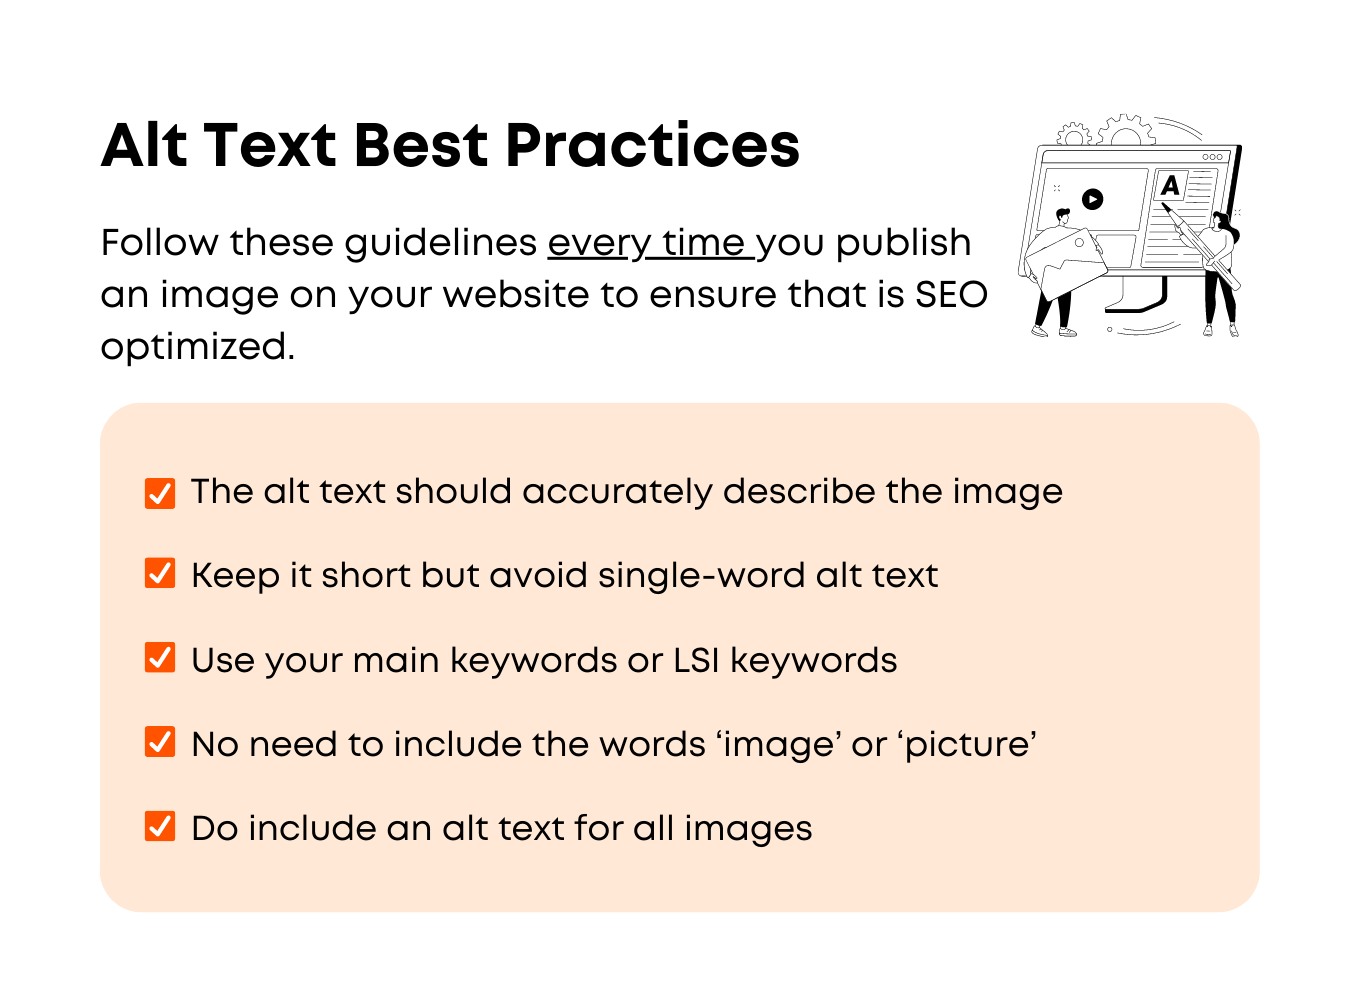
Now that you know how to add alt text, the next step is learning how to write it effectively. Good alt text isn’t just about describing the image—it’s about creating an accessible experience for users with visual impairments and improving your SEO. Here are some best practices:
- Be Descriptive and Concise: Aim for a clear, succinct description that captures the essence of the image. Usually, one or two short sentences are enough. For example, instead of saying “image,” specify “a red vintage bicycle leaning against a brick wall.”
- Avoid Keyword Stuffing: While including relevant keywords can help SEO, don’t force keywords into your alt text. Keep it natural and user-focused.
- Focus on Function and Context: Think about what the image does on your site. If it’s decorative, you might leave the alt text blank or set it as a null alt attribute (alt=””). If it’s informative, describe its role, like “Download button for the free eBook.”
- Use Clear Language: Avoid vague descriptions like “picture” or “image of.” Instead, be specific—“a smiling young woman holding a coffee mug during a video call.”
- Consider the User Experience: Remember that alt text is primarily for users who can’t see the image. Write it with empathy and clarity, helping them understand what they’re missing.
- Test Your Alt Text: Imagine yourself as a user relying on a screen reader. Does your description make sense? Is it helpful? If not, revise it.
In summary, effective alt text is about bridging the gap between visual content and accessible information. It’s a small detail that makes a big difference in making your website welcoming to everyone, while also boosting your search engine rankings.
5. Common Mistakes to Avoid When Using Alt Text in WordPress
Using alt text might seem straightforward at first, but there are some common pitfalls that can trip you up. Let’s go over a few mistakes to watch out for so your images truly serve everyone in your WordPress site.
1. Leaving Alt Text Empty
This is one of the most frequent errors. When you forget to add alt text entirely, screen readers have nothing to describe, leaving visually impaired users in the dark. Always make it a habit to include descriptive alt text that conveys the essence of the image.
2. Overloading with Keywords
While it might be tempting to stuff your alt text with keywords for SEO, this actually hurts your accessibility and can even lead to search engine penalties. Keep your descriptions natural and focused on what the image conveys.
3. Being Too Vague or Generic
Alt text like “Image” or “Picture” doesn’t tell anyone anything. Instead, be specific. For example, instead of “Woman working,” try “Female graphic designer collaborating on a laptop.” Clear, detailed descriptions help users understand exactly what they’re missing.
4. Ignoring Decorative Images
Decorative images, like background patterns or purely aesthetic icons, don’t need alt text. In fact, including alt text on these can be distracting. Use empty alt attributes (alt="") for such images so screen readers skip them.
5. Not Updating Alt Text When Images Change
If the content of your images changes, don’t forget to update the alt text accordingly. Outdated descriptions can be confusing or misleading to users relying on screen readers.
6. Forgetting to Test Accessibility
Finally, avoid assuming your alt text is perfect. Test your website with accessibility tools or screen readers to ensure your descriptions are helpful and accurate. Sometimes what makes sense to you might not be clear to others.
6. Tools and Plugins to Help Manage Alt Text in WordPress
Managing alt text manually for every image can be a daunting task, especially if your site is image-heavy. Luckily, there are plenty of tools and plugins designed to make this process smoother and more efficient.
Popular Plugins for Alt Text Management
- Yoast SEO: Not only good for SEO, but it also offers features to improve your image descriptions and accessibility scores.
- WP Accessibility: Adds accessibility improvements, including better handling of alt text and other assistive features.
- Image Attributes Optimizer: Helps you bulk edit image alt text directly from the media library, saving time.
- Automatic Alt Text Generator: Uses AI to automatically generate alt text for images, which you can then review and edit as needed.
- Media Library Assistant: Provides advanced filtering and bulk editing options for media files, including alt text management.
How to Use These Tools Effectively
Here are some tips to get the most out of these plugins:
- Bulk Edit: Use bulk editing features to add or update alt text for multiple images at once.
- Review AI-Generated Alt Text: If using automatic tools, always review the generated descriptions to ensure accuracy and relevance.
- Integrate with Workflow: Incorporate alt text management into your regular content updating process to keep descriptions fresh and accurate.
- Test Accessibility: Pair plugin use with accessibility testing tools like screen readers or online scanners to verify improvements.
Final Thoughts
Using the right tools and plugins can significantly cut down the time and effort required to optimize your images for accessibility. Remember, accessible images aren’t just about compliance—they ensure your content is inclusive and valuable to everyone. So, explore these options, experiment with what works best for your site, and keep your audience in mind every step of the way.
7. Testing Your Website’s Accessibility with Alt Text
Now that you’ve added alt text to your images, it’s time to see how well your website performs in terms of accessibility. Testing is a crucial step because it helps you identify areas where users might still face challenges, ensuring your site is as inclusive as possible.
One of the simplest ways to test your site’s accessibility is by using built-in tools and browser extensions. Here are some effective methods:
- Screen Reader Testing: Use popular screen readers like NVDA (Windows), VoiceOver (Mac), or TalkBack (Android). Navigate your site using these tools to experience how visually impaired users perceive your content. Listen to how your images’ alt text is read aloud and check if it provides meaningful information.
- Browser Accessibility Extensions: Install extensions such as WAVE, Axe, or Accessibility Insights. These tools scan your pages for accessibility issues, including missing or inadequate alt text. They highlight problematic areas and provide suggestions for improvement.
- Keyboard Navigation: Try navigating your website using only the keyboard (Tab, Shift+Tab, Enter keys). Ensure that all images, links, and interactive elements are accessible and properly labeled. If an image isn’t properly described, you might notice gaps in the navigation flow or missing focus indicators.
Beyond these tools, consider gathering feedback from actual users with disabilities. Their experiences can reveal real-world challenges you might not detect through automated testing. Invite feedback through surveys or direct communication channels to understand how your site performs from their perspective.
Remember, accessibility isn’t a one-time setup. Make testing a regular part of your website maintenance routine, especially after updates or redesigns. The goal is to create an inclusive environment where everyone can access your content comfortably.
8. Conclusion and Resources for Further Learning
In this guide, we’ve explored the importance of alt text in making your WordPress website accessible to all users. From understanding what alt text is, to how to write effective descriptions, and ensuring your images are properly optimized—every step counts toward creating an inclusive online space.
Key takeaways:
- Always add descriptive alt text to images, especially those conveying important information.
- Keep alt text concise yet informative, avoiding generic descriptions like “image” or “photo.”
- Use WordPress features or plugins to streamline the process of adding and managing alt text.
- Regularly test your website’s accessibility with tools and real user feedback.
Making accessibility a priority not only broadens your audience but also demonstrates a commitment to inclusivity and social responsibility. Remember, small adjustments can make a big difference!
If you’re eager to dive deeper into accessibility best practices and stay updated with the latest standards, here are some valuable resources:
- W3C Web Accessibility Initiative (WAI): ARIA and Accessibility Standards
- The A11Y Project: Accessibility Resources and Guides
- MDN Web Docs on Accessibility
- University of Washington Accessibility Resources
- WordPress Support: Alt Text Guide
Remember, accessibility is an ongoing journey. Keep learning, testing, and refining your website to ensure it remains welcoming and usable for everyone. Happy website building!