If you’re looking to dive into the world of blogging, WordPress is one of the best platforms to start with. With its user-friendly interface and powerful features, anyone can become a blogger, regardless of their technical prowess. Blogging on WordPress allows you to share your thoughts, ideas, and expertise with the world. Whether you want to voice your opinions, showcase your talents, or even promote a business,
Many successful bloggers have begun their journey using WordPress, thanks to its flexibility and robust support community. The platform offers both free and premium options, allowing users to choose what best suits their needs. Let’s get into why WordPress could be your best choice for blogging!
- User-Friendly Interface: The dashboard is intuitive and easy to navigate, making it simple for beginners.
- Customizable Themes: Choose from thousands of themes to make your blog visually appealing.
- Extensive Plugin Library: Enhance your blog’s functionality with various plugins tailored to your needs.
- Built-In SEO Features: Optimize your posts for search engines, helping to increase your blog’s visibility.
- Strong Community Support: Access forums, documentation, and tutorials to help you along your journey.
Setting Up Your WordPress Account
Setting up your WordPress account is a straightforward process that will get you started on your blogging adventure in no time! Here’s how you can do it in a few easy steps:
- Choose Your Hosting Plan: If you’re using WordPress.org, you’ll need to select a hosting provider (like Bluehost, SiteGround, or HostGator). If you’re using WordPress.com, you can choose a free or paid plan.
- Register Your Domain: If you’re going for self-hosting, choose a catchy domain name that reflects your blog’s theme. Make it memorable!
- Create Your Account: Fill in the necessary information, including your email address and selecting a password. Make sure to use a strong password for security!
- Install WordPress: Most hosting providers offer a one-click installation option for WordPress. Follow the guides given to complete the installation.
- Login to WordPress: Once installed, navigate to your domain followed by /wp-admin. Enter your login credentials to access your dashboard.
And just like that, you have your WordPress account set up and ready to roll! Now, it’s time to dive into customizing your blog and creating your first post. Exciting, right?
Choosing the Right Theme for Your Post
Choosing the right theme for your WordPress post is like picking the perfect outfit for a special occasion. It influences how your audience perceives your content and enhances the overall reading experience. Here are some key considerations to keep in mind when selecting a theme:
- User-Friendly Design: Your theme should be intuitive and easy to navigate. The last thing you want is for your visitors to feel lost on your site!
- Responsive Layout: In today’s mobile-centric world, ensure your theme is responsive. A responsive theme will automatically adjust to look great on desktops, tablets, and smartphones.
- Visual Appeal: Choose a theme that aligns with your content. If you’re running a cooking blog, a theme with vibrant food imagery and bold colors may work wonders!
- Customization Options: Look for a theme that allows you to customize the layout, colors, and fonts. This personal touch can help create a unique identity for your blog.
- SEO Optimized: An SEO-friendly theme can give your posts a better chance of ranking high on search engines, helping you reach a wider audience.
More importantly, think about the functionality you need. For example, if you’re planning to include lots of images or videos, look for themes that support multimedia. Take your time to explore various themes in the WordPress repository or consider premium options that offer advanced features for serious bloggers. Happy theming!
Writing Your First Post
Alright, now you’ve got your theme sorted! It’s time to dive into writing your very first post. This step can be exciting, yet it might also feel a bit daunting. But don’t worry – I’m here to guide you through it!
Let’s break down the basics of crafting your post:
- Select a Compelling Topic: What are you passionate about? Choose a topic that excites you and will resonate with your readers. Research trending topics or questions people have within your niche to guide your choice.
- Create an Outline: Structure your thoughts to create a flow. An outline doesn’t have to be overly complex; just a simple framework can help you stay organized.
- Catchy Title: Your title is the first thing people will see. Make it catchy and informative. Use action words or numbers to grab attention – for example, “Top 5 Tips for a Perfect Cup of Coffee.”
- Introduction: Start with a hook! Whether it’s a surprising fact, a question, or a relatable story, the introduction should draw readers in.
- Body Content: Deliver your content in digestible chunks. Use headings, subheadings, and bullet points to break it up. Aim for clarity, and don’t forget to engage your audience with your unique voice!
- Conclusion: Wrap it up with a summary or a call to action. Encourage your readers to comment, share, or check out related posts on your blog.
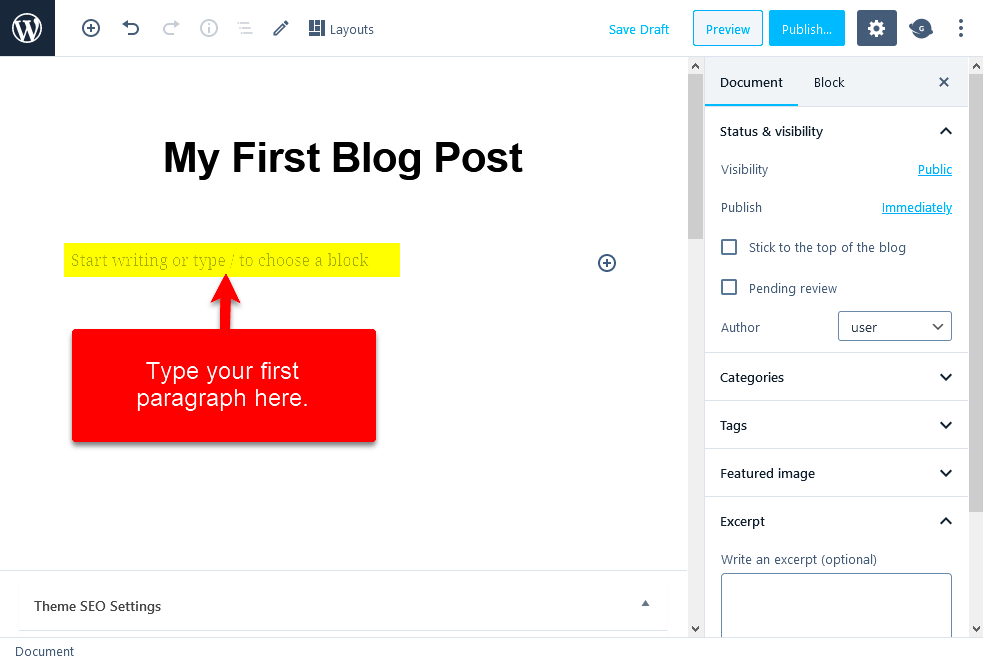
Finally, proofread for any grammar issues or typos and add images for visual appeal. Once you’re satisfied with your masterpiece, hit that ‘Publish’ button and celebrate your first post! The blogging journey has officially begun, and you’re on your way to creating meaningful content. Enjoy the ride!
Formatting Your Blog Post
Formatting your blog post is key to making it engaging and readable. Think of it as dressing your content in a way that grabs attention and is easy on the eyes. Here’s how to do it effectively:
- Use Headings and Subheadings: Break up your content with headings (H2, H3, etc.). This not only improves readability but also helps search engines understand your article’s structure.
- Short Paragraphs: Keep paragraphs short—around 2 to 4 sentences. This makes it easier for readers to digest your ideas.
- Bullet Points and Lists: Use bullet points or numbered lists to present information clearly. For instance, instead of writing, “Here are the benefits of formatting: it enhances readability, it makes key points stand out,” try:
- Enhances readability
- Makes key points stand out
- Breaks up large chunks of text
- Emphasize Important Points: Use bold or italic text to highlight key phrases, but don’t go overboard! It should enhance the reading experience, not distract from it.
- Consistent Font and Size: Choose a readable font. Stick to a consistent font style and size throughout your post for a professional appearance.
- Whitespace: Don’t overcrowd your post. Use whitespace effectively to guide the reader’s eye and create a clean layout.
By taking the time to format your blog post properly, you’re more likely to keep your readers engaged and make your content easier to share!
Incorporating Images and Media
Images and media can make your blog post pop! They not only add visual interest but also help to convey your message more effectively. Here are some tips on how to incorporate them into your WordPress posts:
- Choose High-Quality Images: Always use high-resolution images that align with your content. You can find free stock images on sites like Unsplash, Pexels, or Pixabay.
- Optimize Images: Before uploading, optimize images for web use to reduce loading times. Use tools like TinyPNG or JPEGmini.
- Use Relevant Media: Include videos, infographics, or audio clips to enhance your message. This keeps readers engaged and can also help explain complex ideas.
- Alt Text and Captions: Don’t forget to add alt text to your images for accessibility and SEO purposes. Captions can help clarify your images’ relevance too.
- Align Images Appropriately: Align your images to fit well within your content. You can center them or float them left/right for a professional layout.
- Embed Content: Use embedding options to include tweets, Instagram posts, or YouTube videos directly into your blog, making it visually diverse.
Incorporating various forms of media not only beautifies your blog but also allows you to communicate your message in a richer, more entertaining manner. So go ahead, get creative!
Utilizing Categories and Tags
When it comes to organizing your WordPress posts, categories and tags are your best friends. They help you structure your content, making it easier for readers to navigate your blog and find relevant posts. But what’s the difference between the two? Let’s break it down.
Categories are like the main topics or sections of your blog. Imagine your blog as a book; categories would be the chapters. They help you group related posts together for easy browsing. For instance, if you have a blog about travel, categories could include:
- Destinations
- Travel Tips
- Travel Gear
Tags, on the other hand, are more specific keywords that describe the details of your post. If categories are chapters, think of tags as the index at the back of the book. Tags offer additional layers of organization. For example, if you’re writing about a hiking trip in Spain, you might use tags like:
- Hiking
- Spain
- Nature
Using these tools effectively not only enhances user experience but can also improve your blog’s SEO. Make sure to keep your categories broad but specific enough to encapsulate your posts, and don’t go overboard with tags—5 to 10 relevant tags per post is usually a good rule of thumb.
Previewing Your Post
Before you hit that Publish button, it’s crucial to take a moment to preview your post. This step can save you from embarrassing typos and layouts that just don’t look right. WordPress has a handy Preview feature that lets you see exactly how your post will appear once it’s live.
To preview your post, simply click on the Preview button located in the Publish box, which is usually found on the right side of the editor screen. Here’s what to look out for during your preview:
- Layout: Make sure your images are displayed correctly and that your text flows well.
- Formatting: Check that headings, lists, and other formatting elements look as intended.
- Links: Test any hyperlinks to ensure they direct to the right pages.
- Mobile View: Consider how your post will appear on mobile devices as well.
If you spot any errors—whether it’s a typo, an awkward sentence, or an image that’s out of place—now is the time to fix them. Don’t rush this step; a well-crafted post deserves attention to detail. Once everything looks good and you’re satisfied with your content, you can confidently publish your post and share it with the world!
9. Publishing Your Blog Post
Once you’ve crafted your masterpiece and you’re ready to share your thoughts with the world, it’s time to hit that precious “Publish” button. But wait! Before you do, let’s go through a couple of important steps to ensure you’re really ready for prime time.
1. Preview Your Post: Before making it live, always use the preview feature. This lets you see exactly how your post will appear to readers. Check to make sure images display correctly and there are no missing elements.
2. Check Your Formatting: Look over your headlines, paragraphs, and lists. Proper formatting improves readability. Here’s a quick checklist:
- Are headings appropriately sized?
- Are important points bulleted or numbered?
- Is the text concise and engaging?
3. Add Categories and Tags: Categorizing your post helps readers find related content on your blog. Tags, on the other hand, enhance SEO. Think carefully about which categories and tags best fit your post.
4. Set a Featured Image: A striking image can encourage readers to engage with your post. Choose a relevant, high-quality image that captures the essence of your content.
5. Publish or Schedule: You have the option to publish immediately or schedule for a future date. If you’re launching a series or want to target a specific time frame, scheduling can be super useful.
When you feel confident everything is in order, just click “Publish.” Congratulations! You’ve officially entered the blogging world.
10. Promoting Your Post
Publishing your post is just the beginning. Now it’s time to let the world know your thoughts exist! Promotion is key to increasing your visibility and attracting readers. Here’s how you can effectively promote your blog post:
1. Share on Social Media: Utilize platforms like Facebook, Twitter, and Instagram to share your post. Create engaging snippets or quotes that pique your followers’ interest. Consider posting at different times to reach a broader audience.
2. Engage in Online Communities: Join relevant forums or groups related to your topic. Share your post where appropriate, but be sure to follow the community rules and not spam.
3. Email Newsletter: If you have a mailing list, send a newsletter announcing your new post. Include a brief overview and a link to encourage clicks.
4. Collaborate with Other Bloggers: Reach out to bloggers in your niche. Ask if they’d be willing to share your post or collaborate on a new piece. Guest blogging can also drive traffic back to your site.
5. Use SEO Techniques: Optimize your post for search engines by using relevant keywords and phrases within your content. This helps improve your post’s visibility in search results, drawing in more organic traffic.
By strategically promoting your blog post through these channels, you’ll significantly increase your chances of reaching a wider audience. Happy promoting!
Conclusion and Next Steps
Congratulations! You’ve successfully navigated the journey of writing and publishing your first WordPress post. Whether you’re sharing your thoughts, promoting a business, or expressing a passion, this is only the beginning of your blogging adventure. To ensure your success and sustained growth in the blogging world, consider the following next steps:
- Keep Writing Regularly: Establish a blogging schedule and stick to it. Consistency is key in building an audience.
- Engage with Your Audience: Respond to comments, ask for feedback, and encourage interaction to foster a community around your blog.
- Optimize for SEO: Implement search engine optimization techniques to enhance the visibility of your posts. Utilize keywords effectively and create engaging meta descriptions.
- Promote Your Content:
- Share your posts on social media platforms.
- Consider email marketing to reach your audience directly.
- Network with other bloggers or collaborate for guest posts.
- Analyze Performance: Use tools like Google Analytics to track the performance of your blog. Identify what content resonates most with your readers and adjust accordingly.
As you continue your blogging journey, remember to stay patient and keep learning. Each post is an opportunity to grow your skills and connect with others. Embrace the process, and don’t hesitate to explore new topics and avenues to express your creativity!

