Hey there! If you’re running a WordPress website, you probably already know that managing who has access to your site is super important. Whether you’re collaborating with a team, hiring a developer, or just giving a guest contributor some permissions, adding new users is a key part of keeping your site organized and secure. In this guide, we’ll walk through the simple steps to add new users and make sure they have the right level of access. Don’t worry if you’re new to this — by the end, you’ll feel confident managing your user list like a pro!
Understanding User Roles and Permissions in WordPress
Before you start adding users, it’s helpful to understand the different roles available in WordPress and what they can do. Think of user roles as a way to control who can see, edit, or manage various parts of your website. WordPress comes with several predefined roles, each with its own set of permissions:
- Administrator: Has access to everything on the site. Can add, delete, and manage all content and settings. Think of this role as the site owner or head admin.
- Editor: Can publish and manage posts, including those written by others. Great for content managers or team members focused on content creation.
- Author: Can publish and manage their own posts. Ideal for guest bloggers or contributors who only need to add content.
- Contributor: Can write and edit their own posts but cannot publish them. They need approval from an Editor or Administrator.
- Subscriber: Can only manage their profile and view content. Usually used for users who just want to log in to access certain features or comment.
Understanding these roles helps you decide what access level each new user should have. For example, you wouldn’t want a Contributor to have the same permissions as an Administrator, since that could pose security risks or accidental changes. By assigning the correct role, you keep your site secure and ensure everyone can do their job effectively without overstepping boundaries.
3. How to Add a New User to Your WordPress Website
Adding a new user to your WordPress site is a straightforward process, and it’s a great way to collaborate with team members, guest authors, or even manage different aspects of your website. Whether you want to give someone access to create content, manage settings, or handle technical tasks, WordPress makes it easy to do so.
Here’s a simple step-by-step guide to adding a new user:
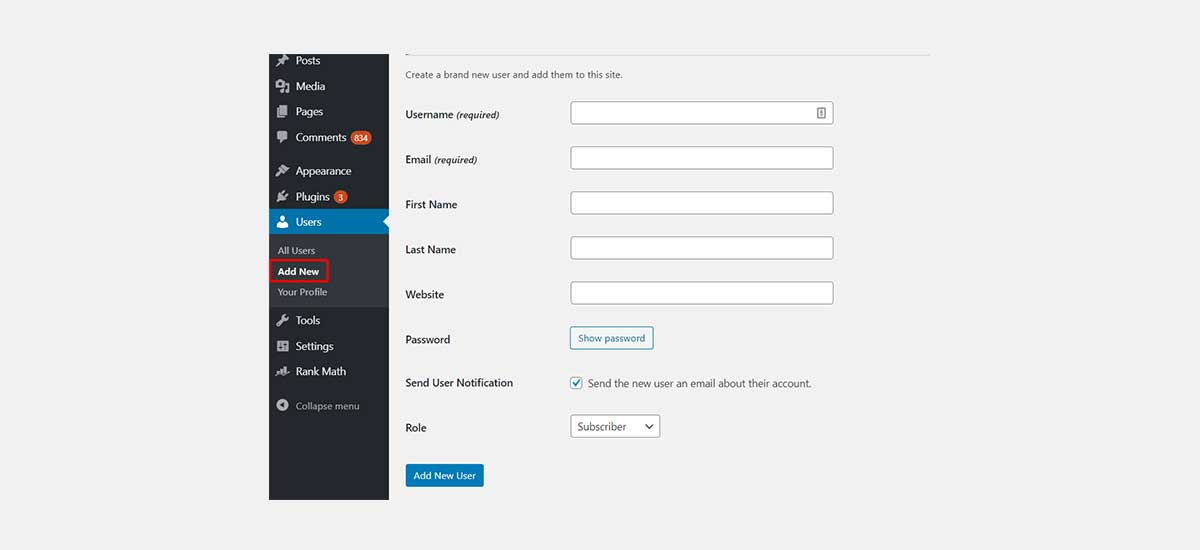
- Log in to your WordPress Dashboard. Use your admin credentials to access the backend of your site.
- Navigate to the “Users” menu. On the left sidebar, you’ll see a menu item called “Users.” Click on it.
- Click “Add New.” At the top of the Users page, you’ll find the “Add New” button. Click it to start creating a new user account.
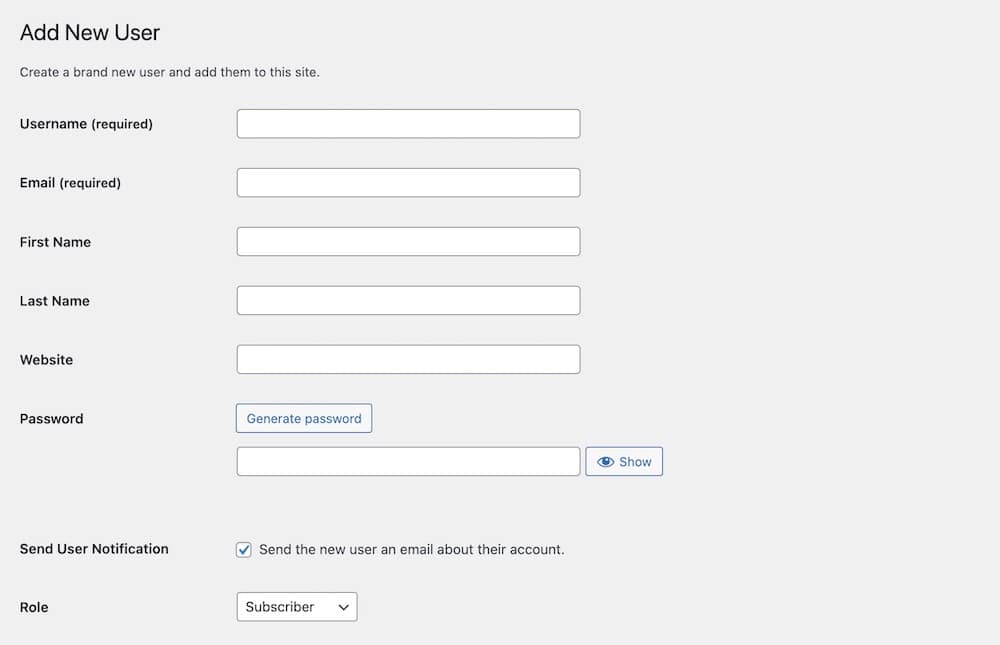
- Fill out the user details:
- Username: This is mandatory. Choose a unique username for the new user.
- Email: Enter a valid email address for the user.
- First Name & Last Name: Optional, but helpful for identification.
- Website: Optional, if the user has a personal or professional site.
- Password: Generate a strong password or use the “Show Password” option to create one. Remember, strong passwords are essential for security!
- Assign a role (more on this in the next section). For now, you can select a role or come back to it later.
- Click “Add New User.” Once all details are filled in, hit this button, and the new user will be added to your site.
That’s it! The new user now has access according to the role you assigned. They will receive an email notification (if the email option is enabled) with their login details, making it easy for them to get started.
4. Assigning Appropriate User Roles During Registration
Choosing the right user role is crucial because it determines what the new user can see and do on your website. WordPress offers a set of predefined roles, each with different permissions:
| Role | Description | Permissions |
|---|---|---|
| Administrator | The highest level; full control over the site. |
|
| Editor | Can manage and publish content for all users. |
|
| Author | Can publish and manage their own posts. |
|
| Contributor | Can write and edit their own posts but cannot publish. |
|
| Subscriber | Basic role with minimal access. |
|
When adding a new user, carefully consider what level of access they need. For example, if someone is helping with content creation, assigning the Author role makes sense—they can publish their own posts but not interfere with site settings or other users.
To assign a role during user addition, just select the appropriate role from the dropdown menu in the “Add New User” form. If you need to change a user’s role later, you can do so by editing their user profile in the “Users” section.
Remember, giving someone an Administrator role grants them full control, so only assign this if you completely trust the user and understand the responsibilities involved.
5. Best Practices for Managing Users and Security
When it comes to managing users on your WordPress site, security should always be a top priority. After all, each user you’ve added can potentially access sensitive parts of your website, especially if they have higher permissions like Administrator or Editor. So, how can you keep things safe while still allowing your team to do their jobs effectively? Here are some best practices to keep in mind:
Use Appropriate User Roles
WordPress comes with a set of predefined roles—Subscriber, Contributor, Author, Editor, and Administrator. Assign each user the role that fits their responsibilities. For example:
- Subscribers: Can read content and manage their profile. Perfect for regular visitors or members.
- Contributors: Can write and manage their own posts but cannot publish them. Ideal for guest writers.
- Authors: Can publish and manage their own posts. Good for content creators.
- Editors: Can manage and publish posts and pages, including those created by others. Suitable for content managers.
- Administrators: Have full access to all site features. Use sparingly and only for trusted users.
Assigning the correct role minimizes the risk of accidental or malicious changes to your site.
Implement Strong Passwords and Enable Two-Factor Authentication
Weak passwords are a common security vulnerability. Encourage your users to create strong, unique passwords. Better yet, consider installing security plugins that support two-factor authentication (2FA). This adds an extra layer of security, requiring users to verify their login via a second device or app, making it much harder for hackers to gain access.
Limit User Capabilities and Permissions
If you need to give users specific permissions without granting full admin rights, consider using plugins like Members or User Role Editor. These tools allow you to customize roles and capabilities, tailoring access to your exact needs while maintaining security.
Regularly Review User Accounts
Make it a habit to periodically review your user list. Remove or deactivate accounts that are no longer needed, especially those with high-level permissions. This reduces the risk of unauthorized access if an account is compromised.
Backup Your Site Regularly
In case of a security breach or user error, having recent backups ensures you can restore your site quickly. Use reputable backup plugins and store copies off-site for added safety.
Monitor User Activity
Some security plugins offer activity logs that track user actions. Monitoring these logs can help you spot suspicious behavior early, such as multiple failed login attempts or unexpected content changes.
By following these best practices, you’ll create a safer environment for your website and your users. Managing user roles thoughtfully not only protects your site but also streamlines workflow and enhances overall security.
6. Conclusion and Additional Tips for User Management in WordPress
Managing users in WordPress might seem straightforward at first, but as your website grows, so does the importance of handling user permissions and security diligently. Taking the time to assign appropriate roles, enforce strong security measures, and regularly review user accounts can save you headaches down the line.
Here are a few additional tips to keep in mind:
- Keep WordPress and plugins updated: Regular updates patch security vulnerabilities and improve functionality.
- Use reputable security plugins: Tools like Wordfence or Sucuri can help you monitor and protect your site.
- Educate your users: Make sure everyone understands the importance of security, such as avoiding sharing passwords or clicking on suspicious links.
- Document your user management policies: Having clear guidelines ensures consistency and helps onboard new team members smoothly.
Remember, your website’s security is an ongoing process. By staying proactive and following best practices, you can ensure that your WordPress site remains safe, collaborative, and efficient. Happy managing!