If you’re running a WordPress site, chances are you’ve heard about Google Analytics. It’s a powerful free tool that helps you understand how visitors find and interact with your website. Whether you’re a blogger, small business owner, or manage a large online store, knowing your audience’s behavior can make a huge difference. With Google Analytics, you can track things like which pages are most popular, where your traffic is coming from, and how visitors navigate through your site. This information helps you make smarter decisions, improve user experience, and ultimately grow your online presence. Think of it as a behind-the-scenes dashboard that shows you what’s working and what’s not.
Understanding the Google Analytics Tracking Code
At the heart of Google Analytics is the tracking code—a small piece of JavaScript that you add to your website’s pages. This code acts like a tiny spy, collecting data about your visitors’ actions and sending it back to your Google Analytics account. When someone visits your site, the tracking code records details such as:
- Page visits
- Time spent on pages
- Geographic location
- Device and browser information
- Referral sources (where visitors came from)
The code snippet is generated when you set up a Google Analytics property. It typically looks like a small JavaScript snippet starting with <script> tags. Once added to your website, it loads on every page, ensuring comprehensive tracking. For WordPress sites, the tracking code is usually inserted into the header or via plugins, making the setup process straightforward even if you’re not a coding expert. Remember, the accuracy of your data depends on correctly installing this code, so it’s worth paying attention to where and how you add it.
3. Preparing Your Google Analytics Account and Tracking ID
Before you can start tracking your website’s visitors, you need to set up your Google Analytics account and grab your unique Tracking ID. Think of this as getting your account ready so that your website can start sending data to Google’s servers. It’s a straightforward process, but it’s important to do it right to ensure everything works smoothly.
First, if you don’t have a Google account, you’ll need to create one — it’s free and easy. Once you’re signed in, head over to Google Analytics and click on “Start for free” or “Set up for free” to create your account.
Here’s a quick rundown of the steps:
- Set up an account: Enter your account name (usually your business or website name).
- Configure your property: This is your website. Enter your website’s name and URL, select your industry category, and your preferred reporting time zone.
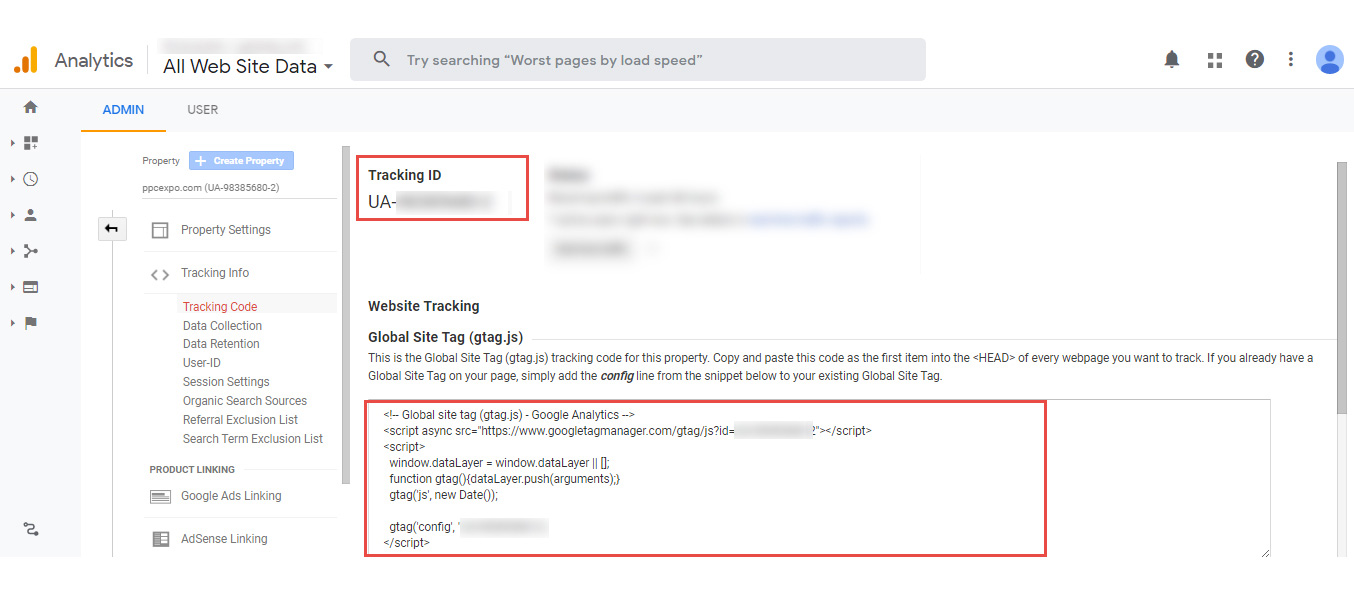
- Get your Tracking ID: Once the property is created, Google Analytics will generate a unique Tracking ID that looks like UA-XXXXXXXX-X.
Make sure to copy that Tracking ID carefully — you’ll need it when adding the code to your site. This ID is what links your website’s data with your Google Analytics account, so double-check it for accuracy.
And don’t worry! Google Analytics also provides a tracking code snippet that you’ll embed into your website. For now, just keep your Tracking ID handy; we’ll talk about how to use it in the next section.
4. Methods to Add the Google Analytics Tracking Code to WordPress
There are several ways to add the Google Analytics tracking code to your WordPress site, and choosing the right method depends on your comfort level and whether you want a quick setup or more control. Let’s walk through the most common methods so you can pick what suits you best.
1. Using a Plugin (Easiest for Most Users)
If you’re not comfortable editing code, using a plugin is the simplest way. Plugins like MonsterInsights or GA Google Analytics make it a breeze to connect your site to Google Analytics.
- Install and activate your chosen plugin: Go to Plugins > Add New in your WordPress dashboard, search for the plugin, and hit Install & Activate.
- Configure the plugin: Most plugins will have a setup wizard or settings page where you just need to enter your Tracking ID.
- Save your settings: Once done, the plugin will handle inserting the tracking code into your site automatically.
This way, you don’t have to touch any code, and updates are handled smoothly.
2. Manually Adding the Tracking Code to Your Theme
If you prefer a more hands-on approach, you can add the tracking code directly to your theme’s files. Here’s how:
- In your Google Analytics account, click on your property and then on “Tracking Info” > “Tracking Code”.
- Copy the entire tracking script provided.
- Go to your WordPress Dashboard > Appearance > Theme Editor.
- Select your theme’s header.php file.
- Paste the tracking code just before the closing </head> tag.
- Save your changes.
Note: Be cautious when editing theme files. It’s a good idea to use a child theme or a site-specific plugin to prevent your changes from being overwritten during theme updates.
3. Using a Custom Code Snippet with a Plugin
If you want to keep your code organized and avoid editing theme files directly, plugins like Insert Headers and Footers or Code Snippets allow you to add custom scripts easily:
- Install and activate the plugin.
- Navigate to its settings page.
- Paste your Google Analytics tracking code into the header section.
- Save your changes.
This method is flexible and keeps your tracking code separate from your theme files, making future updates safer.
Summary
Adding Google Analytics to your WordPress site is a crucial step to understanding your visitors and improving your website. Whether you choose a plugin for simplicity, manually inserting the code for more control, or using a custom code snippet plugin, the goal is the same: get your tracking code onto your site correctly. Once set up, you’re all set to start analyzing your website’s performance and gaining valuable insights that can help you grow your online presence.
5. Adding the Tracking Code Manually via Theme Files
If you’re comfortable tinkering a bit with your WordPress theme files, adding the Google Analytics tracking code manually can be a straightforward option. This method involves placing the code directly into your site’s header, so it loads on every page. But a quick heads-up: editing theme files can be risky if you’re not familiar with PHP or HTML, so always back up your site before making changes!
Here’s a simple step-by-step to do it:
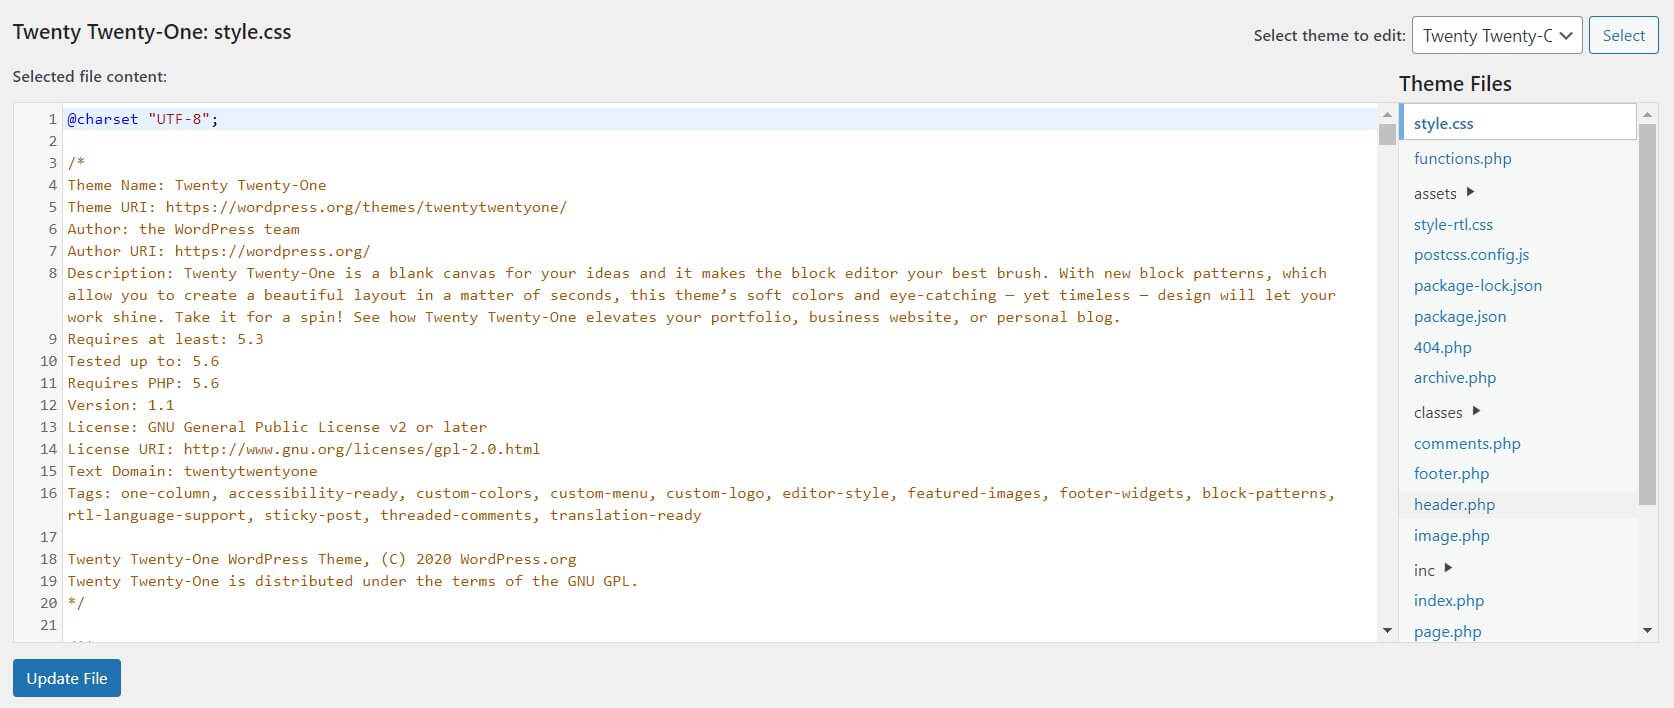
- Access Your Theme Files: Log in to your WordPress admin dashboard. Navigate to Appearance > Theme Editor. On the right side, you’ll see a list of theme files.
- Locate the header.php File: Find and click on header.php. This file contains the code that runs in the head section of your site.
- Insert the Tracking Code: Scroll to find the closing
</head>tag. Paste your Google Analytics tracking code just before this line. - Save Changes: Click Update File to save your modifications.
And that’s it! Your tracking code is now embedded directly into your site’s header, meaning Google Analytics can start collecting data right away.
Important Tips:
- Use a child theme if you’re comfortable with theme development. This way, your changes won’t be overwritten during theme updates.
- Double-check the tracking code for accuracy. A small typo can prevent data from being recorded properly.
- Test your setup by visiting your website and checking the real-time reports in Google Analytics. If you see your visit tracked, you’re good to go!
While manual addition gives you control, remember that it requires a bit of care. If you prefer a more user-friendly approach, moving on to using plugins might be the way to go.
6. Using a WordPress Plugin to Insert the Tracking Code
If editing theme files sounds a bit daunting—or if you want an easier, more manageable way to add your Google Analytics code—plugins are your best friends. They provide a simple interface to insert tracking codes without touching a single line of code. Plus, many plugins come with added features like tracking multiple sites, event tracking, or even enhanced privacy controls.
Here’s how to do it with a popular plugin like “Insert Headers and Footers” or “GA Google Analytics”:
- Install and Activate the Plugin: Go to Plugins > Add New. Search for “Insert Headers and Footers” or “GA Google Analytics”. Click Install Now and then Activate.
- Access the Plugin Settings: Usually, you’ll find the plugin under Settings > Insert Headers and Footers or a similar menu.
- Paste Your Tracking Code: Copy your Google Analytics tracking script. Then, paste it into the section labeled Scripts in Header or similar.
- Save Your Changes: Click Save, and you’re all set!
Why use a plugin?
- It keeps your tracking code separate from theme files, making updates safer.
- You can easily disable or remove the code if needed.
- Many plugins offer additional analytics features or integrations.
Another advantage is that plugins often have user-friendly dashboards, so you don’t need to navigate code or theme files. Plus, if you switch themes later, your tracking code stays intact and functional.
In a nutshell, using a plugin simplifies the process and reduces the chance of errors—making it perfect for beginners or anyone who prefers a hassle-free setup. Just install, configure, and forget about it until you want to analyze your site’s traffic data!
7. Verifying the Tracking Code Installation
After you’ve added the Google Analytics tracking code to your WordPress site, the big question is: Is it working correctly? Thankfully, there are a few straightforward ways to verify that your setup is successful and that data is flowing into your Google Analytics account.
Using Google Tag Assistant
One handy tool is the Google Tag Assistant, a browser extension available for Chrome. Here’s how to use it:
- Install the Google Tag Assistant extension.
- Visit your website where you’ve installed the tracking code.
- Click on the Tag Assistant icon in your browser toolbar.
- Click “Enable” and refresh your site.
- The extension will show you if the Google Analytics tag is present and correctly configured.
If you see a green checkmark indicating “No errors,” you’re good to go! If it flags issues, double-check your tracking code placement.
Real-Time Reports in Google Analytics
Another way to verify is directly within your Google Analytics account:
- Log into your Google Analytics dashboard.
- Navigate to Reports > Real-Time > Overview.
- Visit your website in another tab or device.
- Refresh the Google Analytics report page; if it shows your active session, your tracking code is functioning properly!
This real-time data can sometimes take a few seconds to appear, so be patient. If you don’t see any activity after a few minutes, recheck your code placement and ensure there are no conflicting scripts.
Using Browser Developer Tools
For those comfortable with browser developer tools, you can also verify the presence of the tracking code:
- Right-click on your webpage and select Inspect (or press F12).
- Go to the Console tab.
- Type
window.dataLayerand press Enter. If your Google Tag Manager is used, it should show your data layer array. - Alternatively, check the Network tab, filter by Collect or google-analytics.com to see if tracking requests are being sent.
Performing these checks ensures your Google Analytics setup is working smoothly, giving you confidence that your data collection is accurate and reliable.
8. Best Practices for Managing Google Analytics on Your WordPress Site
Now that you’ve got your tracking code verified, it’s important to stay on top of best practices to keep your analytics data clean, useful, and secure. Managing Google Analytics effectively involves a few key habits.
Keep Your Tracking Code Up-to-Date
If you ever change themes or update your website structure, revisit your tracking code placement. Ensure it remains correctly embedded and that no updates overwrite your existing code. Using a plugin like Site Kit by Google can help keep your tracking code consistent across updates.
Use Google Tag Manager for Flexibility
Instead of adding the tracking code directly to your site’s code, consider implementing Google Tag Manager (GTM). It offers:
- Centralized management of all your tracking tags.
- Easy updates without editing website code.
- Enhanced capabilities like event tracking, custom scripts, and more.
This approach makes managing multiple tags much simpler and reduces the risk of errors.
Segment Your Data and Set Goals
To make your analytics truly actionable, define clear goals, such as:
- Newsletter sign-ups
- Product purchases
- Contact form submissions
Set these up within Google Analytics to track conversions and understand user behavior better. Additionally, segment your data by:
- Device type
- Geography
- Traffic source
This segmentation provides deeper insights into how different user groups interact with your site.
Regularly Review Your Data
Don’t just set and forget! Make it a habit to review your analytics reports weekly or monthly. Look for trends, anomalies, or unexpected drops in traffic. This proactive approach helps you spot issues early and optimize your website accordingly.
Maintain Privacy and Compliance
Lastly, ensure your analytics setup respects user privacy and complies with regulations like GDPR or CCPA. This might involve:
- Adding a privacy notice on your site.
- Implementing cookie consent banners.
- Configuring IP anonymization in your Google Analytics settings.
Managing your analytics thoughtfully not only keeps your data accurate but also builds trust with your visitors.
Conclusion and Additional Tips for Monitoring Your Website Traffic
Adding Google Analytics tracking code to your WordPress site is a crucial step in understanding your audience and enhancing your website’s performance. Once you’ve successfully implemented the code, you can start analyzing visitor behavior, traffic sources, and conversion metrics to make informed decisions. Remember, consistent monitoring helps identify trends and areas for improvement, ultimately leading to a better user experience and increased engagement.
Here are some additional tips to maximize your website monitoring efforts:
- Set up Goals: Define specific actions you want visitors to take, such as completing a purchase or signing up for a newsletter. Tracking goals helps measure your success.
- Use Custom Dashboards: Customize your Google Analytics dashboard to focus on key metrics relevant to your business.
- Leverage Segments: Analyze specific visitor groups, such as new vs. returning visitors or mobile vs. desktop users, for deeper insights.
- Regularly Review Reports: Schedule periodic reviews of your analytics data to stay updated on traffic patterns and user behavior.
- Integrate with Other Tools: Connect Google Analytics with tools like Google Search Console or Google Ads for comprehensive insights.
| Tip | Benefit |
|---|---|
| Set up Goals | Measure specific user actions and campaign effectiveness |
| Use Custom Dashboards | Quickly access key metrics without sifting through extensive reports |
| Leverage Segments | Gain detailed insights into different visitor groups |
By consistently utilizing these tips, you can gain a comprehensive understanding of your website’s performance and make strategic improvements that drive growth and success.