In today’s digital world, connecting with your audience across social media platforms is more important than ever. Adding social media icons to your WordPress header is a simple yet effective way to boost engagement, increase your online presence, and make it easy for visitors to find and follow you. Whether you’re a blogger, business owner, or freelancer, this quick guide will walk you through the benefits and how to get those icons up in your header seamlessly. Let’s dive into why this small change can make a big difference!
Why Adding Social Media Icons to Your WordPress Header Is Important
Having social media icons prominently displayed in your WordPress header is a smart move for several reasons. First off, it enhances your website’s usability. When visitors arrive, they want to connect with you on platforms like Facebook, Twitter, Instagram, or LinkedIn — and having those icons right at the top makes it super easy for them to do just that. No digging through menus or scrolling down to the footer.
But it’s not just about convenience. Well-placed social icons also help build trust and credibility. When visitors see that you’re active on multiple social channels, it signals that you’re engaged and approachable. This can encourage them to follow, share, or even reach out directly, creating a stronger bond between you and your audience.
From an SEO perspective, social signals (like followers and shares) can have a positive impact on your website’s authority. While social media isn’t a direct ranking factor, increased engagement can lead to more traffic, backlinks, and brand recognition — all of which can boost your search engine visibility.
Another key benefit is consistency. When your social icons are in the header, they appear on every page, ensuring your audience always has easy access no matter where they land on your site. This consistent placement helps reinforce your brand and makes following or contacting you effortless.
Finally, adding social media icons is a simple, low-cost way to enhance your website’s professionalism. It shows that you care about your online presence and are making an effort to connect with your community. Plus, with so many plugins and easy customization options available, it’s a quick tweak that can deliver impressive results. So, if you’re looking to boost engagement and strengthen your brand, adding social media icons to your header is definitely a step in the right direction!
3. Choosing the Right Social Media Icons for Your Website
When it comes to adding social media icons to your WordPress header, the first step is selecting the right icons that match your website’s style and branding. Not all icons are created equal, and the ones you choose can really influence how visitors perceive your site and how easily they can connect with you.
Consider your brand identity — do you have a modern, minimalist look, or is your brand more playful and vibrant? The icon style should complement your overall design. For example, sleek, flat icons work well for modern sites, while more colorful, whimsical icons might suit creative portfolios or blogs.
Next, think about which social platforms are most relevant to your audience. You don’t need to include every possible icon—focus on the platforms where your target audience is active. Common options include:
- YouTube
Once you’ve identified the platforms, look for icon sets that are:
- Consistent in style: To maintain a cohesive look, choose icons from the same set or designer.
- High quality: Use SVG icons for scalability and clarity across devices.
- Accessible: Ensure icons are recognizable and have appropriate alt text or aria labels for screen readers.
There are plenty of free and premium icon libraries out there, such as Font Awesome, Flaticon, and Iconfinder. For a seamless look, many WordPress themes and plugins support icon fonts or SVGs directly, making integration easier.
Finally, think about color schemes. Some icons come in monochrome, which can be styled with CSS to match your site’s palette, while others have vibrant colors. Choose what works best for your site’s aesthetic and user experience.
4. Step-by-Step Guide to Adding Social Media Icons to Your WordPress Header
Now that you’ve picked the perfect icons, it’s time to add them to your WordPress header. Don’t worry—it’s easier than you might think! Here’s a simple, step-by-step guide to help you do it smoothly.
Step 1: Choose Your Method
There are a few ways to add social media icons:
- Using a WordPress plugin
- Manually editing your theme’s code
- Using a page builder with built-in social icons
For most users, a plugin is the easiest and safest method, especially if you’re not comfortable editing code.
Step 2: Install a Suitable Plugin
Search for popular social media icon plugins in your WordPress dashboard, such as:
- Simple Social Icons
- WP Social Icons
- Social Icons Widget by WPZoom
Install and activate your chosen plugin. Most plugins come with simple settings to customize the icons and placement.
Step 3: Configure Your Icons
Navigate to the plugin’s settings page. Here, you’ll typically:
- Add your social media profile URLs
- Select icon styles or upload custom icons
- Choose icon sizes and colors
- Decide on the display location, such as header, footer, or widget areas
For header placement, look for options to add the icons directly to your header area or use a widget in a header widget area if your theme supports it.
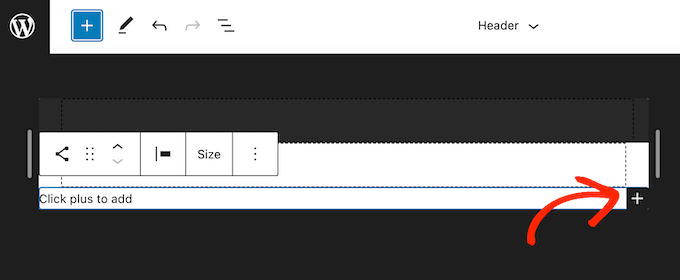
Step 4: Position the Icons in Your Header
If your theme has widget areas in the header, simply drag and drop the social icons widget there. Otherwise, you may need to:
- Go to Appearance → Customize
- Select Header or Header Builder
- Add a widget or custom HTML block in the header section
- Insert the icons’ shortcode or HTML code provided by the plugin
Step 5: Style and Test
Use your theme’s customizer or additional CSS to tweak icon sizes, spacing, or colors to match your branding. Once everything looks good, visit your site on different devices to ensure the icons are visible, accessible, and functioning correctly.
And that’s it! With these simple steps, you’ll have stylish, functional social media icons gracing your WordPress header—making it easy for visitors to connect with you and boosting your engagement.
5. Using Plugins to Insert Social Media Icons Efficiently
If you’re looking for a quick and hassle-free way to add social media icons to your WordPress header, plugins are your best friends. No need to mess around with code or worry about design compatibility — plugins handle all that for you. Plus, they often come with a variety of icon styles, placement options, and customization features, making it super easy to match your website’s look and feel.
Some popular social media plugin options include:
- Simple Social Icons: A lightweight plugin that lets you add customizable icons to your header or footer with just a few clicks.
- Social Icons Widget & Block by WPZOOM: Offers a wide range of icon styles and supports many social networks. You can add icons via widgets or blocks.
- Smash Balloon Social Photo Feed: Perfect if you want to showcase your Instagram feed alongside icons.
Here’s a quick step-by-step on how to add icons using a plugin:
- Install and activate your chosen plugin from the WordPress Plugin Directory.
- Go to the plugin’s settings page, often found under “Settings” or directly in the WordPress dashboard menu.
- Add your social media profile URLs — think of this like telling the plugin where your social presence lives.
- Choose your icon style, size, and alignment options — most plugins offer a live preview so you can see what it looks like before saving.
- Decide where to display the icons. Many plugins let you add them to your header, footer, or even within specific pages or posts.
- Save your settings and check your website to see the icons in action!
Using plugins not only saves you time but also gives you a lot of flexibility. Plus, they tend to be regularly updated and compatible with various themes, so you can focus on engaging your audience rather than wrestling with code.
6. Customizing Your Social Media Icons for Better Branding
Adding social media icons is great, but making sure they align with your brand’s look and feel is what’s going to really boost engagement. Customization isn’t just about aesthetics — it’s about creating a cohesive experience for your visitors. Here’s how you can tailor your icons to better reflect your brand:
Choose the Right Style
Icon styles range from simple outlines to filled, rounded, square, or even animated icons. Think about your website’s overall design:
- Minimalist brands: Opt for sleek, outline icons that blend seamlessly.
- Bold, vibrant brands: Bright, filled icons can make a statement.
- Luxury or elegant brands: Consider monochrome or subtle hover effects to add sophistication.
Match Colors to Your Palette
If your branding uses specific colors, customize your icons to match. Many plugins allow you to set custom colors or use CSS for more precise control. Consistent colors reinforce brand recognition and create a polished look.
Size and Placement
Make your icons prominent enough to be noticed but not overwhelming. Think about the header’s layout and balance. Test different sizes and positions — maybe a horizontally aligned row at the top, or vertically stacked icons in your header menu.
Use Custom Icons or SVGs
If you want something unique, consider uploading custom SVG icons. This approach lets you create icons that are perfectly aligned with your branding and design language. Just make sure you’re comfortable with editing code or using a page builder that supports SVG uploads.
Consistent Hover Effects and Animations
Adding subtle hover effects, like color changes or slight enlargements, can make your icons more interactive and engaging. Just keep it consistent across all icons to maintain a professional look.
Remember, the goal is to create a seamless, branded experience that encourages visitors to connect with you on social media. By customizing your icons thoughtfully, you’ll improve not just the aesthetics but also your overall engagement and brand recognition online.
7. Testing and Ensuring Responsiveness of Your Social Icons
Once you’ve added your social media icons to your WordPress header, the next step is to make sure they look great and work perfectly across all devices. You don’t want your visitors to struggle to see or click those icons whether they’re browsing on a desktop, tablet, or smartphone. So, testing and responsiveness are key!
Here’s what you should do:
- Preview on Multiple Devices: Use your browser’s developer tools (like Chrome DevTools) to simulate various screen sizes. Check how your icons appear on desktops, tablets, and smartphones. Are they clear? Are the clickable areas large enough?
- Use Real Devices: If possible, test on actual devices. Sometimes emulators don’t catch all display issues. Open your website on different smartphones and tablets to see how the icons behave.
- Check Loading Speed: Optimized icons load faster. Use tools like Google PageSpeed Insights or GTmetrix to see if your icons are slowing down your site and follow their suggestions for optimization.
- Responsive Design Checks: Ensure your icons resize or reposition gracefully. For example, if you used custom CSS, verify that media queries are correctly set up to adjust icon size, spacing, or alignment on smaller screens.
Remember, the goal is a seamless experience for every visitor. If you notice issues—like overlapping icons, tiny click zones, or icons that disappear—you’ll want to tweak your CSS or plugin settings until everything looks sharp and functions smoothly.
Also, consider accessibility. Make sure your icons have descriptive alt text or aria labels so screen readers can interpret them properly. This way, you’re not only making your site look good but also inclusive for all users.
In summary, thorough testing ensures your social icons are both beautiful and functional across all devices. It’s worth investing a little time here to provide a professional, user-friendly experience that encourages visitors to connect with you on social media!
8. Tips for Maximizing Engagement with Your Social Media Icons
Adding social media icons is just the first step. To truly boost engagement, you need to make sure those icons are inviting, accessible, and strategically placed. Here are some practical tips to help you maximize the impact of your social media icons:
1. Placement Matters
Usually, the header is a prime spot since it’s one of the first things visitors see. But don’t forget other locations like the footer or sidebar, depending on your site layout. The key is consistency and visibility—ensure your icons are easy to find without overwhelming your design.
2. Use Clear, Recognizable Icons
Stick to the official logos of your social platforms. They’re instantly recognizable, which encourages clicks. Custom icons can be creative but risk confusing visitors. Keep it simple and familiar.
3. Include Call-to-Action Text
Sometimes, adding a short prompt like “Follow us on Twitter” or “Like us on Facebook” next to your icons can encourage more interaction. You can also add hover effects with subtle animations or color changes to draw attention.
4. Make Icons Clickable and Large Enough
Ensure your icons are not too small—aim for at least 44×44 pixels, which is a good minimum for touch devices. Also, check that the clickable area is generous enough so visitors don’t get frustrated trying to tap or click.
5. Link Directly to Your Profiles
Double-check all links to your social profiles are correct and open in new tabs. This way, visitors stay on your site while browsing your social pages.
6. Incorporate Social Sharing Buttons
Beyond just icons for following, add sharing buttons on your content pages. This encourages visitors to share your blog posts or products, expanding your reach.
7. Track Engagement
Use analytics tools to monitor how often visitors click on your social icons. This insight helps you understand what platforms your audience prefers and allows you to optimize accordingly.
8. Keep Icons Up-to-Date
If your branding or social profiles change, update the icons promptly. Fresh and accurate links show professionalism and encourage trust.
Ultimately, well-placed, attractive, and functional social media icons serve as gateways for your visitors to connect, engage, and share your content. Think of them as digital handshake points—friendly, accessible, and inviting! By following these tips, you’ll turn simple icons into powerful engagement tools that help grow your online presence.
Conclusion and Final Thoughts
Adding social media icons to your WordPress header is a simple yet powerful way to enhance your website’s engagement and connectivity. By prominently displaying your social profiles, you make it easier for visitors to find and follow you across various platforms, which can lead to increased traffic, brand awareness, and community interaction. Remember to choose icons that match your website’s design for a cohesive look and ensure they are placed in a visible, accessible location within your header.
To recap, the key steps include:
- Selecting the right social media icons that align with your branding
- Using plugins or custom code to add these icons to your header
- Ensuring the icons are responsive and work well on all devices
- Regularly updating your social links to keep your visitors connected
Ultimately, integrating social media icons into your WordPress header is a straightforward process that can significantly boost your online engagement. Take the time to customize and optimize their placement, and you’ll see the benefits reflected in your website’s interaction levels and overall reach. Keep experimenting with different styles and placements to find what works best for your audience and website design.