Have you ever wished your visitors could decide how much they want to pay for your digital or physical products? That’s exactly what a “Name Your Price” feature does! It empowers users to set their own price, which can boost sales, increase customer satisfaction, and even help you reach a wider audience. Implementing this on your Reddit WordPress site can make your offerings stand out and foster a sense of trust and flexibility. Plus, it’s a win-win: customers get to pay what they believe your product is worth, and you might just see higher conversions than traditional fixed pricing.
By adding a “Name Your Price” option, you’re also tapping into a more personalized shopping experience. It can be especially useful for creators, artists, musicians, or any seller who wants to accommodate different budget levels. The benefits include:
- Increased Engagement: Visitors are more likely to interact with your site when they can choose their own price.
- Better Customer Relationships: Offering flexibility shows you care about your audience’s needs.
- Potential for Higher Revenue: Some customers may pay more than a fixed price if given the chance.
- Market Differentiation: Standing out from competitors who only offer fixed prices.
Overall, this feature can be a game-changer for your online store or community, making the shopping experience more dynamic and customer-centric.
Prerequisites and Tools Needed for Implementation
Before diving into setting up a “Name Your Price” feature on your Reddit WordPress site, you’ll want to make sure you have the right tools and a solid plan in place. Here’s what you need:
Prerequisites
- WordPress Website: Ensure your site is up and running smoothly with access to the admin dashboard.
- Basic Knowledge of WordPress: Familiarity with installing plugins, editing pages, and customizing your theme will be helpful.
- Product or Service to Sell: Have your offerings ready—digital downloads, memberships, or physical items.
- Payment Gateway: Set up a secure and reliable payment processor like PayPal, Stripe, or others supported by WooCommerce.
Tools Needed
- WordPress Plugin for “Name Your Price”: There are several options, but popular ones include:
- WooCommerce Name Your Price
- PW WooCommerce Gift Cards (supports flexible pricing)
- Easy Digital Downloads – Name Your Price Extension
- WooCommerce Plugin: If you haven’t already, install WooCommerce to handle product management and payments.
- Secure SSL Certificate: Protect your customers’ payment info during transactions.
- Optional Customization Tools: Like page builders or custom CSS for styling your pricing options.
Once you have these essentials, you’ll be ready to start customizing your site for the flexible pricing experience. Remember, always back up your site before installing new plugins or making significant changes!
3. Step-by-Step Guide to Adding the Name Your Price Feature on Your WordPress Site
So, you’re ready to let your visitors decide what they want to pay? That’s a fantastic way to boost engagement and give your audience a sense of control. Implementing a “Name Your Price” feature on your WordPress site might sound intimidating, but don’t worry—step-by-step, we’ll make it simple.
First things first, you’ll want to choose the right method. You can go the plugin route, which is often the easiest, or create a custom solution if you’re comfortable with coding. Here, we’ll focus on the plugin approach because it’s user-friendly and quick to set up.
Step 1: Pick a Suitable Plugin
- Research options: Search the WordPress plugin repository for “Pay What You Want” or “Name Your Price” plugins. Popular choices include WP Name Your Price or WooCommerce Name Your Price.
- Check compatibility: Make sure the plugin works with your current WordPress version and theme.
- Read reviews and ratings: Pick a plugin with good feedback to ensure reliability and support.
Step 2: Install and Activate the Plugin
- Go to your WordPress dashboard.
- Navigate to Plugins > Add New.
- Search for your chosen plugin by name.
- Click Install Now and then Activate.
Step 3: Create Your Product or Service Page
Once the plugin is active, you’ll need to add your product or service where customers can input their desired price. This could be a regular product page, a custom landing page, or even a downloadable file. The plugin will typically add a new field or option to your product setup.
Step 4: Configure the Price Input
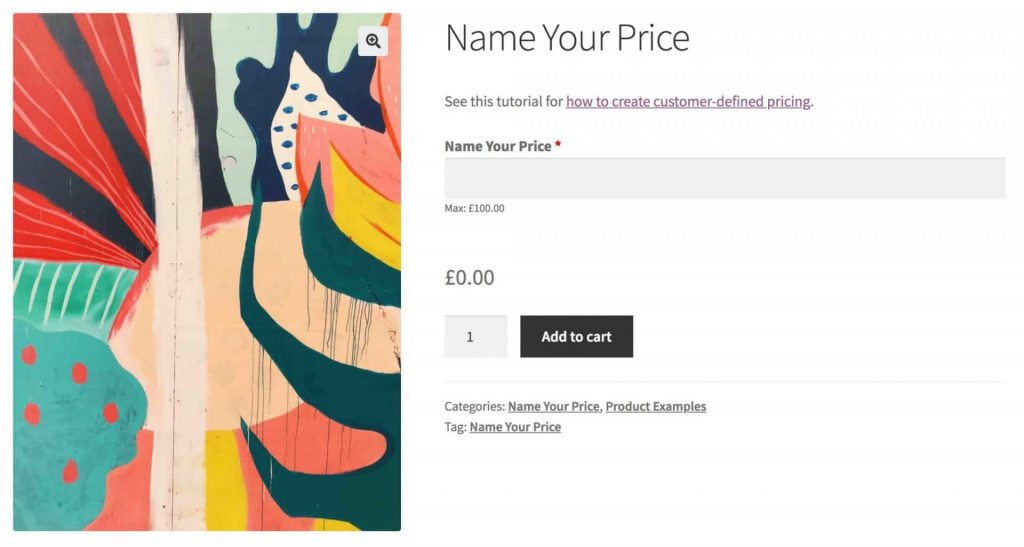
Follow the plugin’s instructions to set up the price input field. Usually, you can specify:
- The minimum price allowed.
- The default or suggested price.
- Optional maximum price.
Step 5: Test the Setup
Before going live, test the entire process. Visit your product page, input different prices, and ensure the checkout process reflects the amount you entered. Make sure payments go through smoothly and that the submitted price is correctly recorded.
And voilà! You’ve now set up a basic “Name Your Price” feature. Next, let’s look at how to fine-tune your plugin or custom code to give your visitors the best experience possible.
4. Configuring the Plugin or Custom Code for Price Selection
Now that you’ve got the “Name Your Price” feature installed, it’s time to fine-tune the settings to match your goals. Whether you’re using a plugin or custom code, proper configuration ensures a seamless experience for your visitors and accurate checkout processing.
Configuring Your Plugin
Most plugins come with a settings page where you can customize how the price input behaves. Here’s what to keep an eye on:
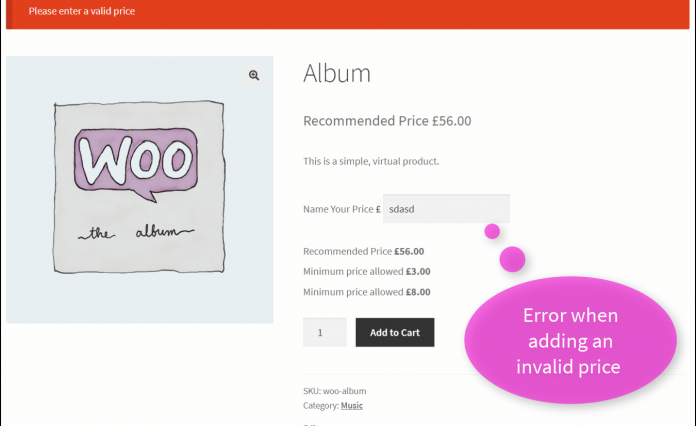
- Minimum and maximum prices: Decide what’s the lowest and highest amount your customers can choose. This helps prevent undervaluing or overpricing your products.
- Default or suggested price: Set a default value to guide customers or encourage certain price points.
- Display options: Choose how the price input appears—inline, as a popup, or with additional descriptions for clarity.
- Validation rules: Ensure the input accepts only valid numerical values within your specified range.
Customizing the User Experience
To make the process intuitive:
- Add clear instructions: Let users know they can input their desired price.
- Show the price prominently: Display the total price clearly at checkout.
- Offer suggested prices: Provide a few options to guide customers and increase conversions.
Implementing Custom Code (If Not Using a Plugin)
If you prefer a more tailored approach and are comfortable with coding, you can add a custom input field to your product page. Here’s a simplified overview:
- Add an input field: Use HTML <input type=”number”> for users to enter their price.
- Validate input: Use JavaScript or PHP to ensure the value is within your desired range.
- Pass the value to checkout: Customize your cart or checkout template to include the user’s input.
- Adjust payment processing: Modify your payment logic to accept the dynamic amount entered by the user.
Final Tips
- Test thoroughly: Always test different scenarios to ensure everything works smoothly.
- Communicate clearly: Let your customers know they can name their price and how it affects their purchase.
- Monitor and optimize: Keep an eye on sales and adjust minimum/maximum prices or suggested amounts based on customer behavior.
With these configurations in place, your “Name Your Price” feature will be user-friendly and effective. Remember, the goal is to make the process as simple and transparent as possible, encouraging customers to pay what they feel your product or service is worth.
5. Integrating the Feature with Reddit for Enhanced User Engagement
Now that you’ve set up your “Name Your Price” feature on your WordPress site, it’s time to think about how to connect it with Reddit — one of the most vibrant communities out there. The goal? Boost user engagement, gather feedback, and even drive more traffic to your site by tapping into Reddit’s vast audience.
First things first, you want to make sure your Reddit integration feels seamless and natural. Here’s how you can do it:
- Create a dedicated Reddit post or thread: Announce your new “Name Your Price” feature in a specific subreddit relevant to your niche. Be transparent about what you’re offering and invite users to participate.
- Use engaging call-to-actions (CTAs): Encourage users to visit your site, try out the feature, and share their experiences. Phrases like “Tell us what you’d pay for this” or “Customize your price” work well.
- Leverage Reddit’s API or third-party tools: If you’re comfortable with more advanced integrations, you can use Reddit’s API to automatically post updates or respond to comments. Alternatively, tools like Zapier can help connect Reddit activity with your WordPress site, triggering notifications or updates.
- Incorporate Reddit sharing buttons: Add social sharing buttons on your product or landing pages so users can easily share their customized prices or experiences directly to Reddit. This helps amplify your reach.
Another great tactic is to host Reddit AMAs (Ask Me Anything) or Q&A sessions about your “Name Your Price” feature. This not only builds trust but also encourages users to interact directly with you, providing valuable insights and ideas for improvement.
Remember, Reddit favors authentic, community-driven content. Avoid overtly promotional posts; instead, focus on engaging conversations, sharing behind-the-scenes looks, or asking for feedback. This approach fosters genuine engagement and encourages users to explore your site’s new feature naturally.
6. Testing the Functionality and Troubleshooting Common Issues
Before you go live with your “Name Your Price” feature and Reddit integration, thorough testing is essential. You want to ensure everything works smoothly and that your users have a seamless experience. Let’s walk through some key steps and common issues you might encounter.
Testing the Core Functionality
- Simulate user interactions: Try out the feature yourself — select different price points, submit your choices, and verify that the data gets captured correctly in your database.
- Check for responsiveness: Make sure the feature works well across various devices — desktops, tablets, and smartphones. A mobile-friendly experience is crucial for user engagement.
- Verify notifications and confirmations: Confirm that users receive proper feedback after submitting their price — whether it’s a thank you message, confirmation email, or redirect to a specific page.
- Test Reddit sharing and API integrations: Ensure that posts, comments, or updates from Reddit trigger the desired actions on your site, and vice versa.
Common Issues and Troubleshooting Tips
| Issue | Possible Cause | Solution |
|---|---|---|
| Form not submitting or data not saving | JavaScript errors or plugin conflicts | Check your browser console for errors, disable conflicting plugins, and ensure your form scripts load correctly. |
| Reddit API not responding or posting fails | Incorrect API credentials or rate limits | Verify your API keys, ensure they have the right permissions, and avoid exceeding Reddit’s rate limits. |
| Responsive design issues on mobile devices | CSS conflicts or missing media queries | Review your CSS, test on multiple devices, and consider using responsive frameworks like Bootstrap. |
| Users submitting inappropriate prices or spam | Lack of moderation controls | Implement validation rules, set minimum/maximum price limits, and monitor submissions regularly. |
Remember, testing is an ongoing process. After launching, keep an eye on user feedback, monitor your analytics, and be ready to make adjustments. Troubleshooting may seem daunting at first, but with patience and attention to detail, you’ll ensure your “Name Your Price” feature runs smoothly and keeps your community engaged and satisfied.
7. Best Practices for Using the Name Your Price Feature Effectively
Implementing a “Name Your Price” feature is a fantastic way to engage your audience and give them a sense of control over their purchases. But to make this feature truly successful, you need to approach it thoughtfully. Here are some best practices to keep in mind:
Set Clear Guidelines and Expectations
Before you roll out the feature, be transparent about how it works. For example, if there’s a minimum or maximum price, specify these limits upfront. Clarify whether users can name any price they want or if there are restrictions. This prevents confusion and helps manage user expectations.
Offer Recommended Price Ranges
While letting users choose their own price is great, providing a suggested price range can guide them and encourage fair valuations. You might include a note like, “Most customers pay between $10 and $20 for this product.” This can also help you gauge what customers are willing to pay and tailor your offerings accordingly.
Implement Price Validation
To avoid users entering unreasonable amounts, set validation rules. For example, prevent prices below your minimum threshold or excessively high figures. This keeps the system fair and protects your revenue streams.
Use Analytics to Monitor Trends
Track what prices users are entering over time. This data can reveal customer willingness to pay, inform future pricing strategies, and highlight whether your suggested ranges are effective. Many WordPress plugins or custom code can help with this analysis.
Offer Incentives or Rewards
Encourage users to offer fair prices by adding incentives, such as discounts for paying above a certain amount or exclusive access. This motivates users to participate actively and can boost your revenue.
Test and Gather Feedback
Before fully launching, test the feature with a small audience. Ask for feedback on usability and fairness. Use this input to make adjustments, ensure a smooth experience, and build trust with your community.
Maintain Transparency and Good Customer Service
If users have questions or issues, be responsive. Clear communication about how their price is used and how they can adjust it fosters trust and encourages repeat participation.
8. Conclusion and Final Tips for Successful Implementation
Adding a “Name Your Price” feature to your Reddit WordPress site can be a game-changer for engaging your community and boosting sales. But like any new tool, its success hinges on thoughtful implementation and ongoing management.
Here are some final tips to help you make the most of this feature:
- Start Small: Roll out the feature gradually. Test with a limited audience to iron out any issues before a full launch.
- Be Transparent: Clearly communicate how the pricing works, any restrictions, and how user input influences the final price.
- Monitor and Adjust: Keep an eye on user behavior and sales data. Adjust suggested ranges, minimums, or other settings based on real-world feedback.
- Engage Your Community: Encourage discussion around pricing. This can lead to valuable insights and foster a sense of involvement.
- Stay Flexible: Be prepared to tweak the feature as you learn what works best for your audience and business goals.
- Focus on Value: Ensure that your offerings provide real value, so users feel comfortable naming their price without undervaluing your work.
By following these best practices and tips, you’ll create a seamless, engaging experience that benefits both your community and your bottom line. Remember, the key is to stay transparent, listen to your users, and be adaptable. Good luck with your “Name Your Price” implementation!