Starting your own website might seem daunting at first, but with WordPress, it’s more accessible than ever. Whether you’re creating a blog, a small business site, or an online portfolio, WordPress offers a flexible platform that’s easy to learn. The best part? You don’t need to be a tech wizard to get started—just a little patience and curiosity will do. In this guide, I’ll walk you through each step of building your website from scratch, so you can finally share your ideas, products, or talents with the world. Let’s dive in!
Choosing the Right Domain Name and Web Hosting Provider
Before you can start building your website, you need two essential things: a domain name and a hosting provider. Think of your domain name as your website’s address—something memorable that represents your brand or idea. The right domain name is crucial because it affects your branding, SEO, and how easily visitors can find you. When choosing a domain, keep it simple, short, and relevant. Avoid complicated spellings or hyphens, and consider including keywords related to your niche if possible.
Once you have your domain name, it’s time to find a web hosting provider. Hosting is like renting space on the internet where your website lives. There are many options out there, but for beginners, shared hosting is usually the best choice—it’s affordable and easy to set up. Look for hosts that offer one-click WordPress installation, good customer support, and reliable uptime. Some popular beginner-friendly hosting providers include Bluehost, SiteGround, and DreamHost.
| Criteria | Recommended Hosting Providers |
|---|---|
| Ease of Use | Bluehost, SiteGround, DreamHost |
| Price | Budget-friendly options available |
| Customer Support | 24/7 support with live chat or phone |
| Features | One-click WordPress install, SSL certificates, uptime guarantee |
Remember, your domain name and hosting are investments in your website’s future. Choose wisely, and don’t be afraid to ask questions or read reviews before making a decision. Once you’ve secured your domain and hosting, you’ll be ready to move on to installing WordPress and customizing your site!
3. Installing WordPress on Your Hosting Server
Alright, so you’ve chosen your hosting provider and domain name — great! Now it’s time to get WordPress installed and ready to rock. The good news? Most hosting providers make this process pretty straightforward, often with one-click installers. But don’t worry if you want to understand the steps involved; I’ll walk you through the typical process.
First things first, log into your hosting account and look for a section called “Control Panel” or something similar, like cPanel or Plesk. Once inside, find the icon labeled “WordPress Installer,” “Softaculous,” or “Website Builder.” The exact name can vary depending on your host.
Using One-Click Installers
- Click on the WordPress installer option.
- Fill in the necessary details:
- Domain Name: Choose the domain where you want to install WordPress.
- Site Name: You can change this later, but for now, just enter your website’s name.
- Admin Username & Password: Pick a unique username and a strong password — avoid default options like “admin” for security reasons.
- Email Address: Enter a valid email for notifications and password recovery.
- Click “Install”.
Once installed, you’ll see a confirmation message with your admin login URL, typically something like yourdomain.com/wp-admin. Save these details somewhere safe because you’ll need them to start customizing your site.
Manual Installation (If Needed)
If your host doesn’t have a one-click installer, no worries! You can install WordPress manually by following these steps:
- Download WordPress from wordpress.org.
- Upload the files to your hosting server via FTP or File Manager.
- Create a MySQL database and user through your hosting control panel.
- Run the WordPress installation script by navigating to your domain in a browser.
But honestly, most hosts make the one-click option super easy and fast, so I recommend that route if it’s available.
4. Configuring Basic Settings for Your WordPress Site
You’re all set with WordPress installed—congratulations! Now, let’s jump into some essential settings to make your website functional, secure, and ready for visitors.
General Settings
To start, head to your WordPress dashboard and click on “Settings” > “General.” Here, you’ll want to check and update:
- Site Title & Tagline: Make sure your site’s name and description are accurate. These appear in search results and help visitors understand what your site is about.
- WordPress Address (URL) & Site Address (URL): Usually, these are the same — ensure they point to your domain.
- Timezone & Date Format: Set your local timezone and preferred date/time display.
- Membership: Decide if you want visitors to register or if your site is private.
Permalinks
Next, go to “Settings” > “Permalinks.” This is where you decide how your URLs look. I recommend choosing the “Post name” option because it’s clean, SEO-friendly, and easy for visitors to read. For example: yourdomain.com/my-first-post.
Reading Settings
Under “Settings” > “Reading,” you can set what your homepage displays:
- Choose to show your latest posts or a static page.
- If you want a homepage that’s just a welcome page, select “A static page” and pick the page you created for your homepage.
Discussion Settings
If you plan to have a blog or allow comments, visit “Settings” > “Discussion”. Here, you can control comment moderation, notifications, and spam protection. It’s a good idea to enable “Comment Moderation” to review comments before they go live to keep spam at bay.
Final Tips
Once you’ve configured these basics, click “Save Changes.” Take some time to explore your dashboard, personalize your site, and install essential plugins (more on that later). Remember, setting up your site’s foundational settings correctly now will save you headaches later on.
And that’s it for the initial setup! You’re well on your way to creating a beautiful, functional WordPress website. Next, we’ll dive into customizing your site’s appearance and adding content. Stay tuned!
5. Selecting and Installing a WordPress Theme
Now that you’ve got your basic WordPress setup ready, it’s time to give your website a fresh new look by selecting the perfect theme. Think of your theme as the outfit your website wears—it’s the first thing visitors see, so choosing the right one is super important!
Here’s how to pick the right theme:
- Define your website’s purpose: Is it a blog, an online store, a portfolio, or a business site? Different themes cater to different needs.
- Look for responsive design: Make sure the theme looks great on all devices—desktops, tablets, and smartphones.
- Check for customization options: Does the theme allow you to easily change colors, fonts, and layouts without touching code?
- Read reviews and ratings: See what other users are saying about the theme’s performance and support.
- Ensure compatibility: Confirm that the theme works well with popular plugins you might want to use.
Where to find themes?
- Official WordPress Theme Repository: Free themes directly accessible from your WordPress dashboard under “Appearance” > “Themes” > “Add New”.
- Premium marketplaces: Sites like ThemeForest, Elegant Themes, or StudioPress offer high-quality themes with more features.
Installing your chosen theme is straightforward:
- Navigate to Appearance > Themes in your WordPress dashboard.
- Click on Add New.
- Use the search bar to find a theme by name or filter by features.
- Once you find a theme you like, click Install.
- After installation, click Activate.
Tip: If you’ve purchased a premium theme outside the WordPress repository, you’ll usually get a download file. To install it:
- Go to Appearance > Themes > Add New > Upload Theme.
- Choose your .zip file, then click Install Now and activate once uploaded.
And voila! You’ve successfully installed your theme. Now, let’s move on to customizing your website’s look and feel to truly make it your own.
6. Customizing Your Website Design and Layout
Great, your theme is installed and active—now comes the fun part: customizing your website to match your style and brand. Think of this as decorating your new home; you want everything to feel just right.
Here are some key customization options to explore:
- Site Identity: Upload your logo, set your site title and tagline, and choose your site icon (favicon).
- Colors and Fonts: Adjust color schemes and typography to match your branding. Many themes provide easy-to-use color pickers and font selectors.
- Header and Footer Layouts: Decide how your header and footer look—add menus, social icons, or contact info.
- Homepage Layout: Choose whether your homepage displays latest posts, a static page, or custom sections.
- Widgets: Drag and drop widgets into sidebars or footer areas to add features like recent posts, search bars, or social links.
Using the WordPress Customizer:
Most themes support the WordPress Customizer, which provides a live preview of your changes. To access it:
- Go to Appearance > Customize in your dashboard.
- Navigate through the options—each theme will have different settings.
- Make adjustments such as setting your site title, changing colors, or adding header images.
- Preview your changes in real-time, and once satisfied, click Publish.
Tip: If your theme supports page builders like Elementor or Beaver Builder, you can create custom layouts with drag-and-drop simplicity. These tools are fantastic for designing unique pages without any coding experience.
Remember, the goal is to make your website visually appealing and easy to navigate. Take your time experimenting with different styles and layouts until it feels right. Once you’re happy with the design, it’s time to add content and make your website truly your own!
7. Adding Essential Plugins to Enhance Functionality
Now that your WordPress website is set up and looking good, it’s time to make it work smarter, not harder. That’s where plugins come in! Think of plugins as apps for your website—they can add new features, boost performance, improve security, and so much more. But remember, less is more. You don’t want to overload your site with too many plugins, which can slow things down or cause conflicts.
So, which plugins are truly essential for beginners? Here’s a quick rundown:
- Yoast SEO: This plugin helps optimize your website for search engines. It guides you on improving your content and keywords, making it easier for people to find you on Google.
- WP Super Cache or W3 Total Cache: Speed is key! These caching plugins help your site load faster, which keeps visitors happy and improves your SEO ranking.
- Akismet Anti-Spam: Spam comments can clutter your site and look unprofessional. Akismet automatically filters out spam, saving you time and headaches.
- Jetpack: A versatile plugin offering security, backups, site stats, and more—all in one package.
- Contact Form 7 or WPForms: Want visitors to reach out? These plugins make creating contact forms super simple.
- UpdraftPlus: Regular backups are your safety net. If something goes wrong, you can restore your site easily with this plugin.
Adding plugins is straightforward. Just go to your WordPress dashboard, click on Plugins > Add New, search for the plugin name, then click Install Now and Activate. Remember to keep your plugins updated to ensure security and compatibility.
And a quick tip: only install plugins from trusted sources, and remove any that you no longer use. This keeps your site running smoothly and secure.
8. Creating and Managing Content with Pages and Posts
With your site now equipped with essential plugins, it’s time to fill it with content. WordPress gives you two main types of content: Pages and Posts. Think of Pages as the static, timeless sections of your website—like your About or Contact pages. Posts are your dynamic, timely updates—like blog articles, news, or announcements.
Let’s start with Creating Pages. To do this:
- Navigate to Pages > Add New in your dashboard.
- Enter a clear, descriptive title (e.g., “About Us”).
- Add your content in the editor. You can include text, images, videos, and even links.
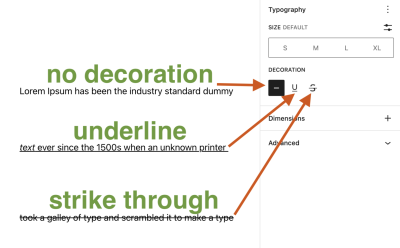
- Use the formatting options to style your content—bold, italics, bullet points, headings—and make it engaging.
- If you want this page to be easily accessible, add it to your menu by going to Appearance > Menus.
- Finally, click Publish to make your page live.
Creating Posts is similar, but they’re more suited for timely updates:
- Go to Posts > Add New.
- Enter a catchy title, then start writing your article or update.
- Use categories and tags to organize your posts, making it easier for visitors to find related content.
- Add images, videos, or other media to make your posts more appealing.
- Preview your post to see how it looks, then hit Publish.
Managing your content is just as easy. You can edit, delete, or update pages and posts anytime from the dashboard. Plus, with plugins like Yoast SEO, you can optimize each piece of content for better visibility.
Remember, consistency is key. Regularly update your blog posts and keep your pages current. This not only helps with SEO but also keeps your visitors engaged and coming back for more.
9. Optimizing Your Website for Search Engines
So, you’ve built your awesome WordPress website — congratulations! But wait, your work isn’t done just yet. To make sure people actually find your site when they search online, you need to optimize it for search engines, a process known as SEO (Search Engine Optimization). Think of SEO as giving your website a little boost so it ranks higher on Google and other search platforms. Don’t worry, it’s not as complicated as it sounds, and I’ll walk you through the essentials.
Understanding the Basics of SEO
At its core, SEO is about making your website understandable and appealing to search engines. This includes things like:
- Using relevant keywords in your content
- Creating quality content that provides value
- Ensuring your site is mobile-friendly
- Speeding up your website so it loads quickly
- Getting backlinks from other reputable sites
Installing an SEO Plugin
The easiest way to get started is by installing a popular SEO plugin like Yoast SEO or All in One SEO Pack. These tools give you step-by-step guidance and help you optimize each page and post. Here’s how:
- Go to your WordPress dashboard
- Navigate to Plugins > Add New
- Search for Yoast SEO
- Click Install Now and then Activate
Optimizing Your Content
Once the plugin is installed, pay attention to these key areas:
- Focus Keywords: Choose a primary keyword for each page or post and make sure it appears naturally in the title, headings, and throughout the content.
- Meta Descriptions: Write compelling summaries that encourage clicks and include your keywords.
- Readable URLs: Keep your URLs short, descriptive, and include keywords (e.g., www.yoursite.com/seo-tips).
- Internal Linking: Link to other relevant pages on your site to keep visitors engaged and help search engines understand your site structure.
Boosting Site Speed and Mobile Friendliness
Beyond content, technical factors matter a lot. Use tools like Google PageSpeed Insights to analyze your site’s speed and get suggestions. Also, choose a responsive theme, or ensure your current theme is mobile-friendly, so your website looks great on all devices.
Monitor Your Progress
Finally, set up Google Analytics and Google Search Console. These free tools give you insights into how visitors find and interact with your site, helping you refine your SEO strategy over time.
10. Launching Your Website and Promoting It Effectively
Alright, your website is optimized, polished, and ready to go. The big moment is here — launching! But just hitting the “publish” button isn’t the finish line. To truly make an impact, you need to actively promote your new website. Let’s explore some practical ways to do this and get your site in front of the right audience.
Preparing for Launch
Before going live, double-check everything. Make sure all pages are complete, links work, and your contact info is correct. Consider doing a soft launch by sharing the site with friends or colleagues first for feedback. Once you’re ready, publish your website and celebrate!
Announce Your Launch
Start with an announcement on your personal or business social media channels. Craft a friendly message like:
“Exciting news! My new website is live! Check it out and let me know what you think.”
Encourage friends, family, and followers to visit and share your site. This initial buzz can help give your website some early momentum.
Content Marketing and Regular Updates
Consistently adding new content, like blog posts, tutorials, or videos, keeps visitors coming back. Search engines love fresh content, and it positions you as an authority in your niche.
- Start a blog with helpful articles related to your industry
- Share updates about your projects or products
- Engage with your audience through comments and social media
Leverage Social Media
Share your website links on platforms like Facebook, Twitter, Instagram, or LinkedIn. Join relevant groups and communities to spread the word organically. Use eye-catching images and compelling headlines to attract clicks.
Utilize Email Marketing
If you have a list of contacts, send out a launch email announcing your website. Offer exclusive content or special deals to encourage visits and shares. Building an email list is a powerful way to maintain ongoing engagement.
Network and Collaborate
Partner with other bloggers, influencers, or local businesses. Guest posting on each other’s sites or co-hosting events can expand your reach. Word-of-mouth still works wonders, especially when trusted sources recommend your site.
Track and Adjust
Use analytics to see where your visitors are coming from and which content they like most. If a particular strategy isn’t working, don’t be afraid to tweak your approach. Consistent effort and adaptation are key to long-term success.
Remember, launching your website is just the beginning. Keep promoting, updating, and engaging with your audience, and your online presence will grow steadily over time. Good luck, and enjoy sharing your new website with the world!
Maintaining and Updating Your WordPress Website Regularly
Keeping your WordPress website up-to-date and well-maintained is essential for ensuring optimal performance, security, and a positive user experience. Regular maintenance helps prevent potential issues, improve site speed, and keep your content fresh and relevant. Here are key practices to follow:
- Update WordPress Core, Themes, and Plugins: Always ensure you are running the latest versions. Updates often include security patches, bug fixes, and new features. Set your site to update automatically or check for updates manually regularly.
- Back Up Your Website Frequently: Before making any significant changes, create a full backup of your site. Use reliable backup plugins like UpdraftPlus or BackupBuddy to schedule automatic backups and store them securely.
- Monitor Website Performance: Use tools such as Google PageSpeed Insights or GTmetrix to check your site’s loading speed and identify areas for improvement. Optimize images, leverage caching, and minimize code to enhance performance.
- Secure Your Website: Install security plugins like Wordfence or Sucuri to protect against malware and hacking attempts. Regularly scan your site and update security settings to stay protected.
- Review and Update Content: Keep your content current and accurate. Regularly add new blog posts, update existing pages, and remove outdated information to engage visitors and improve SEO.
By dedicating time to these maintenance tasks, you ensure your WordPress website remains secure, fast, and compelling for visitors. Staying proactive with updates and regular checks will save you time and prevent costly issues down the road. Remember, a well-maintained website is the foundation of a successful online presence.