Managing your WordPress admin menu might not be the most glamorous part of building a website, but it’s definitely one of the most important. When your dashboard is cluttered or disorganized, finding the tools you need becomes a chore, slowing down your workflow and causing frustration. The good news is, WordPress offers flexible options to customize your admin menu so it suits your needs perfectly. Whether you’re a developer, a site owner, or a content manager, understanding how to manage your admin menu intelligently can make your daily tasks smoother and more efficient. Let’s dive into how you can take control of your
Understanding the Importance of Admin Menu Order
The admin menu isn’t just a list of links — it’s the backbone of your website management. When the menu is well-organized, you can quickly access the most important features without wasting time digging through submenus or scrolling endlessly. Conversely, a poorly ordered menu can lead to confusion, missed features, and decreased productivity. Think of it as arranging your tools for a workshop: the most frequently used tools should be within easy reach, while less-used items can be tucked away. By understanding and optimizing the order of your admin menu, you ensure a smoother workflow, reduce errors, and even improve your overall experience on the dashboard. Plus, a clean, logical menu structure can be a real time-saver, especially when managing multiple sites or large content updates. So, knowing how to prioritize and customize your menu isn’t just about aesthetics — it’s about making your entire WordPress experience more effective and enjoyable.
3. How to Change the Order of Admin Menu Items in WordPress
Managing your WordPress admin menu efficiently can make a huge difference in how quickly you find what you need. Sometimes, the default order of menu items isn’t quite right for your workflow. Luckily, WordPress allows you to customize the order of your admin menu items with a bit of code or simple plugins. Here’s how you can do it:
Rearranging Menu Items Manually with Code
If you’re comfortable adding a little custom code to your site, this is a straightforward method. You’ll be using the admin_menu hook to modify the menu order. Here’s a quick example:
function custom_menu_order($menu_order) { if (!$menu_order) return true; // Define the new order of menu items by their labels or slugs $new_order = array( 'index.php', // Dashboard 'edit.php', // Posts 'upload.php', // Media 'edit.php?post_type=page', // Pages 'plugins.php', // Plugins 'users.php', // Users 'tools.php', // Tools 'options-general.php', // Settings ); // Reorder menu items return $new_order;}add_filter('menu_order', 'custom_menu_order');add_filter('custom_menu_order', '__return_true');This code snippet rearranges the admin menu based on the array you specify. You can change the order by editing the $new_order array with the menu item slugs or labels you want to prioritize.
Tips for Customizing Your Menu
- Identify menu slugs: You can find the slugs by inspecting the URL or using debugging tools.
- Backup first: Always back up your site before making code changes.
- Test thoroughly: Make sure the new order works across different user roles if applicable.
Using Built-in Features or User Roles
Note that some menu items might be hidden based on user roles or permissions. Adjusting roles or capabilities can also influence menu visibility and order. Plugins like User Role Editor can help you modify these permissions easily.
4. Using Plugins to Customize Admin Menu Priority
If coding isn’t your thing or you prefer a more visual, user-friendly way to manage your admin menu, plugins are your best friends. There are several excellent plugins designed specifically for customizing the admin menu and its order. Let’s look at a few popular options:
Top Plugins for Admin Menu Customization
| Plugin Name | Features | Ease of Use |
|---|---|---|
| Admin Menu Editor |
|
Very user-friendly with a visual interface |
| WP Admin UI Customize |
|
Simple and intuitive |
| Adminimize |
|
Great for granular control, requires some setup |
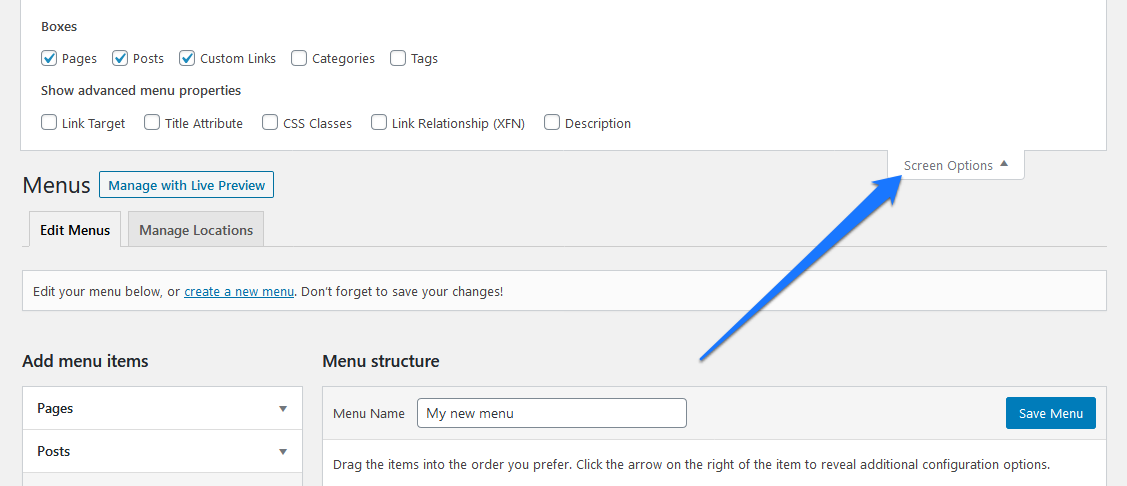
How to Use a Plugin Like Admin Menu Editor
For most users, the Admin Menu Editor plugin is the easiest way to go. Here’s a quick walkthrough:
- Install and activate the plugin from the WordPress plugin repository.
- Navigate to Settings > Menu Editor in your WordPress dashboard.
- You’ll see a visual list of your menu items—simply drag and drop to reorder.
- To hide or rename items, click on the menu item and make your changes.
- Save your changes, and voila! Your admin menu is now customized to your liking.
Final Tips
- Test with different user roles: Some plugins allow role-specific menu customizations, which can be very handy.
- Keep plugins updated: To ensure compatibility and security, always update your admin customization plugins.
- Combine methods: Use plugins for visual customization and code snippets for more specific tweaks if needed.
In the end, customizing your WordPress admin menu is all about making your workflow smoother and more intuitive. Whether you prefer a code-based approach or a plugin with a slick interface, there’s a solution out there that fits your style. Happy customizing!
5. Manual Methods for Reordering Admin Menu Items
If you’re looking to take control of your WordPress admin menu and customize it exactly how you want, manual reordering is the way to go. While WordPress doesn’t provide a built-in drag-and-drop feature for menu items in the dashboard, there are effective ways to achieve your desired order through custom code or plugins.
Using Custom Code: For those comfortable with a bit of coding, adding a custom function to your theme’s functions.php file is a powerful method. Here’s a simple example to give you an idea:
function reorder_admin_menu() { global $menu; // Define your desired order by specifying menu slugs $desired_order = array( 'index.php', // Dashboard 'edit.php', // Posts 'upload.php', // Media 'edit.php?post_type=page', // Pages 'edit-comments.php', // Comments 'themes.php', // Appearance 'plugins.php', // Plugins 'users.php', // Users 'tools.php', // Tools 'options-general.php' // Settings ); // Reorder menu items based on your list foreach ( $desired_order as $slug ) { foreach ( $menu as $key => $item ) { if ( strpos( $item[2], $slug ) !== false ) { $new_menu[] = $item; unset( $menu[ $key ] ); break; } } } // Append remaining items that weren't specified foreach ( $menu as $item ) { $new_menu[] = $item; } $GLOBALS['menu'] = $new_menu;}add_action( 'admin_menu', 'reorder_admin_menu', 999 );This code snippet essentially rearranges menu items based on your predefined order. Just replace the slugs with the menu items relevant to your setup. Remember, editing code can be risky if you’re not familiar—always back up your site first!
Using Plugins: If coding isn’t your thing, plugins like Admin Menu Editor make reordering a breeze. With a user-friendly drag-and-drop interface, you can easily customize your menu without touching a line of code. Just install, activate, and start dragging menu items to your preferred positions. It’s perfect for those who want quick results with minimal fuss.
Whether you prefer a code-based approach or a plugin, manual reordering gives you full control over your WordPress admin menu. It ensures that your most-used sections are just a click away, streamlining your workflow and making managing your site more efficient.
6. Best Practices for Organizing Your WordPress Admin Menu
Organizing your WordPress admin menu isn’t just about aesthetics—it’s about creating a logical structure that helps you work faster and reduces confusion. Here are some best practices to keep your dashboard neat, intuitive, and tailored to your workflow:
1. Prioritize Your Most Used Items
Start by identifying the features and pages you access daily. Keep these at the top or in prominent positions. For example, if you frequently edit posts, make sure the Posts menu is easily accessible. Less-used sections, like Tools or Settings, can be tucked further down or nested under submenus.
2. Group Related Items
Clustering similar menu items makes navigation more intuitive. For example, group all Appearance options—Themes, Widgets, Menus—under a single parent menu. Similarly, keep user management options like Users and Profiles together.
3. Use Clear, Descriptive Labels
Avoid abbreviations or vague terminology. Instead of a menu titled “Tools”, consider more descriptive labels if you customize menu names or add custom links. Clear labels help you quickly identify what each menu does, especially if you work with clients or team members.
4. Limit the Number of Top-Level Menus
Too many top-level menu items can clutter your dashboard and make finding things harder. Aim to keep the main menu streamlined—ideally no more than 7-8 top-level items—and move less critical items into submenus.
5. Use Submenus Effectively
Submenus are a great way to organize related functionalities without overwhelming your main menu. For example, under Settings, you might have sub-items like General, Permalinks, and Reading. This keeps the interface clean while still providing quick access to all options.
6. Regularly Review and Update
As your site grows or changes, your admin menu should evolve too. Periodically review your menu structure to remove unused items or add new ones that reflect your current workflow. This ongoing maintenance ensures your dashboard remains a productivity tool, not a cluttered maze.
7. Use Visual Hierarchy and Spacing
In plugins like Admin Menu Editor, you can add separators or change menu icon sizes to create visual distinctions. Use these features to highlight important sections or separate different groups, enhancing readability and quick navigation.
Conclusion
Organizing your WordPress admin menu with best practices in mind turns your dashboard into a well-oiled machine. It saves you time, reduces frustration, and helps you focus on what really matters—building and maintaining your website. Whether you choose manual reordering, plugins, or a combination of both, the goal is a clean, logical, and personalized workspace that boosts your productivity every day.
7. Common Challenges and How to Overcome Them
Managing the WordPress admin menu can sometimes feel like trying to organize a cluttered toolbox — there’s a lot going on, and it’s easy to get overwhelmed. Let’s talk about some of the common challenges you might face when adjusting menu priorities and how to tackle them effectively.
Challenge 1: Overcrowded Menu
If your admin menu is packed with too many items, it can become confusing and slow you down. The key is to prioritize the most frequently used features and hide or collapse less important ones. Use plugins like Admin Menu Editor to rearrange or hide menu items, giving you a cleaner, more streamlined interface.
Challenge 2: Losing Important Items
Sometimes, when you’re customizing the menu, you might accidentally hide or move crucial items like Settings or Plugins. To prevent this, always double-check your changes before saving, and keep a backup of your original menu structure. Remember, you can restore the default settings anytime if something goes awry.
Challenge 3: Conflicting Plugins or Themes
Not all plugins play nicely together. Some might add menu items that clash or interfere with your customizations. To avoid headaches, test new plugins on a staging site first, and keep your plugins and themes updated. If conflicts happen, consult the plugin documentation or support forums for solutions.
Challenge 4: Maintaining Consistency Across Users
If multiple people manage your site, ensuring everyone sees the same menu layout can be tricky. For multi-user sites, consider role management plugins that allow you to preset menu configurations based on user roles. This way, your team stays on the same page and navigates efficiently.
How to Overcome These Challenges?
- Regularly backup your admin menu settings: Before making major changes, export your configuration so you can revert if needed.
- Test changes in a staging environment: This helps prevent disruptions on your live site.
- Stay informed: Follow plugin updates and community forums for tips and solutions.
- Keep it simple: Aim for a clean, intuitive menu layout with only the essentials visible.
By being proactive and organized, you’ll reduce frustrations and keep your admin panel running smoothly. Remember, the goal is to make your workflow more efficient, not more complicated!
8. Conclusion and Tips for Maintaining an Efficient Admin Panel
Customizing and managing your WordPress admin menu might seem like a small detail, but it can make a big difference in how productive and stress-free your website management is. An organized admin panel helps you find what you need quickly, reduces errors, and streamlines your workflow.
Key Takeaways:
- Prioritize the most-used features: Keep your essential tools front and center.
- Use the right tools: Plugins like Admin Menu Editor make customization straightforward and safe.
- Regularly review and update: As your site evolves, so should your menu structure.
- Backup your settings: Always save your configurations before making significant changes.
- Train your team: Ensure everyone understands the customizations to maintain consistency.
Additional Tips for Long-Term Success:
- Schedule periodic audits: Review your admin menu quarterly to remove outdated items and add new essentials.
- Keep plugins and themes updated: This helps prevent conflicts and security issues.
- Document your customizations: Maintain a simple record of changes for future reference or onboarding new team members.
- Engage with the community: WordPress forums and support groups are great resources for tips and troubleshooting.
Remember, the goal is to create an admin environment that’s tailored to your workflow—simple, intuitive, and efficient. With a bit of effort now, you’ll save countless hours down the line, making managing your WordPress site a much more enjoyable experience. Happy customizing!