If you’re looking to add eye-catching sliders to your WordPress website without the hassle, then the Slider Bricks plugin might just be your new best friend. Designed with both beginners and seasoned web developers in mind, this plugin makes creating stunning, responsive sliders feel like a breeze. Whether you want to showcase your latest products, highlight blog posts, or create a beautiful hero section, Slider Bricks offers a user-friendly way to do it all. No need to be a coding expert—just install, customize, and watch your website come alive with dynamic visuals that captivate visitors right from the start.
Key Features of the Slider Bricks Plugin

The Slider Bricks plugin is packed with features that make slider creation easy, flexible, and highly customizable. Here are some of its standout features:
- Drag-and-Drop Builder: Build your sliders visually with an intuitive drag-and-drop interface. No coding required!
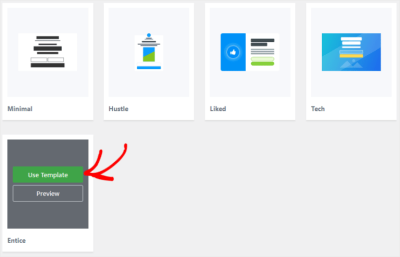
- Pre-designed Templates: Choose from a variety of beautiful templates to kickstart your project or create your sliders from scratch.
- Responsive Design: All sliders automatically adapt to different screen sizes—mobile, tablet, or desktop—ensuring a seamless experience for all visitors.
- Animation Effects: Add smooth transitions and animations to make your slides more engaging. You can customize timings, effects, and more.
- Media Support: Easily insert images, videos, or even HTML content into your slides to create dynamic and versatile displays.
- Layer Support: Use multiple layers within each slide to add text, buttons, icons, or other elements for a polished look.
- Navigation Controls: Customize arrows, dots, or thumbnails for easy navigation through your slides, enhancing user interaction.
- Performance Optimization: Built with speed in mind, Slider Bricks ensures your sliders load quickly without slowing down your site.
- Compatibility: It works seamlessly with popular page builders like Elementor, Beaver Builder, and Gutenberg, giving you flexibility in your workflow.
Overall, Slider Bricks offers a robust set of tools that make creating stunning sliders not just simple but also fun. Its versatility and ease of use mean you can craft professional-looking sliders that boost your website’s visual appeal and user engagement without breaking a sweat.
3. Step-by-Step Guide to Installing the Slider Bricks Plugin

Getting started with Slider Bricks is a breeze—if you follow a few simple steps, you’ll have your sliders up and running in no time! Here’s a straightforward guide to help you install the plugin without any headaches:
- Log into Your WordPress Dashboard: Head over to your website’s admin area by visiting yourwebsite.com/wp-admin and entering your credentials.
- Navigate to Plugins: On the left-hand menu, click on Plugins and then select Add New.
- Search for Slider Bricks: In the search bar on the top right, type Slider Bricks. The plugin should appear in the search results.
- Install the Plugin: Click the Install Now button next to Slider Bricks. Wait a few moments for WordPress to download and install the plugin files.
- Activate the Plugin: Once installed, click on the Activate button. Voila! The plugin is now part of your website.
After activation, you might see a prompt or a new menu item labeled Slider Bricks. That’s your gateway to creating gorgeous sliders. If the plugin requires any additional setup, like connecting to an API or importing demo content, follow the on-screen instructions provided by the plugin documentation or setup wizard.
And that’s it! Your plugin is installed and ready to help you craft stunning sliders. Next, let’s dive into creating your very first custom slider with Slider Bricks.
4. How to Create Custom Sliders Using Slider Bricks
Now that you have the plugin installed, it’s time to create sliders that will wow your visitors. Slider Bricks makes this process super intuitive, even if you’re new to slider creation. Let’s walk through the steps:
Step 1: Create a New Slider
- Go to Slider Bricks in your WordPress dashboard menu.
- Click Add New Slider. A new page will open where you can customize your slider’s settings.
Step 2: Configure Basic Settings
Here, you’ll choose options like:
- Slider Name: Give your slider a clear name so you can identify it later.
- Size & Layout: Decide on the width and height or choose a full-width layout.
- Animation Type: Pick how slides transition—fade, slide, or others.
- Autoplay & Loop: Set whether the slider should automatically play and loop endlessly.
Step 3: Add Slides
This is where the fun begins! You can add multiple slides, each with different content:
- Click Add Slide.
- Choose the slide type:
- Image: Upload or select an existing image from your media library.
- Video: Embed a YouTube or Vimeo video.
- Content: Add custom text, buttons, or other HTML content.
- Customize each slide by adding titles, descriptions, buttons, or overlays as needed.
Step 4: Style Your Slides
Slider Bricks offers styling options to make your slider match your website’s look:
- Adjust fonts, colors, and sizes for text overlays.
- Set background overlays or gradients for images.
- Add entrance animations for each slide or element.
Step 5: Preview and Publish
Before going live, hit the Preview button to see how your slider looks. Make any necessary tweaks. Once satisfied, click Publish.
Step 6: Embed Your Slider
Embedding your slider is simple:
- Use the provided shortcode or block (if you’re using the WordPress block editor).
- Paste the shortcode into your page or post where you want the slider to appear.
- Update or publish your content, and voilà—your stunning slider is live!
And there you have it! Creating custom sliders with Slider Bricks is a straightforward process that combines powerful features with an easy-to-use interface. With a little practice, you’ll be designing eye-catching sliders that enhance your site’s visual appeal and engage your visitors effortlessly.
5. Design Tips for Making Attractive and Effective Sliders
Creating a stunning slider isn’t just about throwing some images together — it’s about crafting a visual experience that captures attention and communicates your message clearly. Here are some practical design tips to help you make sliders that not only look great but also serve their purpose effectively.
Keep it simple and focused. Don’t overload your slider with too much information or too many images. Choose a single, compelling message for each slide and stick to it. Use large, readable fonts and clear visuals that draw the eye without overwhelming the viewer.
Use high-quality images. Blurry or pixelated photos can ruin the vibe of your slider. Invest in high-resolution images that align with your brand’s style. If you’re showcasing products, make sure they’re well-lit and beautifully composed.
Maintain consistency in design. Use a cohesive color palette, fonts, and style throughout your slider. Consistency helps reinforce your brand identity and creates a polished look.
Incorporate engaging text. Your headlines should be attention-grabbing, concise, and easy to read. Pair them with a brief supporting statement or call-to-action (CTA). Use contrasting colors to make the text stand out against background images.
Utilize animation wisely. Subtle transitions and animations can add a professional touch, but avoid overdoing it. Too much movement can be distracting or slow down your site’s performance.
| Design Tip | Why It Matters |
|---|---|
| Keep It Simple | Ensures your message is clear and not cluttered. |
| Use High-Quality Images | Creates a professional look that grabs attention. |
| Maintain Consistency | Builds brand recognition and visual harmony. |
| Engaging Text & CTA | Encourages user interaction and conversions. |
| Thoughtful Animation | Enhances visual appeal without being distracting. |
Remember, your slider is often the first thing visitors see. Make it count by designing slides that are visually appealing, aligned with your branding, and focused on your key message. Don’t be afraid to experiment and see what resonates best with your audience!
6. Integrating Sliders into Your WordPress Website
Once you’ve crafted beautiful sliders, it’s time to seamlessly integrate them into your website. With the Slider Bricks plugin, this process is straightforward and user-friendly — perfect even if you’re not a coding wizard.
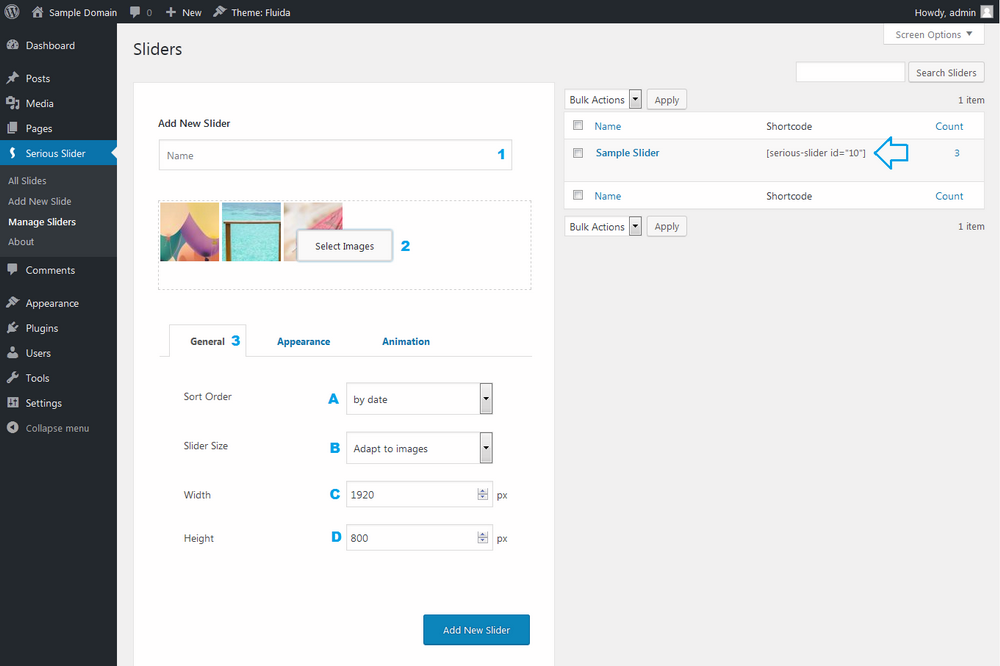
Step 1: Create Your Slider. Inside your WordPress dashboard, navigate to the Slider Bricks plugin and start by creating a new slider. Add your slides, customize the layout, animations, and styles as discussed earlier.
Step 2: Save and Copy the Shortcode. After designing your slider, save it. The plugin will generate a unique shortcode for each slider, something like [sliderbricks id="123"]. Copy this shortcode — you’ll need it to embed the slider into your pages or posts.
Step 3: Insert into Posts or Pages. Open the post or page where you want your slider to appear. Simply paste the shortcode directly into the content editor at the desired location. If you’re using the Gutenberg block editor, you can add a Shortcode block and insert your slider shortcode there.
Step 4: Place in Widgets or Sidebars. Want your slider in a sidebar or footer? Head over to Appearance > Widgets, add a Custom HTML or Shortcode widget, and paste your slider shortcode. This way, your slider can be visible across multiple pages or sections.
Step 5: Preview and Adjust. Always preview your page to see how the slider looks. Make any necessary adjustments in the Slider Bricks editor to ensure it fits perfectly with your site’s layout.
Extra Tips:
- Responsive Design: Slider Bricks automatically makes your sliders mobile-friendly, but double-check how it looks on different devices.
- Performance: Optimize your images to keep load times quick. Lazy loading sliders can also improve site speed.
- CTA Integration: Don’t forget to include clear Call-to-Actions within your slides to guide visitors towards your desired outcomes.
Integrating sliders with Slider Bricks is a breeze, thanks to its intuitive interface and flexible shortcode system. With just a few clicks, you’ll have eye-catching sliders enhancing your website’s appeal and driving engagement. So go ahead — start designing, inserting, and wow your visitors!
7. Common Troubleshooting Tips for Slider Bricks Users
Hey there! If you’ve been playing around with Slider Bricks and hit a snag, don’t worry—you’re not alone. Sometimes things don’t go as planned, but many issues have simple fixes. Here are some common problems users face and how to troubleshoot them:
1. Slider Not Displaying or Showing Blank
If your slider isn’t appearing on your site, first check if the plugin is properly installed and activated. Sometimes, a plugin conflicts with others or your theme can cause issues. To troubleshoot:
- Ensure Slider Bricks is activated in the Plugins section.
- Clear your browser cache and refresh the page.
- Check if the slider is assigned correctly in the post or page where you want it to appear.
- Disable other plugins temporarily to see if there’s a conflict.
- Switch to a default WordPress theme like Twenty Twenty-One to rule out theme conflicts.
2. Slider Looks Incorrect or Layout Is Broken
If your slider appears distorted or elements are misaligned, it could be due to CSS conflicts or incorrect settings:
- Review your slider settings—check widths, heights, and layout options.
- Inspect the page using browser developer tools to identify conflicting styles.
- Ensure your theme’s CSS isn’t overriding Slider Bricks styles. If so, you might need to add custom CSS to fix layout issues.
- Update all plugins and themes to their latest versions to ensure compatibility.
3. Images Not Loading or Broken
This is quite common and can be caused by incorrect image URLs or server issues:
- Re-upload images and replace broken links in your slider settings.
- Check the image file size—large images can sometimes cause loading issues.
- Ensure your images are in supported formats like JPEG, PNG, or GIF.
- Verify that your hosting server isn’t blocking image hotlinking or CDN issues.
4. Slider Not Responsive on Mobile Devices
Responsive design is key! If your slider doesn’t adapt well:
- Go into your Slider Bricks settings and enable responsive options.
- Test on various devices and screen sizes.
- Adjust breakpoints or layout settings within Slider Bricks to improve mobile display.
- Use custom CSS if needed to fine-tune mobile responsiveness.
5. Debugging Tips
If problems persist:
- Enable WordPress debugging by adding
define('WP_DEBUG', true);to your wp-config.php file. This can reveal errors related to your slider. - Check your browser console for JavaScript errors, which can interfere with slider functionality.
- Consult the Slider Bricks documentation and support forums—they’re treasure troves of solutions and advice.
Remember, patience is key! Most issues are straightforward to fix once you identify the root cause. And if you’re ever stuck, reaching out to the plugin’s support team can save you a lot of time.
8. Conclusion and Final Thoughts on Using Slider Bricks for Stunning Sliders
And there you have it! Creating beautiful, engaging sliders with Slider Bricks is more accessible than you might think. Its user-friendly interface, flexible customization options, and seamless integration with WordPress make it a fantastic choice for both beginners and seasoned developers alike.
Whether you’re showcasing your latest products, highlighting important announcements, or simply adding visual flair to your website, Slider Bricks empowers you to craft sliders that captivate your audience. Of course, like any tool, it may come with a learning curve, but with patience and a bit of experimentation, you’ll be creating stunning sliders in no time.
Remember to keep your plugins updated, regularly check your site’s responsiveness, and don’t hesitate to troubleshoot issues as they arise. The more you explore, the more you’ll discover how versatile and powerful Slider Bricks can be for elevating your website’s visual appeal.
So go ahead—dive into creating your next eye-catching slider today! With the right approach and a bit of creativity, your website will stand out and leave visitors impressed. Happy slider building!