Changing your WordPress admin email address might seem like a minor task, but it holds significant importance for site management and security. Whether you’re switching to a more professional email or simply want to ensure better communication, updating your admin email is essential. In this guide, we’ll walk you through the reasons to make this change and the simple steps you need to follow to do so effectively. So, let’s dive in!
Why Change the Admin Email Address?

There are several compelling reasons why you might want to change your WordPress admin email address. Here are some of the most common ones:
- Professional Image: Using a business email address (like [email protected]) instead of a generic one (like [email protected]) enhances your professional image.
- Improved Security: By updating to a more secure email address, you can improve the security of your site. Consider using email services with two-factor authentication.
- Recovery Options: If you ever need to recover your account or reset your password, having the correct email is critical. An outdated address can lead to access issues.
- Better Communication: Ensure all notifications, updates, and alerts from WordPress are sent to the right place. This helps in managing your site effectively.
- Merging Sites: If you manage multiple websites, it’s helpful to consolidate email management into one address for efficiency.
In summary, updating your WordPress admin email address not only helps in portraying a professional facade but also plays a crucial role in security and communication strategies for your website. Remember, keeping your contact information current is key to maintaining the health of your site!
Methods to Change the WordPress Admin Email Address
Changing the WordPress admin email address can be crucial for many reasons, such as keeping your site secure, ensuring you receive important notifications, or simply updating your contact information. Thankfully, there are several methods you can use to achieve this. Let’s dive into the most popular and user-friendly methods for changing your WordPress admin email address:
- Using the WordPress Dashboard
- Through a Plugin
- Editing the Database via phpMyAdmin
Each of these methods has its benefits. For most users, changing the email through the WordPress Dashboard is straightforward and doesn’t require any technical skills. On the other hand, using plugins can offer additional features, like automatic backups of your database before making changes. Finally, if you’re comfortable with code and databases, phpMyAdmin gives you complete control over your WordPress setup.
Now, let’s look at the most user-friendly method – changing the admin email through the WordPress Dashboard.
Changing the Admin Email via WordPress Dashboard
The WordPress Dashboard provides an easy and effective way to change your admin email address. Here’s a step-by-step guide to help you through the process:
- Log into your WordPress Dashboard: Start by logging into your site using your admin credentials.
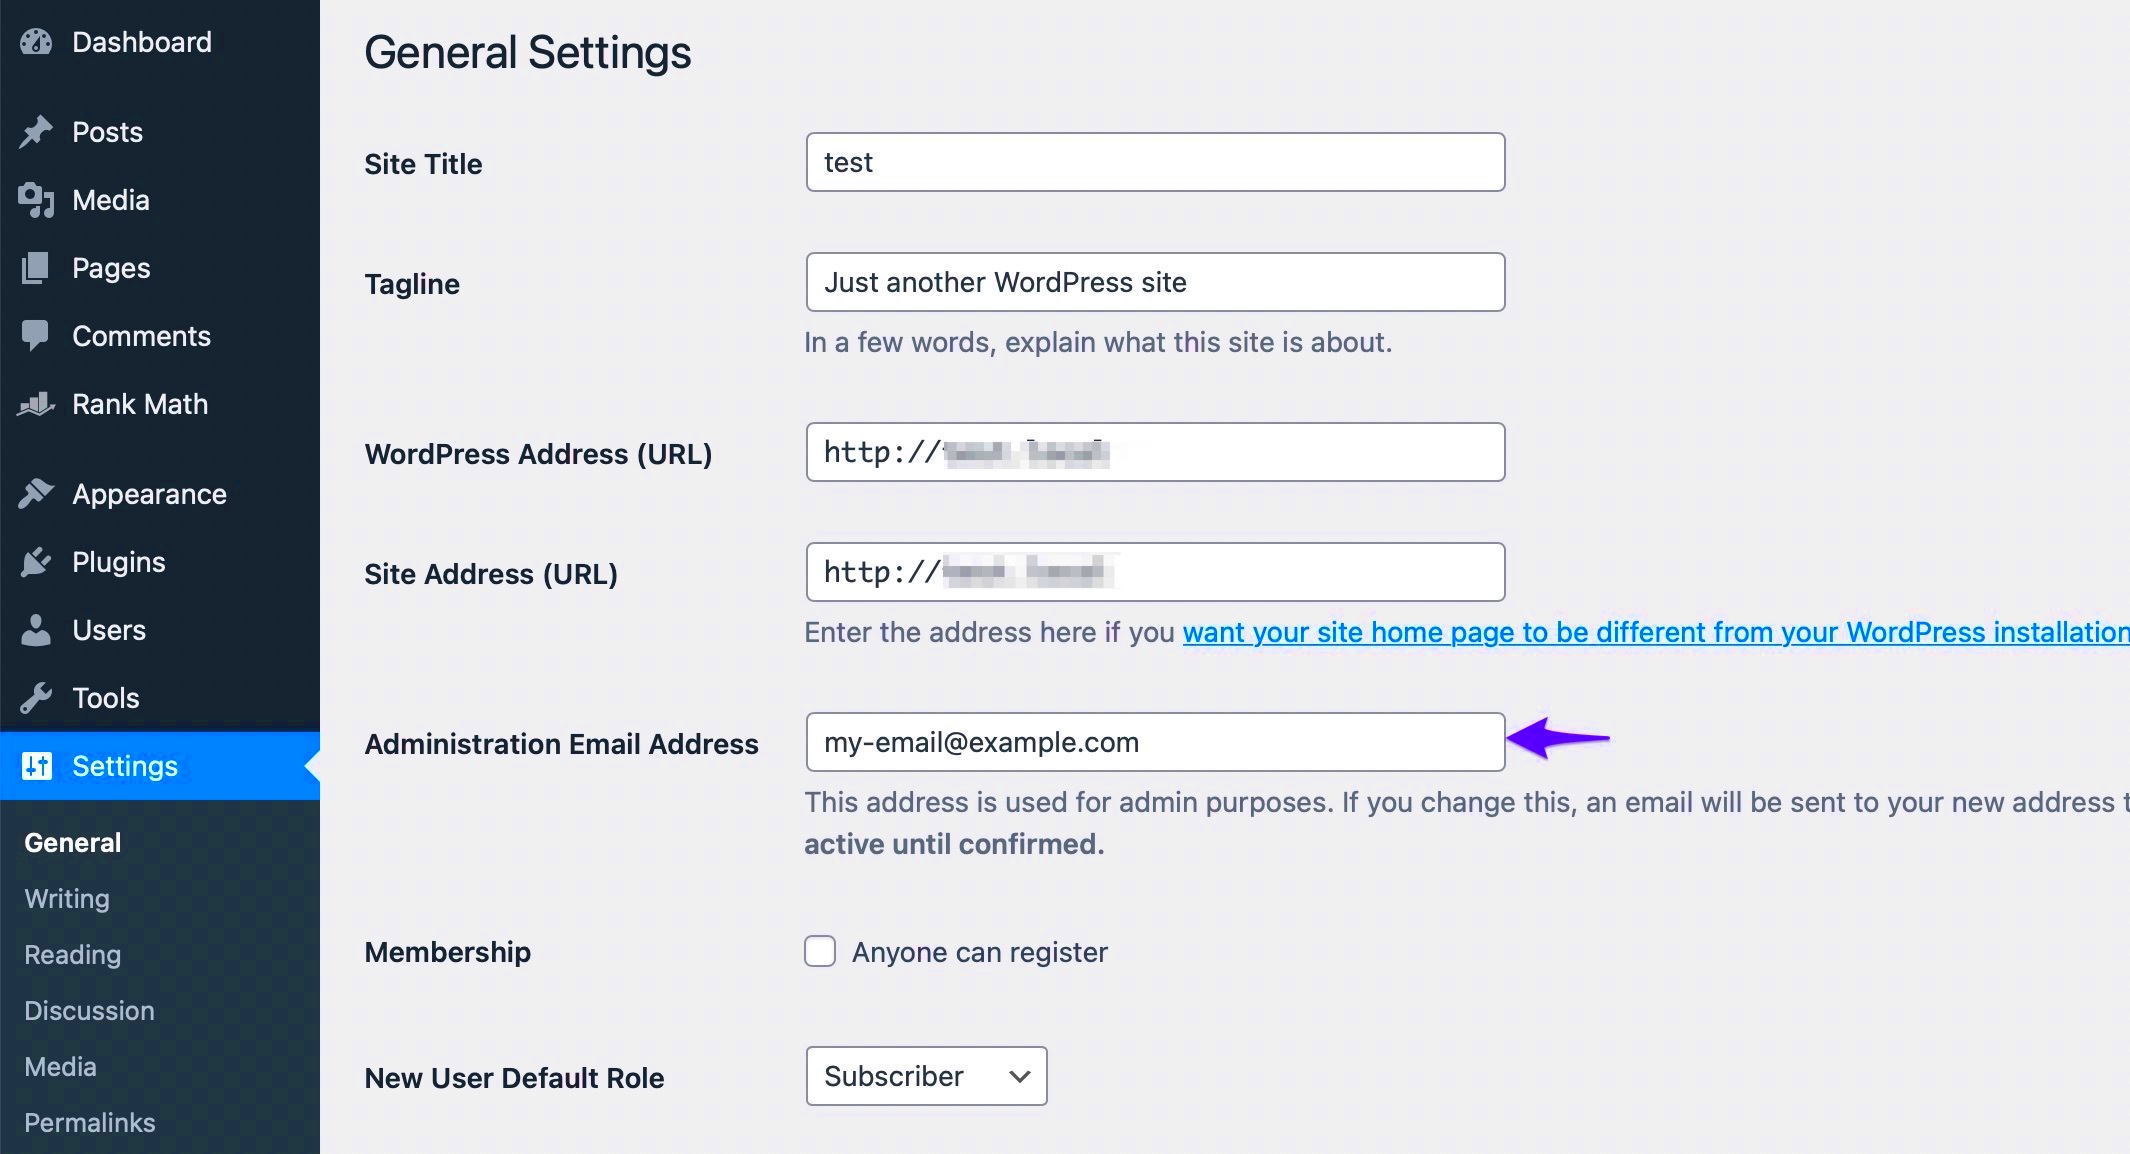
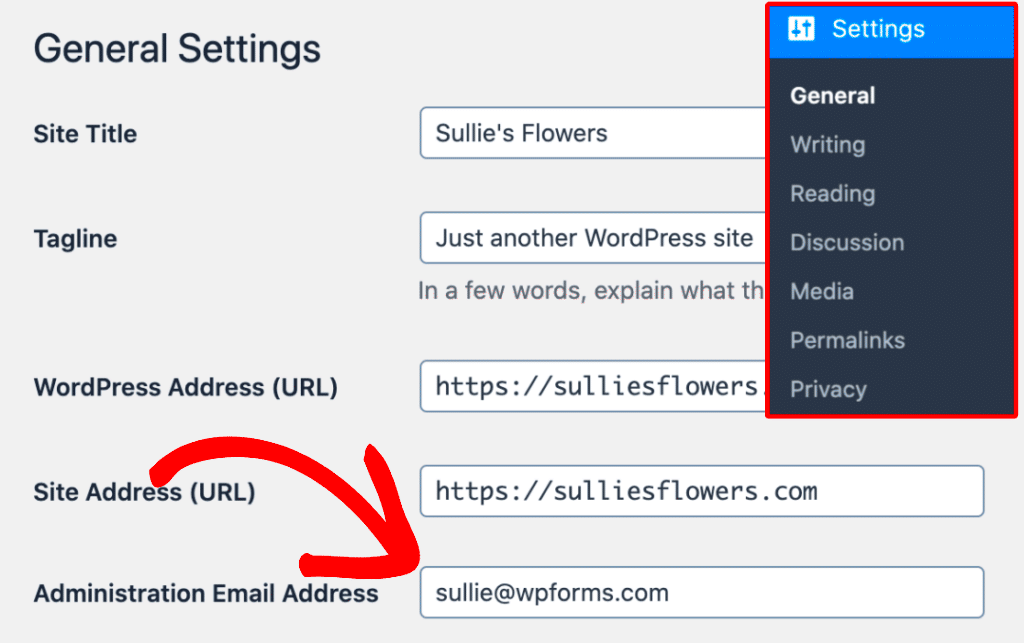
- Navigate to Settings: On the left-hand sidebar, find and click on Settings.
- Access General Settings: Within the settings menu, select General. This page contains various site settings, including your email address.
- Change the Email Address: Look for the Administration Email Address field. Simply type in the new email address you wish to use.
- Save Changes: Don’t forget to scroll down and click the Save Changes button at the bottom of the page.
- Confirm Your New Email: Check your inbox for a confirmation email from WordPress. Click on the confirmation link to finalize your email address change.
And that’s it! Your admin email address is now updated, and you’ll start receiving notifications at the new email. This method is simple and ensures that you’re always aware of changes and updates happening on your site.
Remember, keeping your admin email updated is important for maintaining the security and communication of your WordPress site!
Changing the Admin Email via phpMyAdmin
Sometimes, accessing your WordPress admin dashboard might not be feasible, especially if you’re locked out of your account or if you can’t receive emails due to an outdated email address. In such cases, you can change the admin email directly through phpMyAdmin. Let’s break down the steps to do this.
First things first, you’ll need to log into your hosting provider’s control panel. From there, you can find the phpMyAdmin tool. Once you’re in phpMyAdmin, follow these steps:
- Select the Database: Choose the correct database associated with your WordPress site from the left sidebar. If you’re unsure which one it is, check your wp-config.php file for the database name.
- Navigate to the Users Table: Look for a table named
wp_users. Note that the prefixwp_may be different based on your installation settings. - Locate the Admin Account: In this table, find the username associated with the admin account. Once found, click on the Edit button next to it.
- Update Email Address: You will see a field for the email address. Replace the old email with the new one you wish to set.
- Save Changes: After updating the email, make sure to save your changes by clicking on the Go button at the bottom.
And there you have it! You’ve successfully updated your WordPress admin email through phpMyAdmin. Now, your new email can be used for all administrative notifications and account recovery options.
Changing the Admin Email via wp-config.php File
If you prefer a more direct approach or don’t have access to phpMyAdmin, you can change the admin email address by editing the wp-config.php file directly. This method is perfect when you want to make changes quickly without diving into the database.
To get started, follow these straightforward steps:
- Access Your Files: Use an FTP client or your hosting provider’s file manager to access your WordPress installation files.
- Locate the wp-config.php File: In the root directory (often called public_html or similar), find the
wp-config.phpfile. It’s usually in the same folder aswp-content,wp-admin, andwp-includes. - Open the File for Editing: Right-click on the file and choose the Edit option. Be careful when making changes here, as this file controls a lot of the site’s functionality.
- Add or Update Email Constant: You can add the line
define('ADMIN_EMAIL', '[email protected]');(make sure to change [email protected] to your desired email). If the line is already there, just update it. - Save Your Changes: After making the changes, save the file and close the editor.
Once you’ve done this, the new email address will be set as the admin email for your WordPress site. However, it’s good to note that this change may not immediately reflect in the admin dashboard, so give it a moment!
Now you know two handy methods to change your WordPress admin email. Whether you opt for phpMyAdmin or the wp-config.php file, you can keep your site’s admin address fresh and up to date!
7. Verifying the New Admin Email Address
After you’ve updated your WordPress admin email address, it’s crucial to verify that the new address is working correctly. Verification ensures you can receive important notifications, including password resets and security alerts. Here’s how to do it:
Once you’ve changed the email address in your WordPress settings, you should receive a confirmation email at the new address. This email often contains a link that you must click to verify that you own this new email address.
Follow these steps to verify your new admin email:
- Check your inbox for the confirmation email from WordPress.
- If you don’t see it, check your spam or junk folder.
- Click on the verification link in the email.
- You should be redirected to your WordPress admin area, confirming the email change was successful.
Tip: If you’re not receiving the verification email, make sure your web host is not blocking emails from WordPress. Sometimes, plugins that alter email behavior can interfere as well.
Once you click the verification link, you should see a confirmation message. Now you can rest easy knowing your admin email is up-to-date, allowing you to receive important notifications right in your inbox!
8. Common Issues and Troubleshooting
While changing your WordPress admin email address is typically a straightforward process, you may run into a few common issues along the way. Fear not! Here are some potential problems and their solutions to help you troubleshoot effectively:
| Issue | Possible Solution |
|---|---|
| No confirmation email received |
|
| Cannot access old email address |
|
| Error messages upon submitting new email |
|
Remember, many of these issues can stem from common email-related problems, so don’t hesitate to seek help from your hosting provider if you find yourself stuck. By resolving these issues, you’ll ensure your WordPress site runs smoothly, keeping your emails secure and accessible!
Conclusion
Changing the WordPress admin email address is a critical administrative task that ensures you receive important notifications and updates regarding your website. Whether you’re updating for security reasons or simply want to stay organized, the process is straightforward.
In summary, follow these essential steps to successfully change the admin email address:
- Log into your WordPress Dashboard: Use your admin credentials to access the admin panel.
- Go to Settings: Click on the “Settings” option in the left sidebar.
- Update Email Address: In the “General” settings, locate the “Admin Email Address” field and enter the new email address you want.
- Save Changes: Click the “Save Changes” button at the bottom of the page.
- Verify Your New Email: A confirmation email will be sent to the new address. Click the verification link to confirm the change.
Here’s a quick reference table to guide you through the process:
| Step | Action | Notes |
|---|---|---|
| 1 | Log into WordPress | Use your admin username and password |
| 2 | Access Settings | Navigate to Settings > General |
| 3 | Submit New Email | Replace the old email with the new one |
| 4 | Confirm Changes | Check your inbox for the confirmation email |
By following these steps, you can ensure that you’re always informed about your website’s activities and security updates.


